How to choose plant leaves to start propagation of African Violets?
Choose a mature and healthy African Violet plant
to harvest leaves
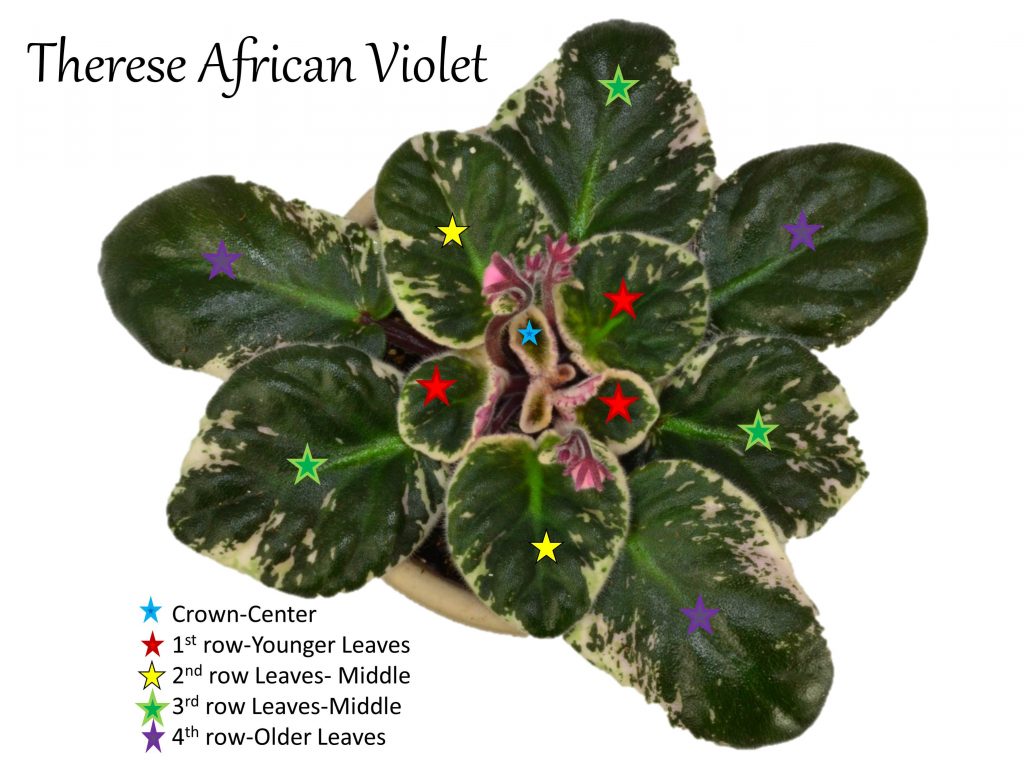
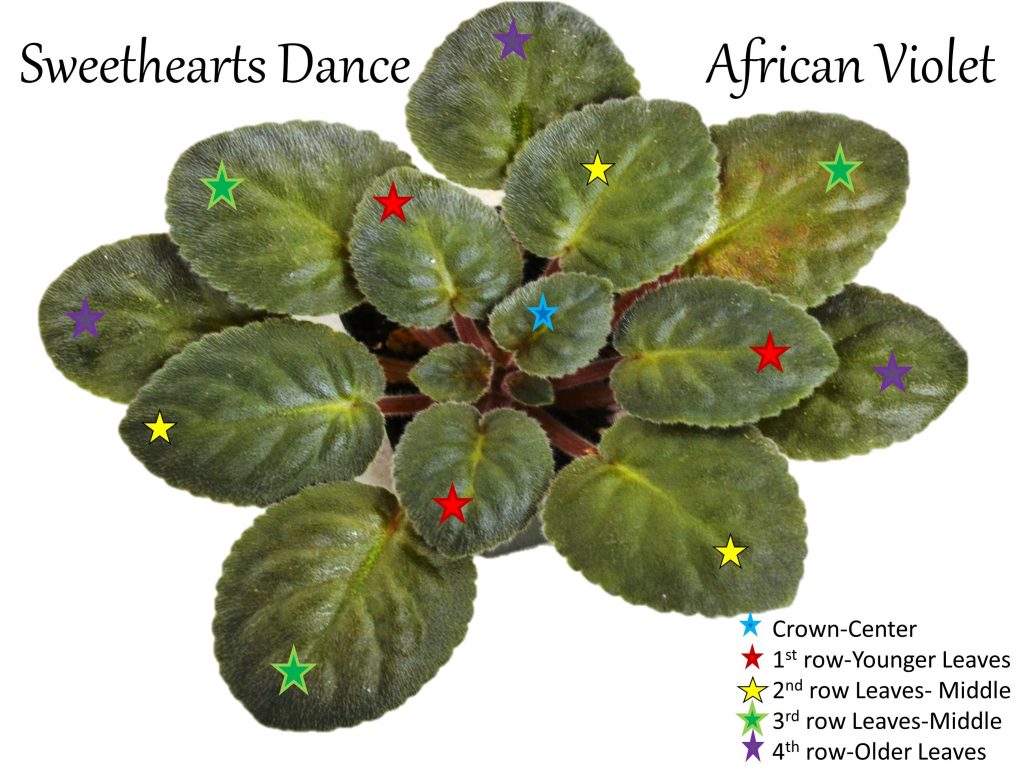
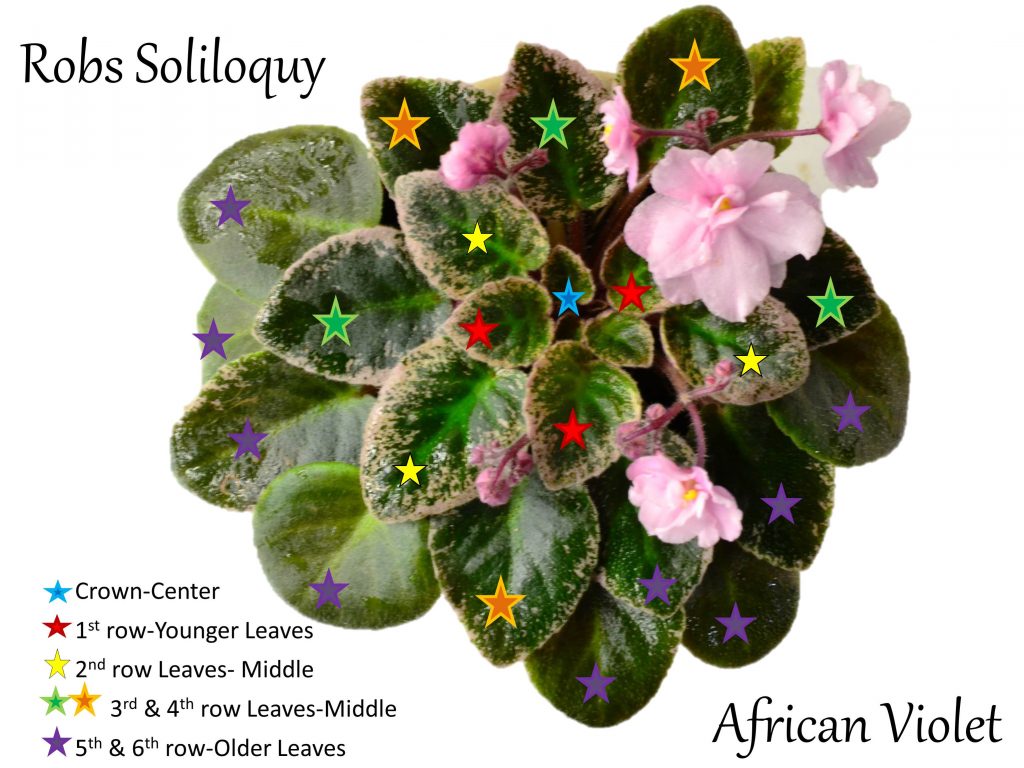
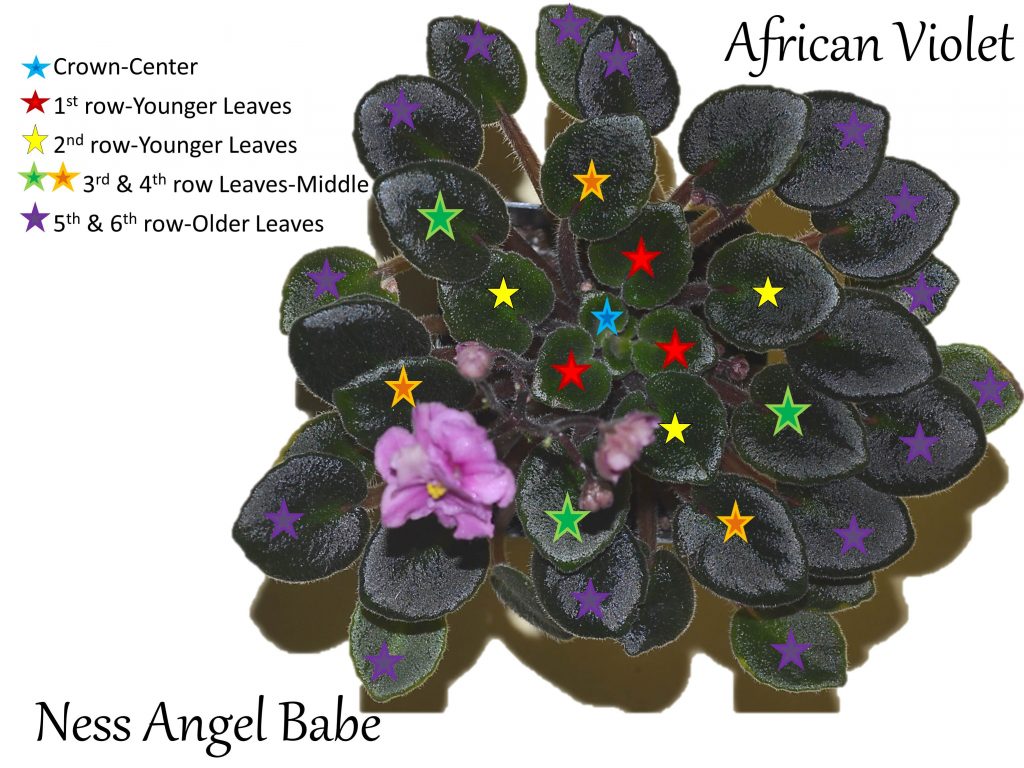
Choose leaves from the middle of the African
Violet plant or the third row of leaves from the center of the African Violet
plant.
Leaves closer to the crown are considered younger/smaller leaves. The leaves towards the outside/edge/larger are older leaves.
Younger / smaller leaves are still growing and may not survive through the propagation cycle. They are not suitable for propagation.
Older leaves are woody with a tough stem and may take longer to root during the propagation cycle.
Choose healthy leaves which are bright green, with no brown patches, no yellowing or limpness.
Choose leaves which are at least 0.5 – 3 inches in length depending upon whether they are miniature, semi-miniature or standard African Violet plants.
Choose 4-5 leaves from one African Violet plant if possible, otherwise 2 leaves are also fine to start with.
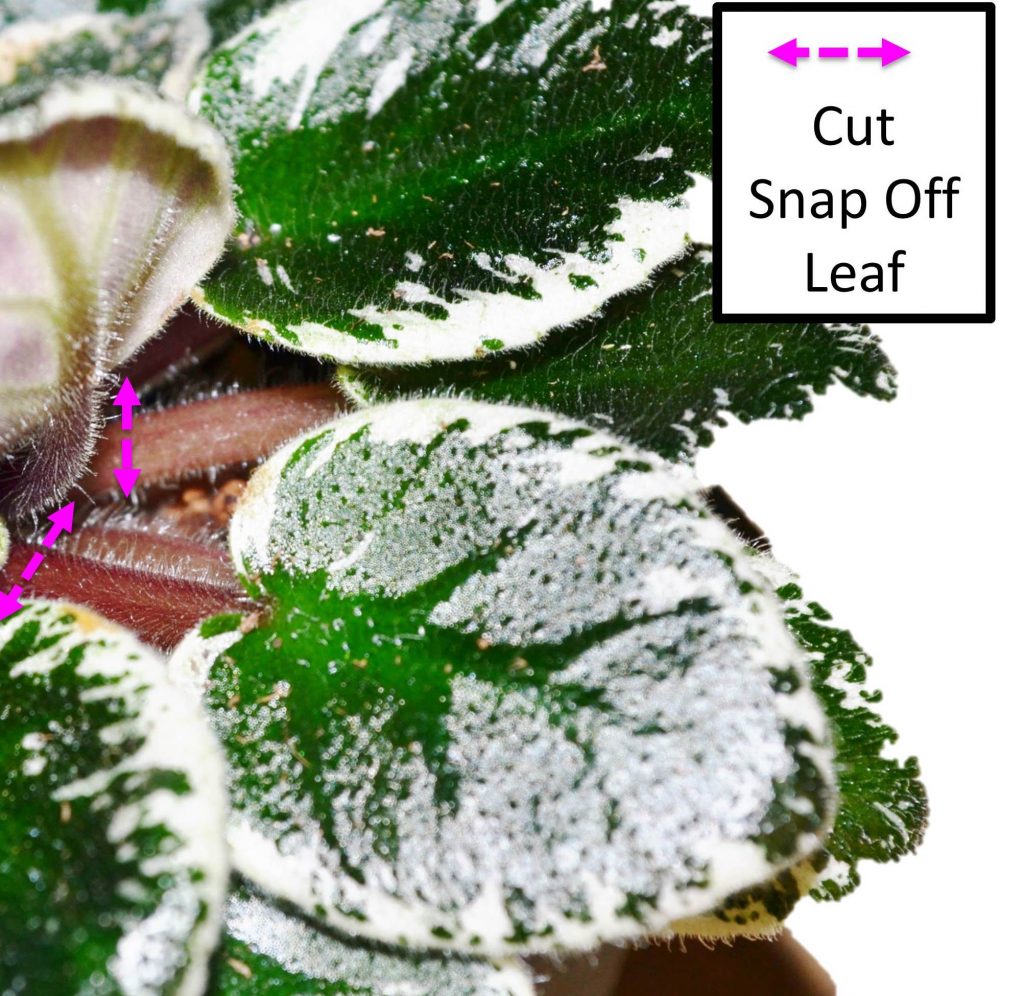
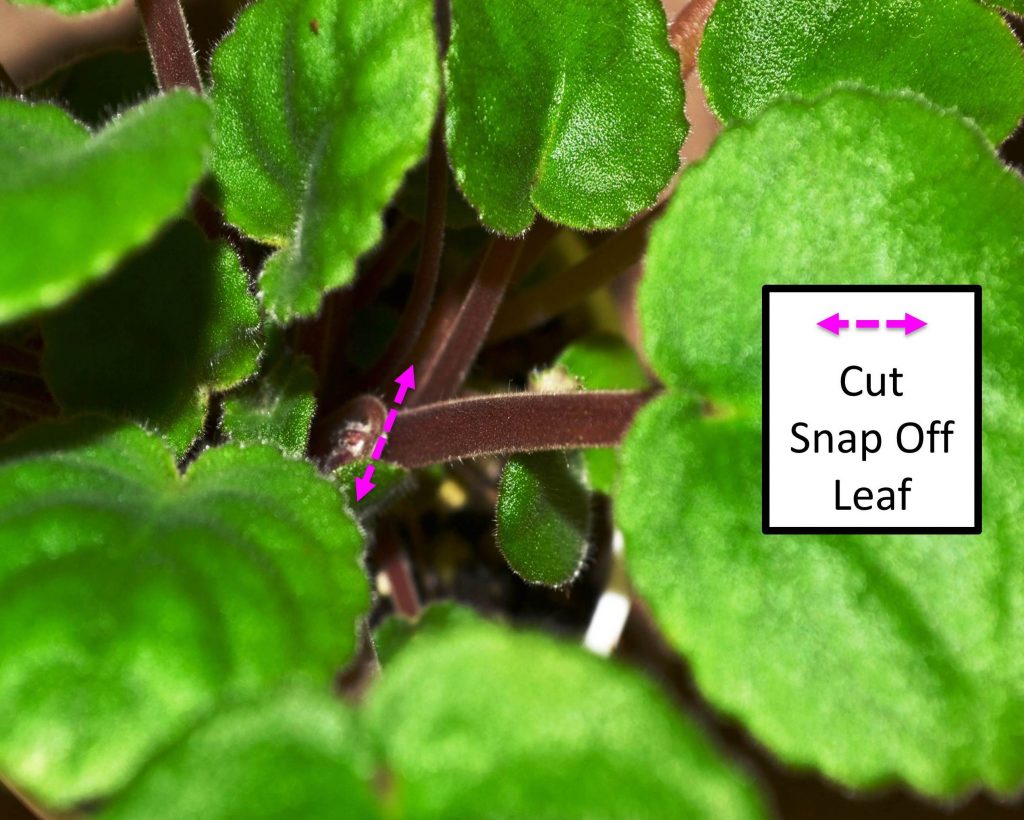
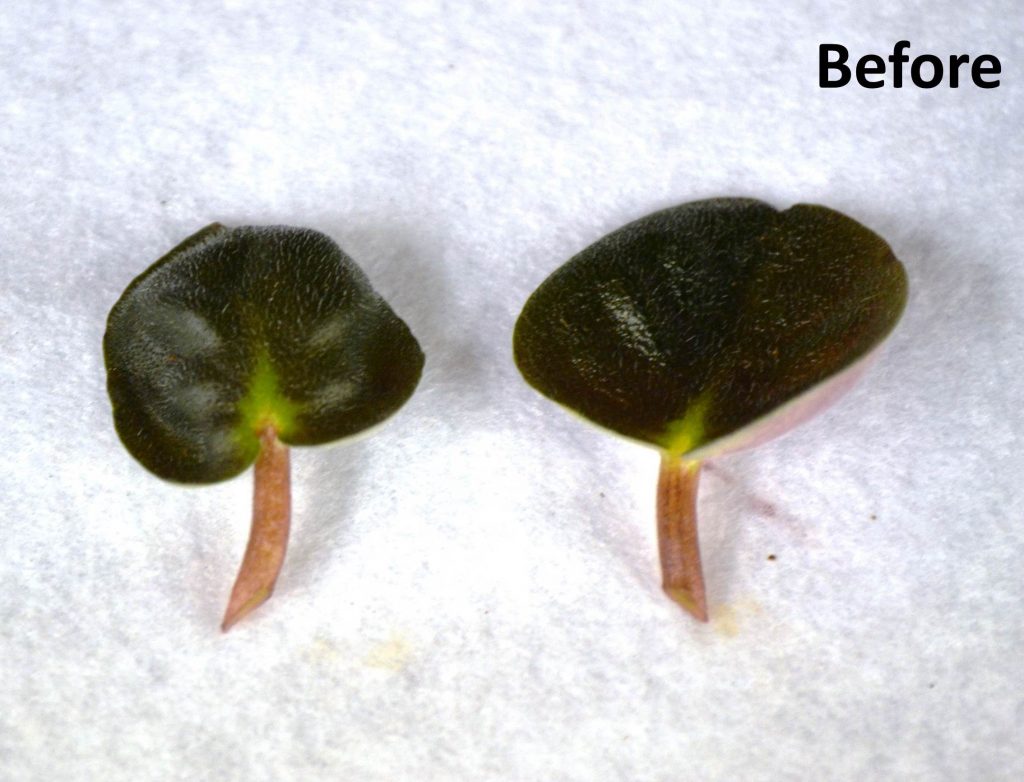
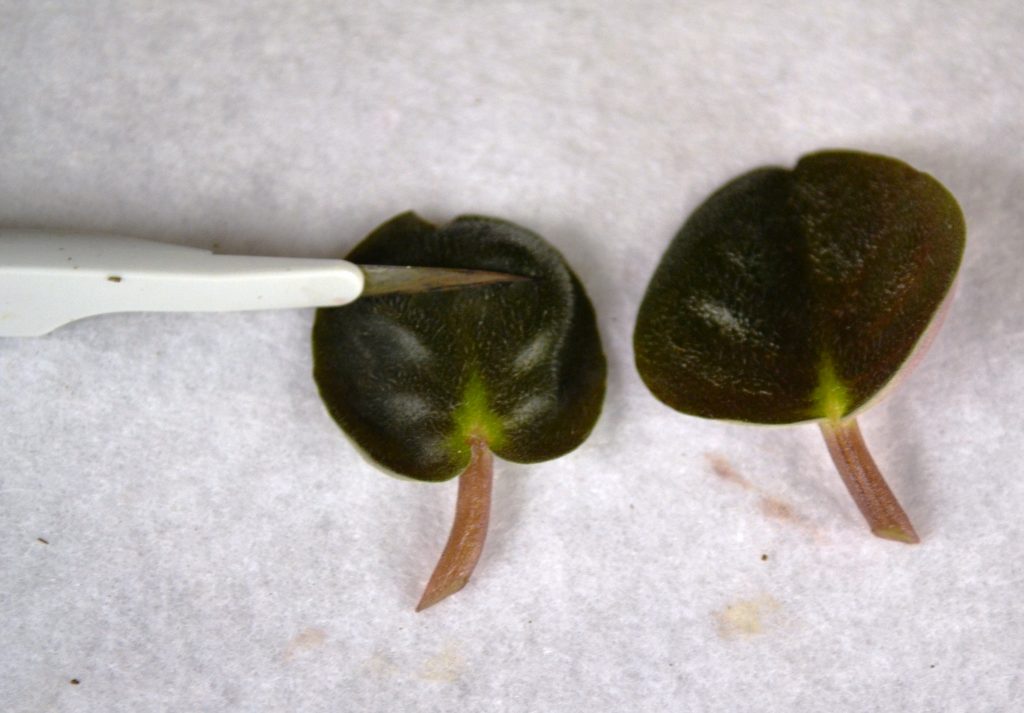
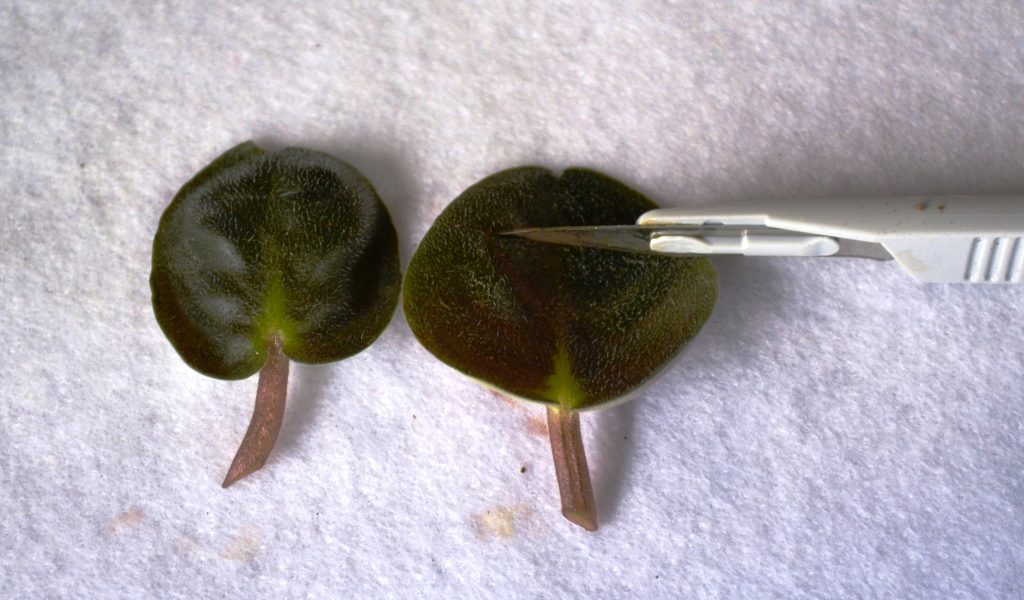
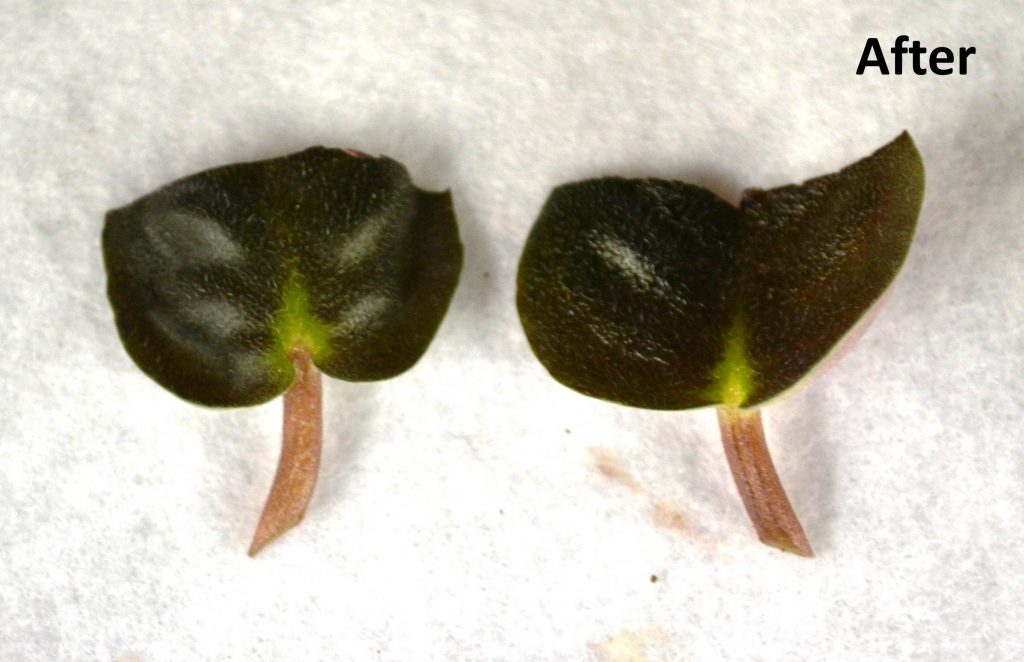
Once you have chosen which leaves to harvest for propagation, proceed to snap off the tender leaf stem from the African Violet plant or use a sharp clean knife to cut the tender leaf stem off of the African Violet plant.
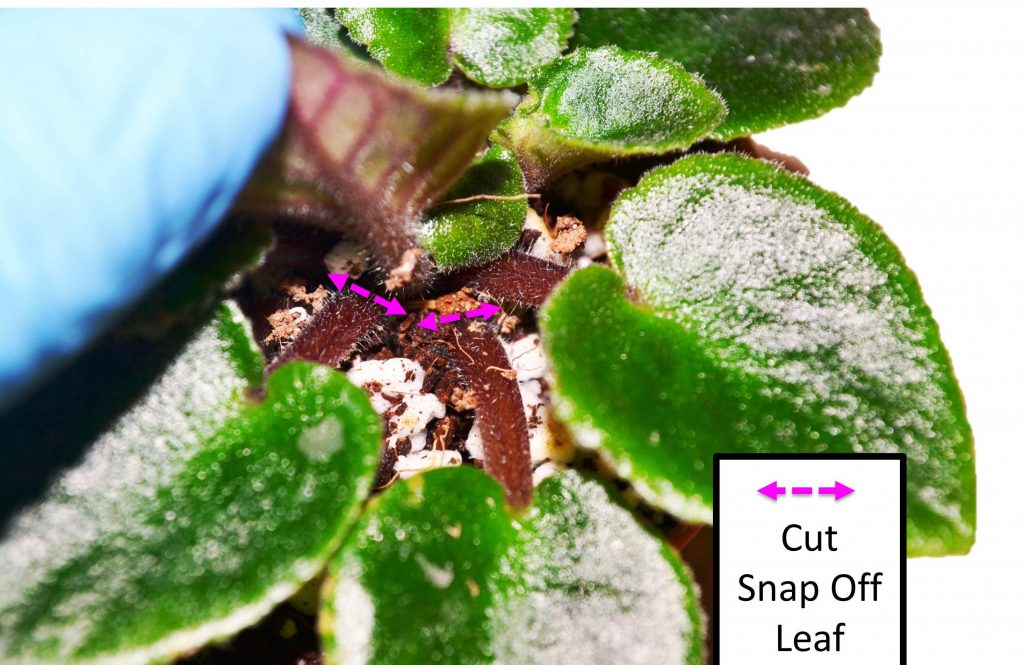
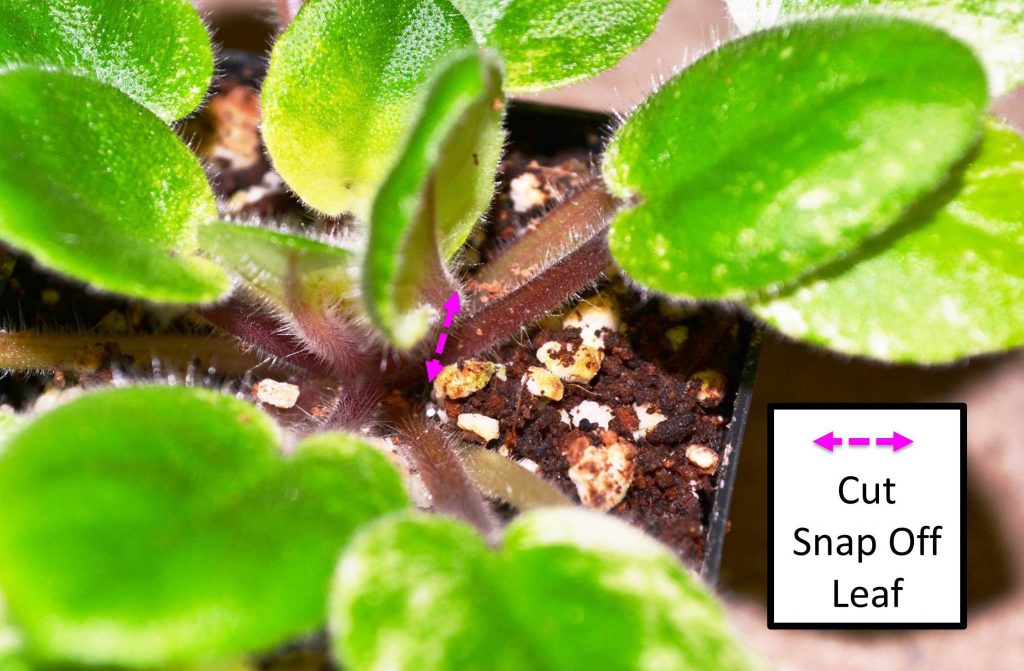
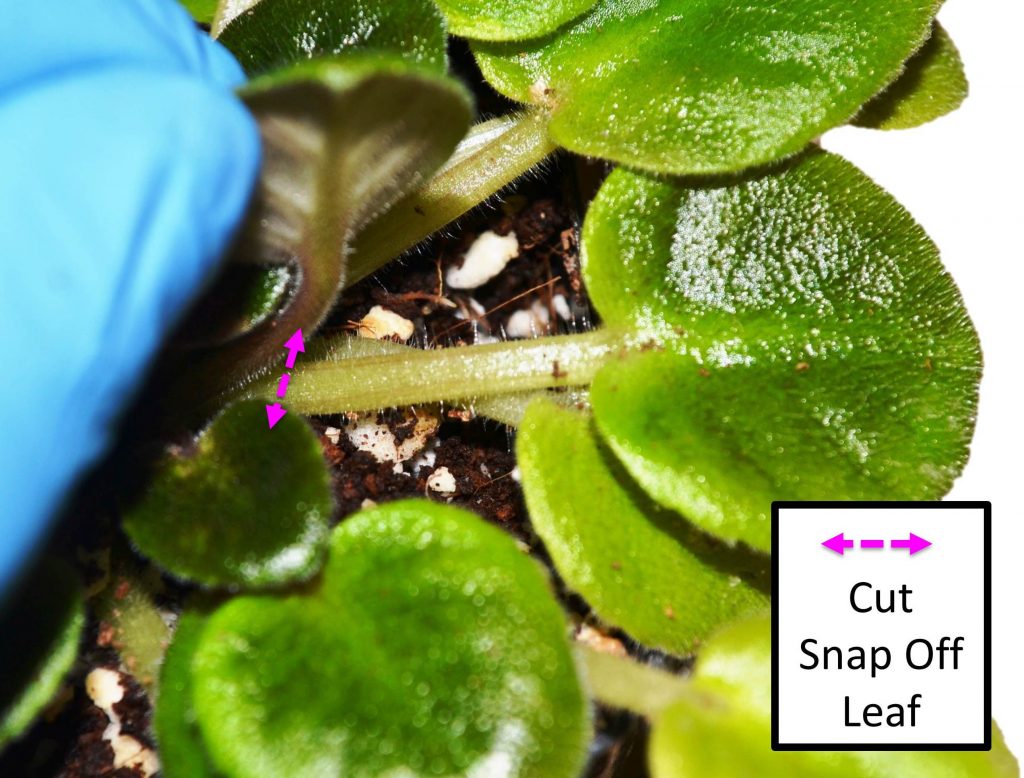
When removing the leaf from the African Violet plant, make sure to remove the entire leaf stem, closer to the crown or base of the African Violet plant. Below are pictures displaying where to cut the leaf stem from the plant.
By removing the leaf stem closer to the plant, you will prevent future root rot from occurring.
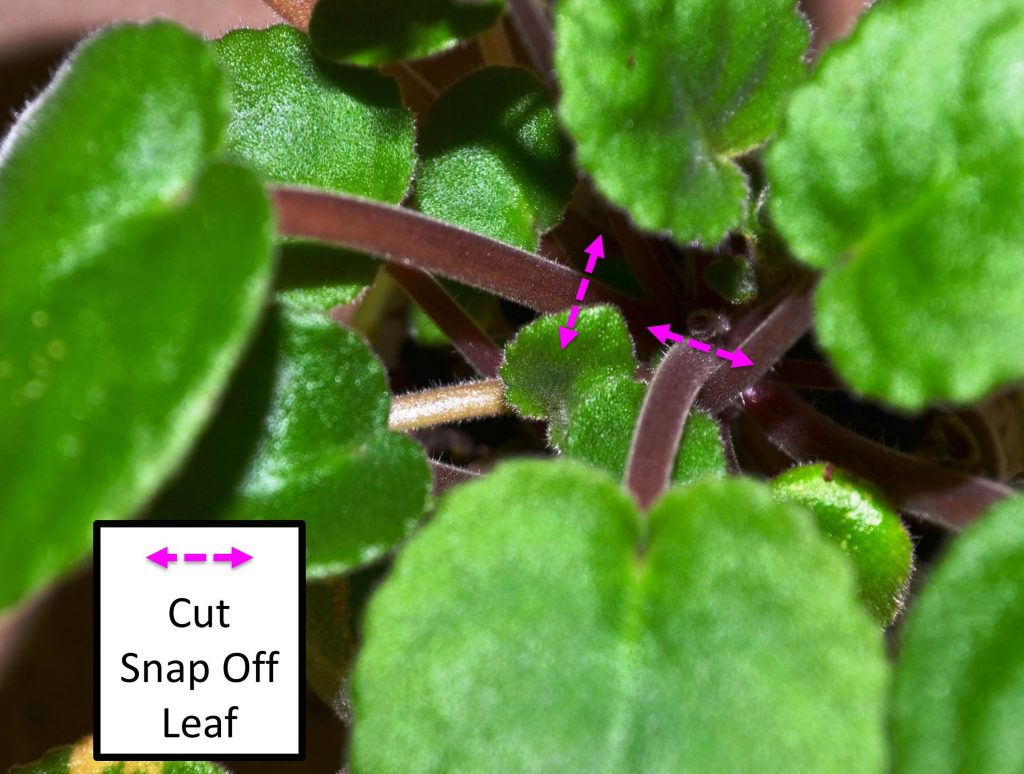
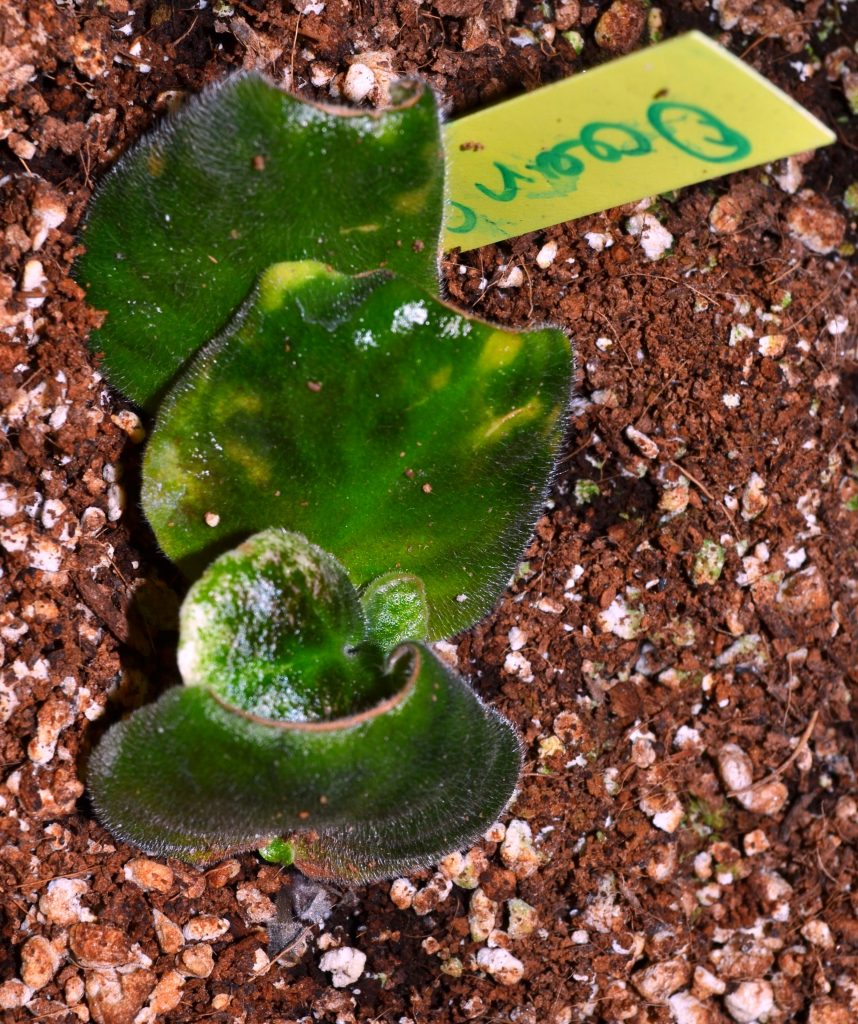
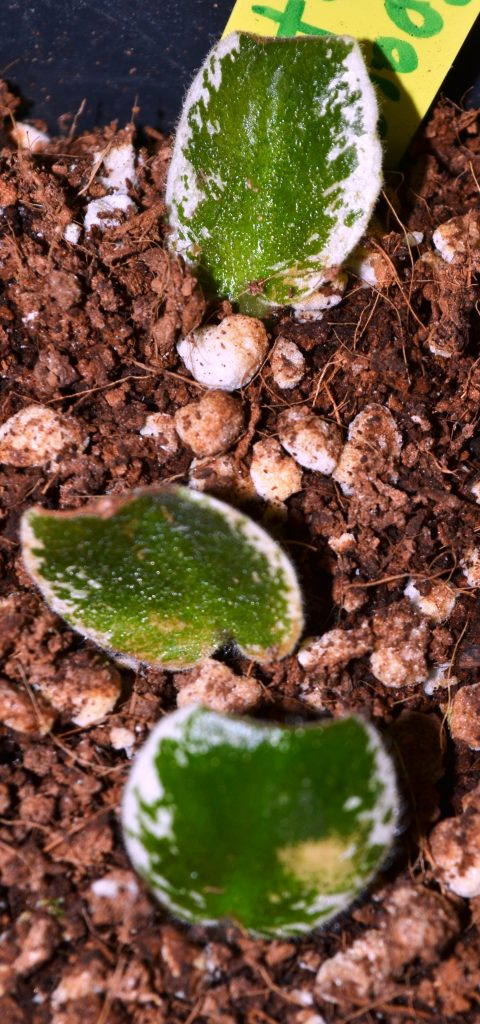
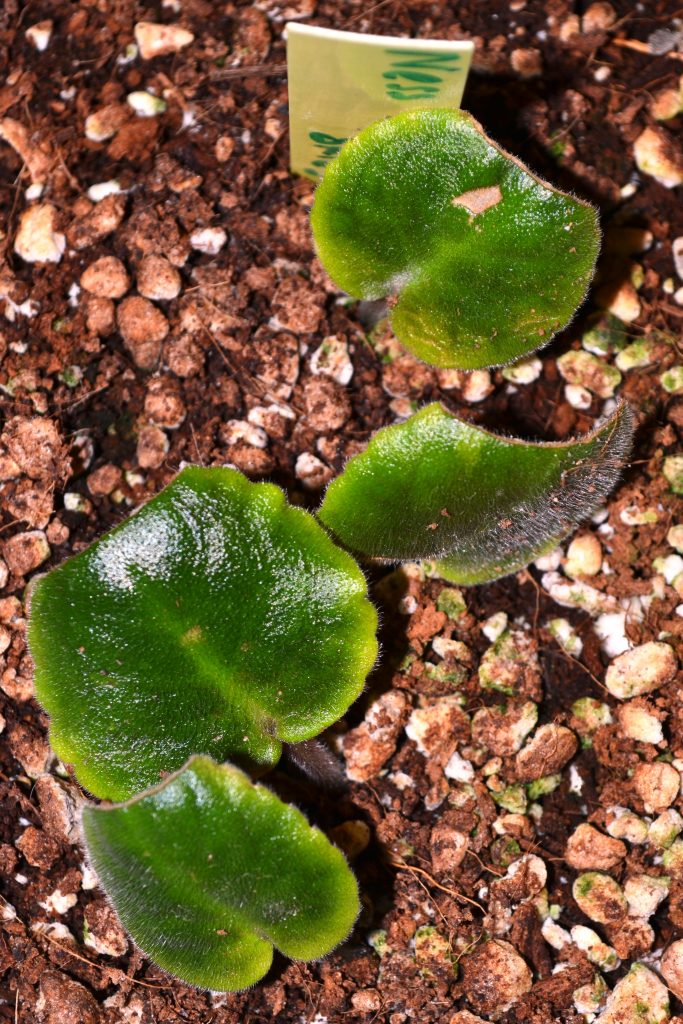
When choosing leaves from a trailer, pick one of the trailer crowns and select a middle leaf from this crown. Can select a few middle leaves from each crown of the trailer on the same plant. Below are pictures of middle leaves from a trailer plant.
What kind of rooting
soil mix to use for propagating African Violet leaves?
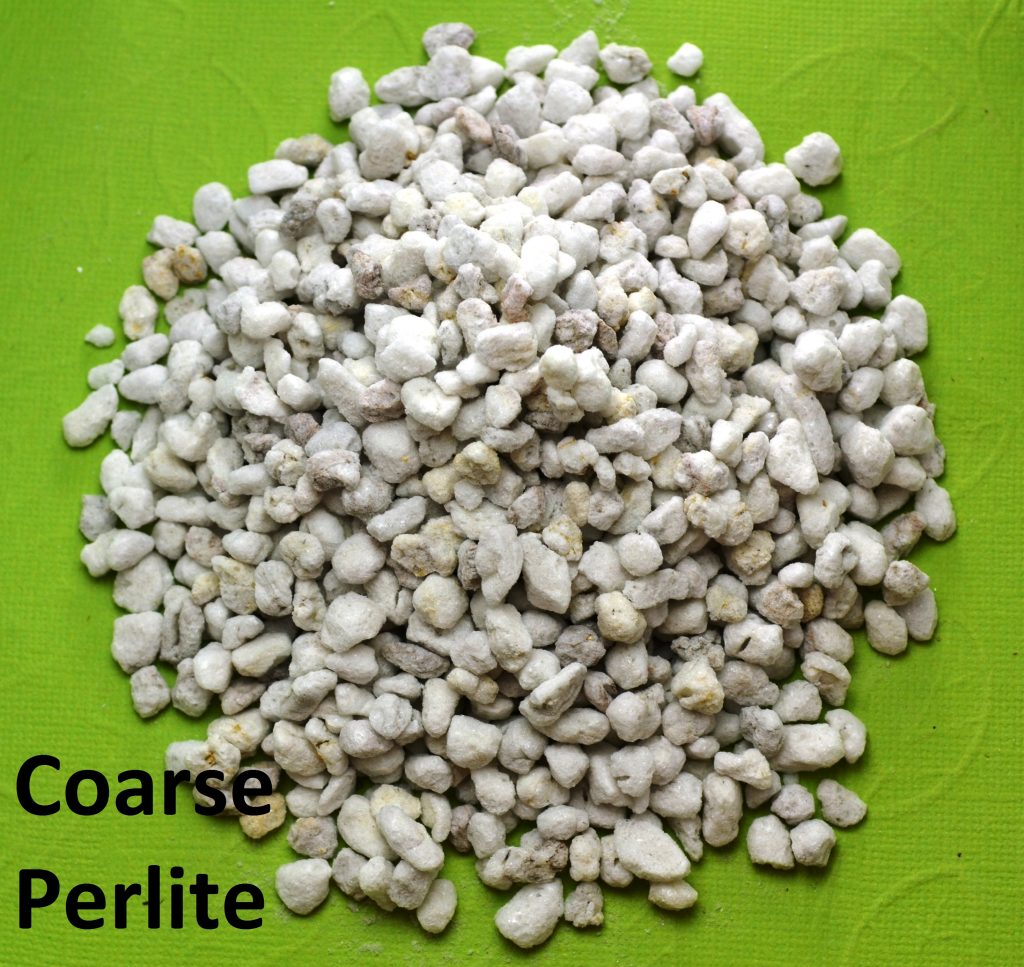
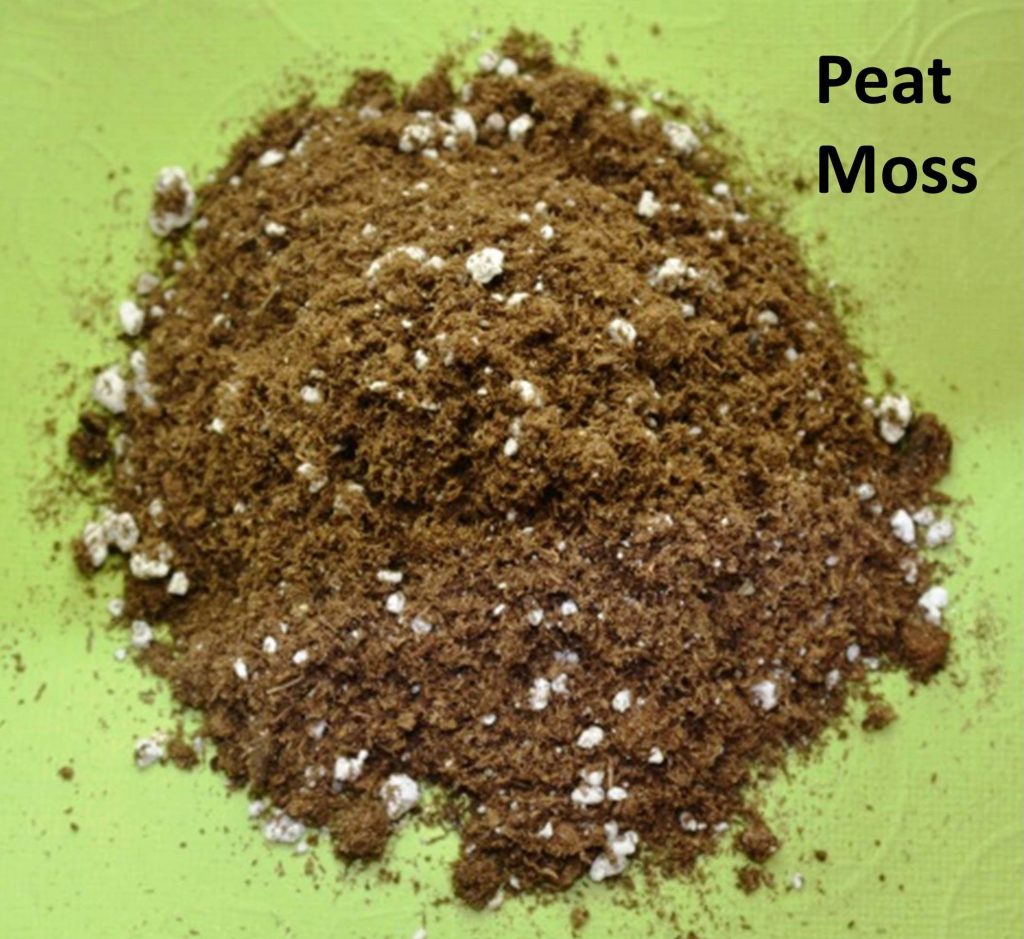
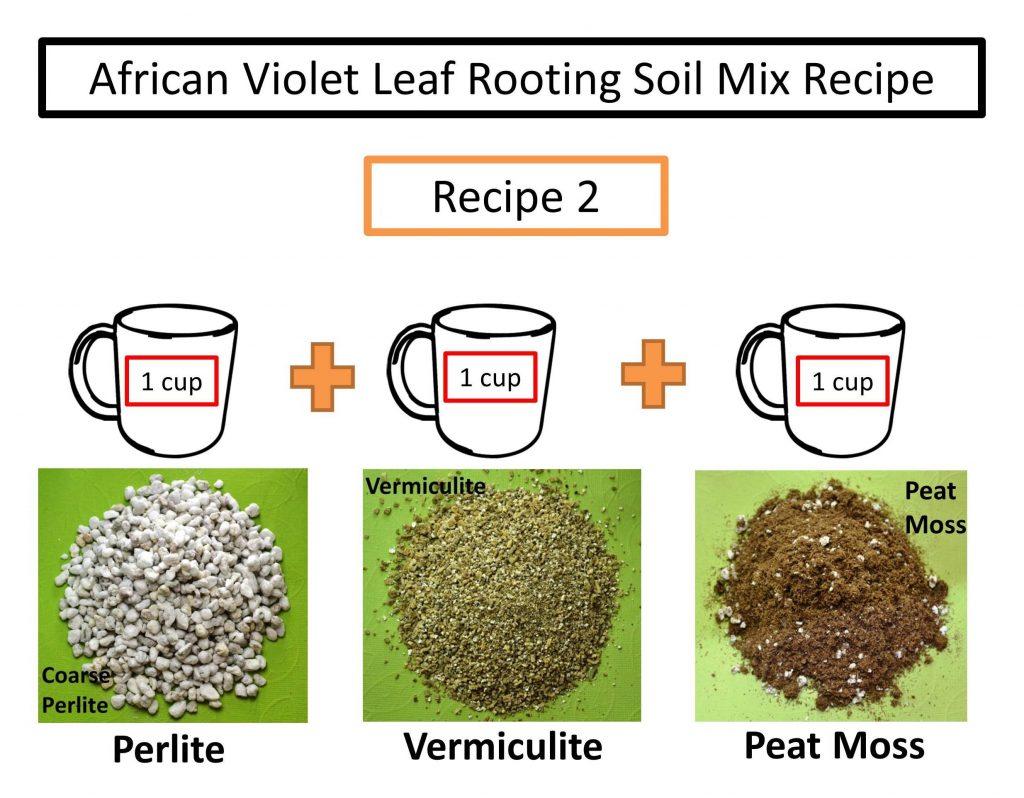
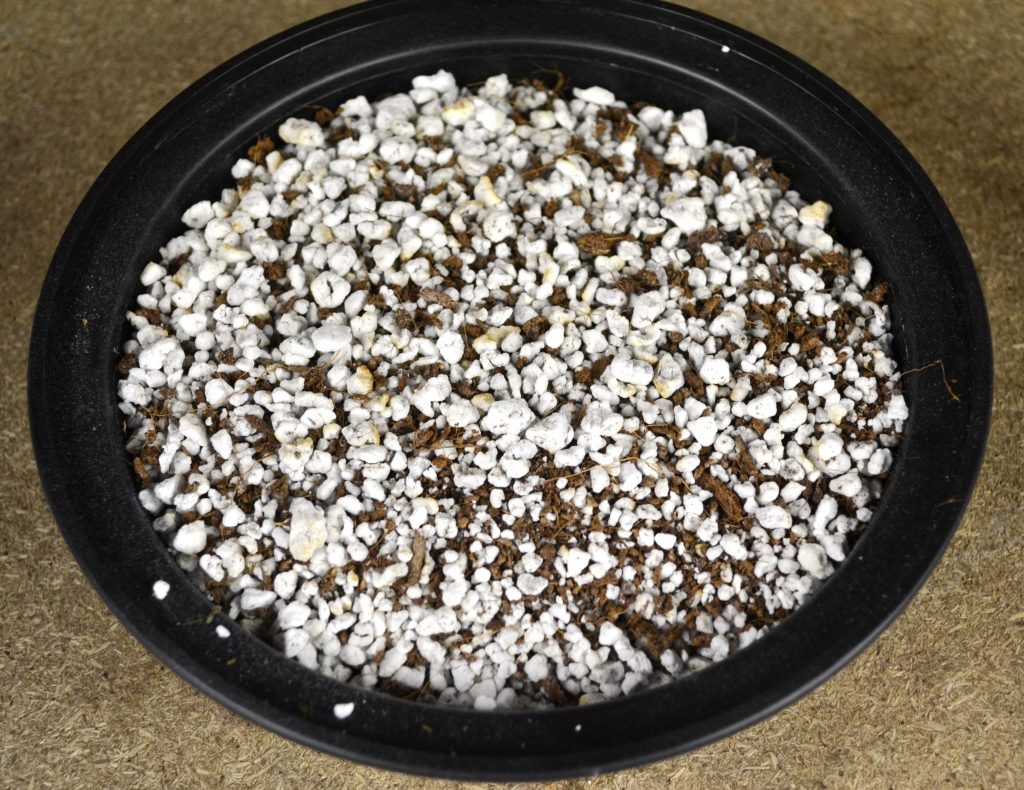
Use a light porous rooting soil mix consisting of perlite and peat moss to start propagation of African Violet leaves.
Rooting Soil Mix Recipe: 2 cups perlite mixed with 1 cup peat moss. Can substitute 1 cup perlite with 1 cup vermiculite. I use only perlite and peat moss in my mix.
Below are perlite recommendations, useful for potting up suckers, as an additive to African Violet soil or even used a thin layer at the bottom of a pot for drainage.
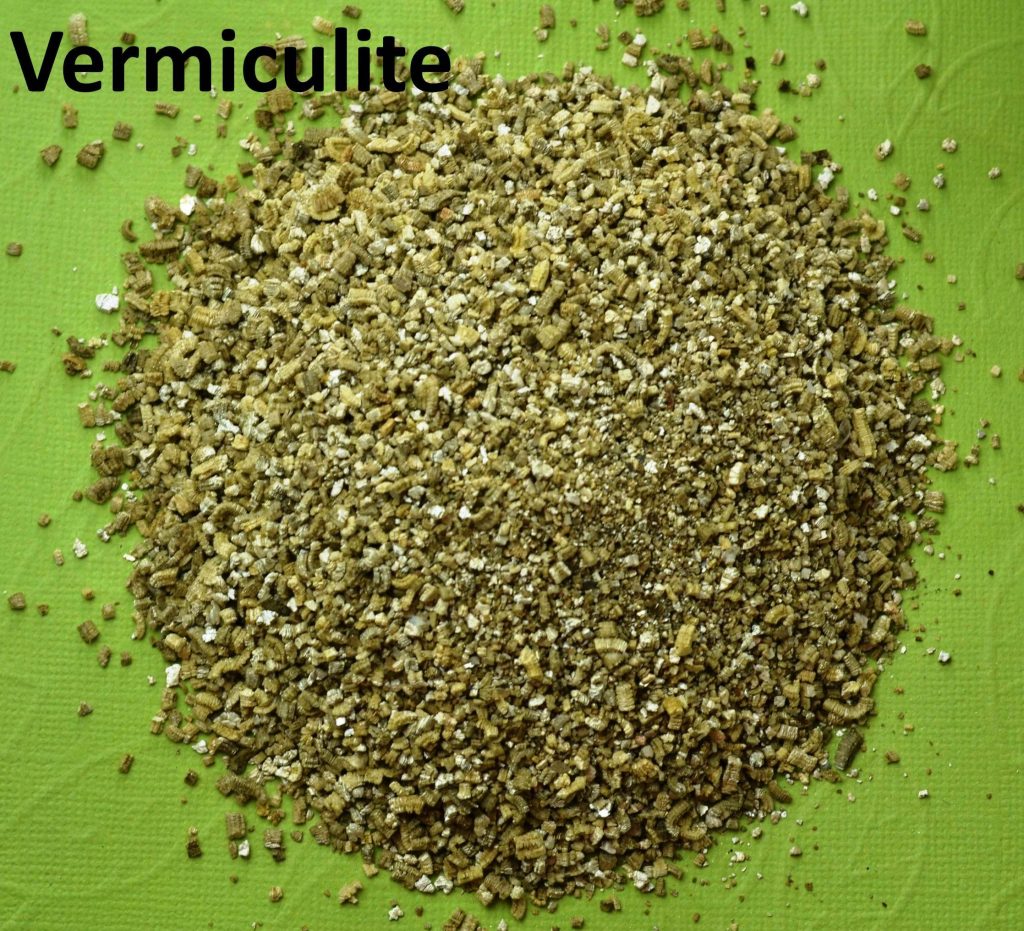
Below are vermiculite recommendations, useful as an additive to African Violet potting soil:
When selecting perlite and peat moss for your
rooting soil mix, its best if they don’t have any fertilizer pre-mixed in the
package. Use a virgin mix, with no additional fertilizers in it. This way you
have control over when to fertilize.
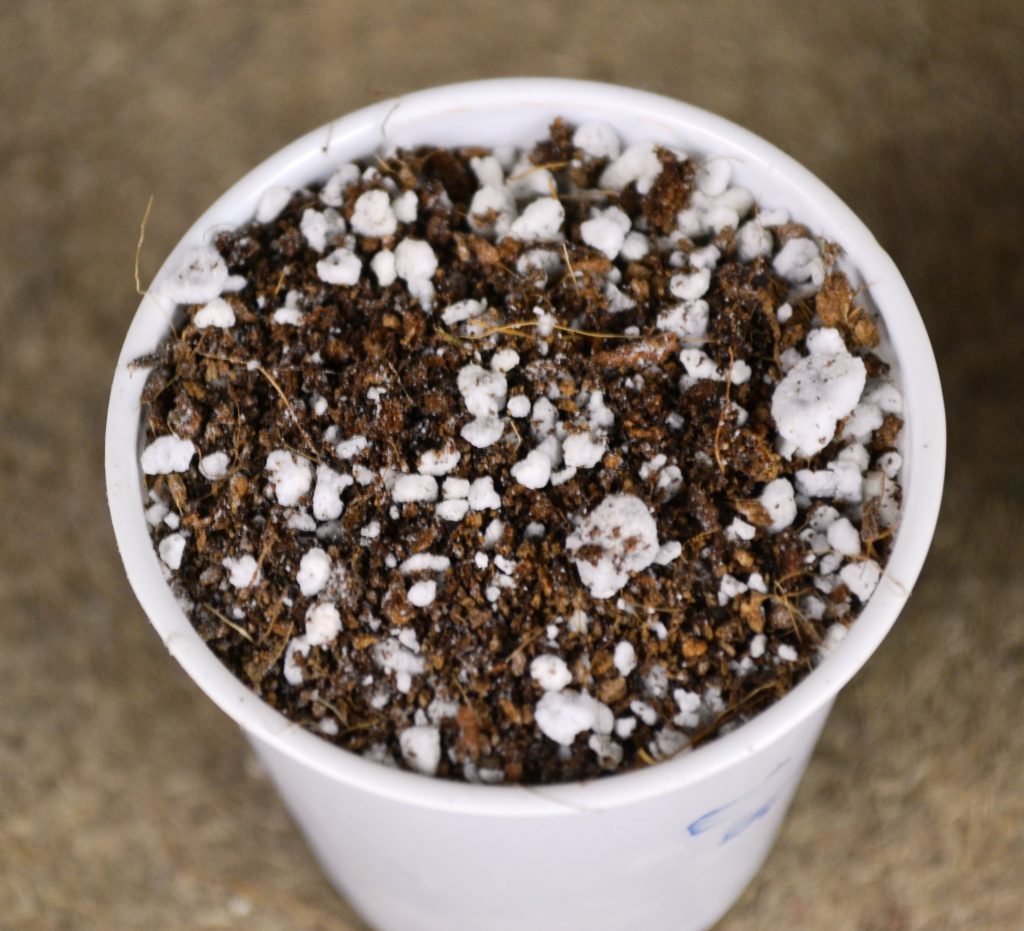
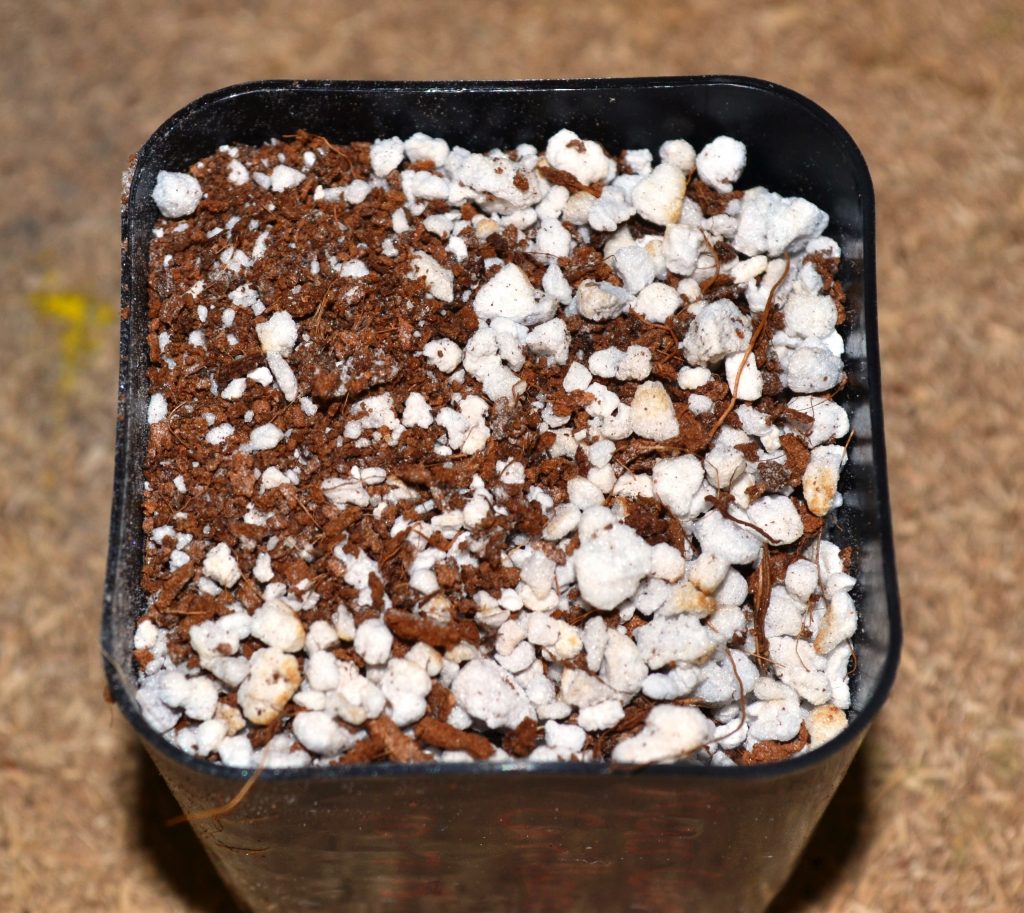
The rooting soil mix should be light weight with
the ability to retain water, but also provide adequate drainage too.
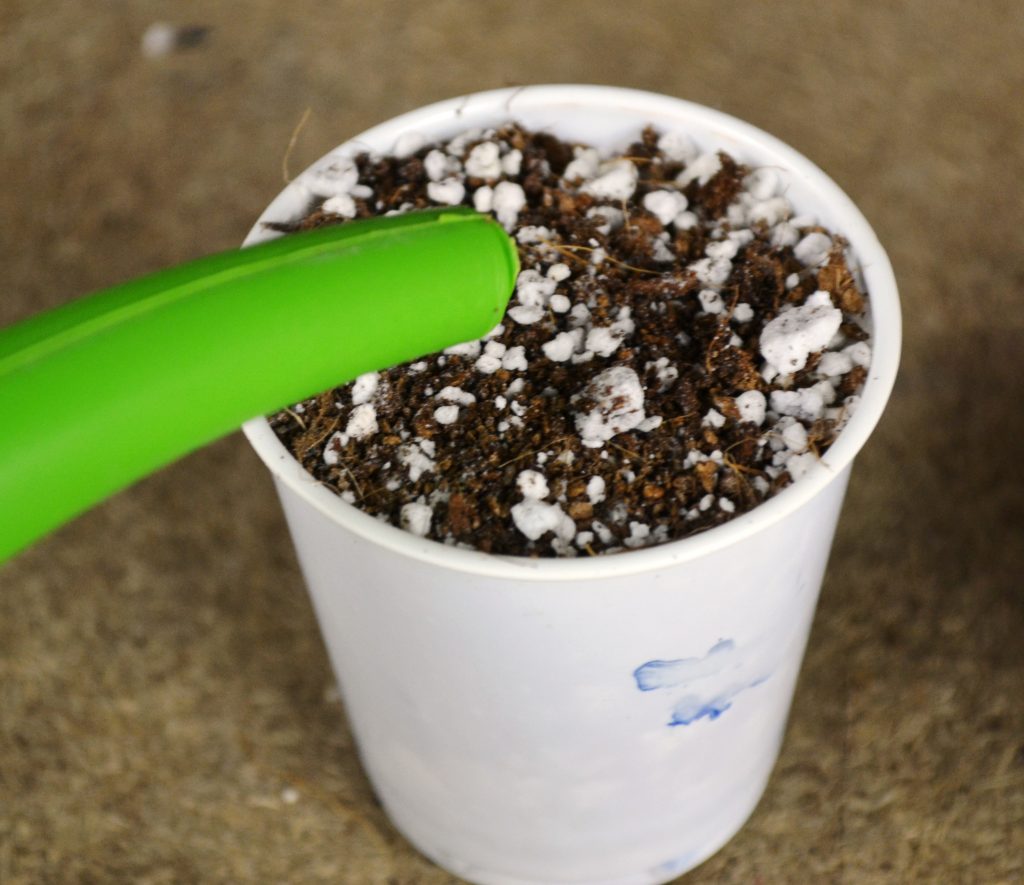
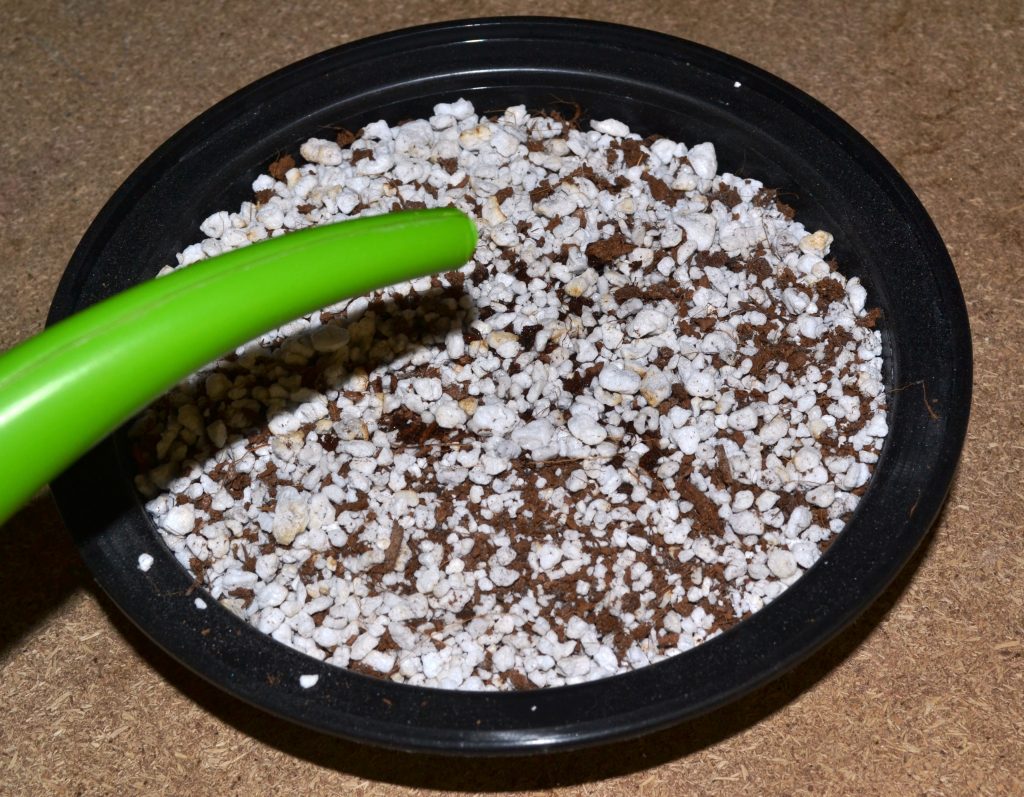
To start propagating, select a suitable container to start African Violet leaves in. It can be a small 3oz. cup, a small 2 inch pot or a medium-sized plastic take out container.
Fill up the pot/container with prepared rooting soil mix.
Add luke warm (room temperature) water to the
rooting soil mix in the pot/container and allow to drain.
The rooting soil mix should be moist, not damp
or too dry.
How to prepare leaves
for propagating African Violets?
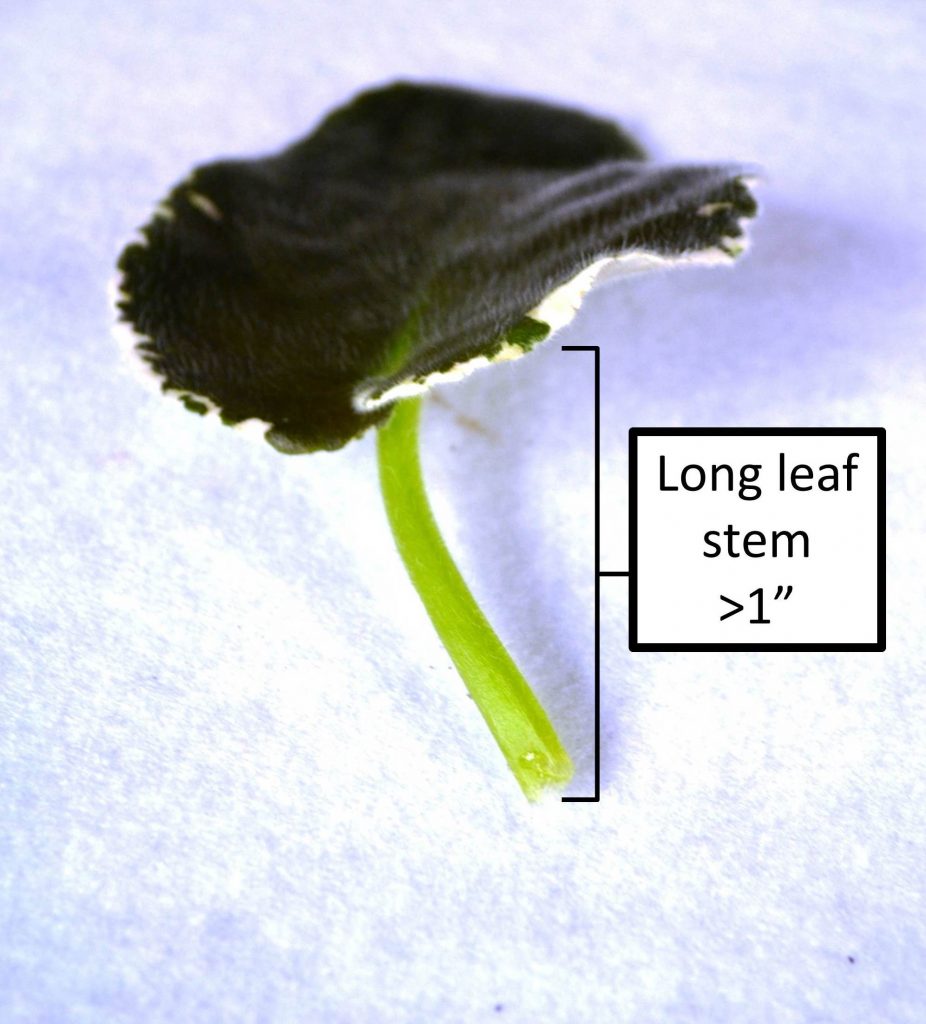
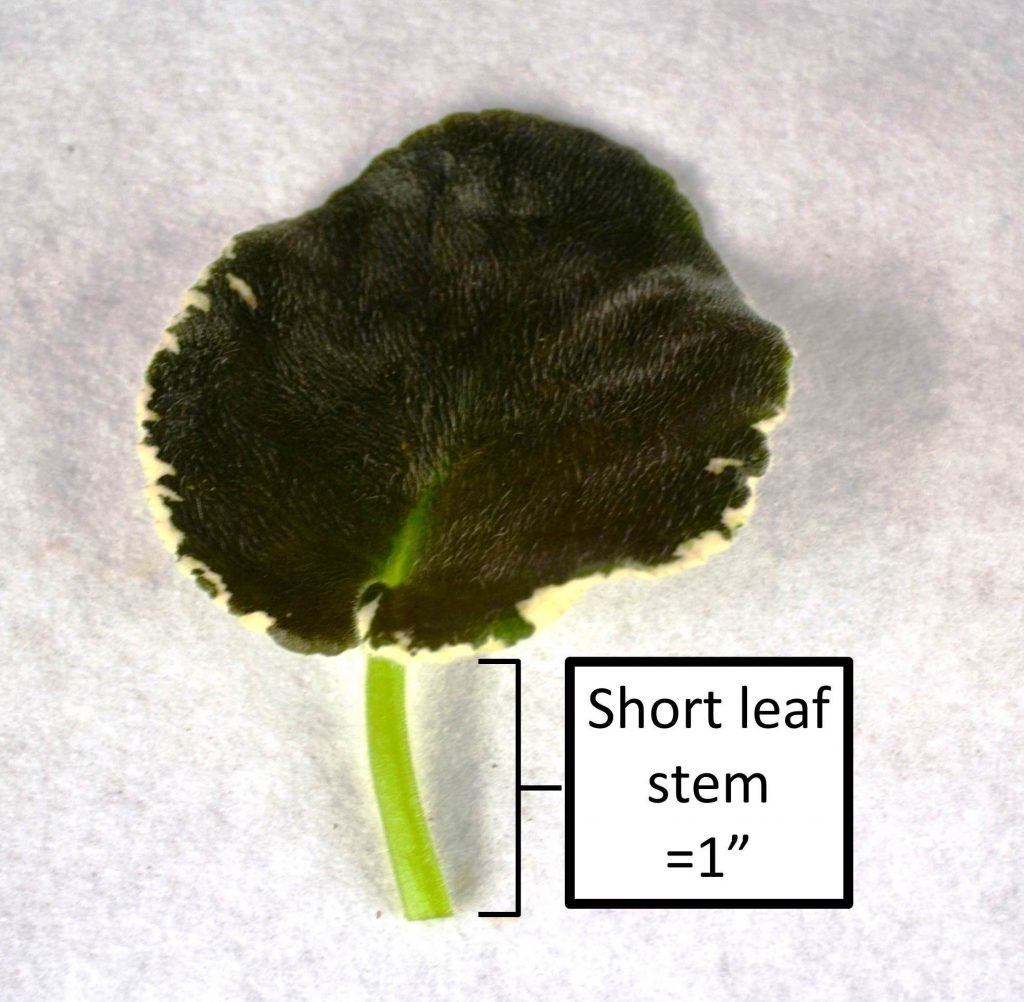
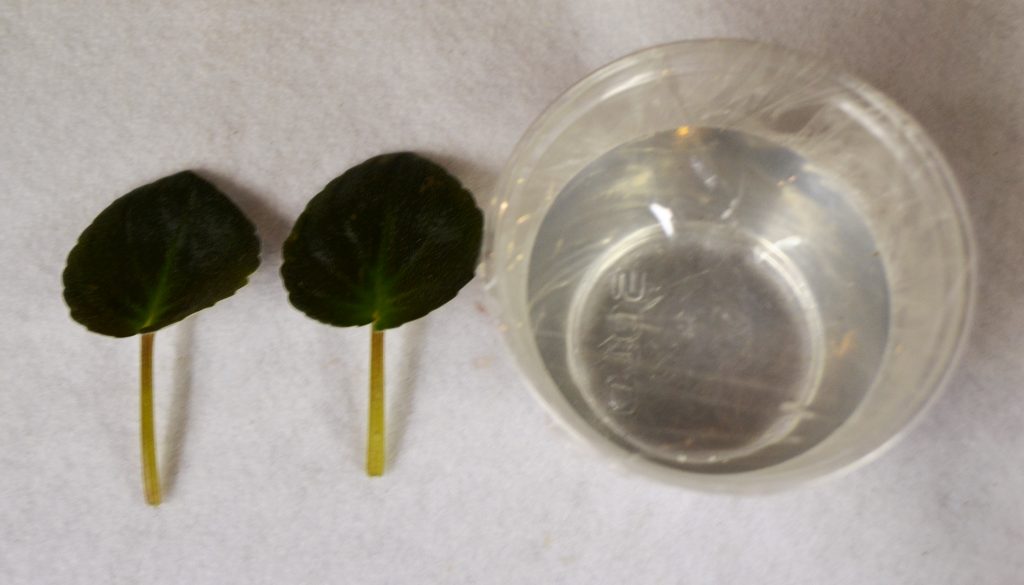
When choosing leaves to propagate African Violets, the leaf stem should be at least 1 inch in length from the base of the leaf to the end of the stem.
If the leaf stem is longer, can use a sharp clean knife/blade to cut down the leaf stem to 1 inch.
Scalpel tool recommendations below, quite useful in slicing leaves for propagation:
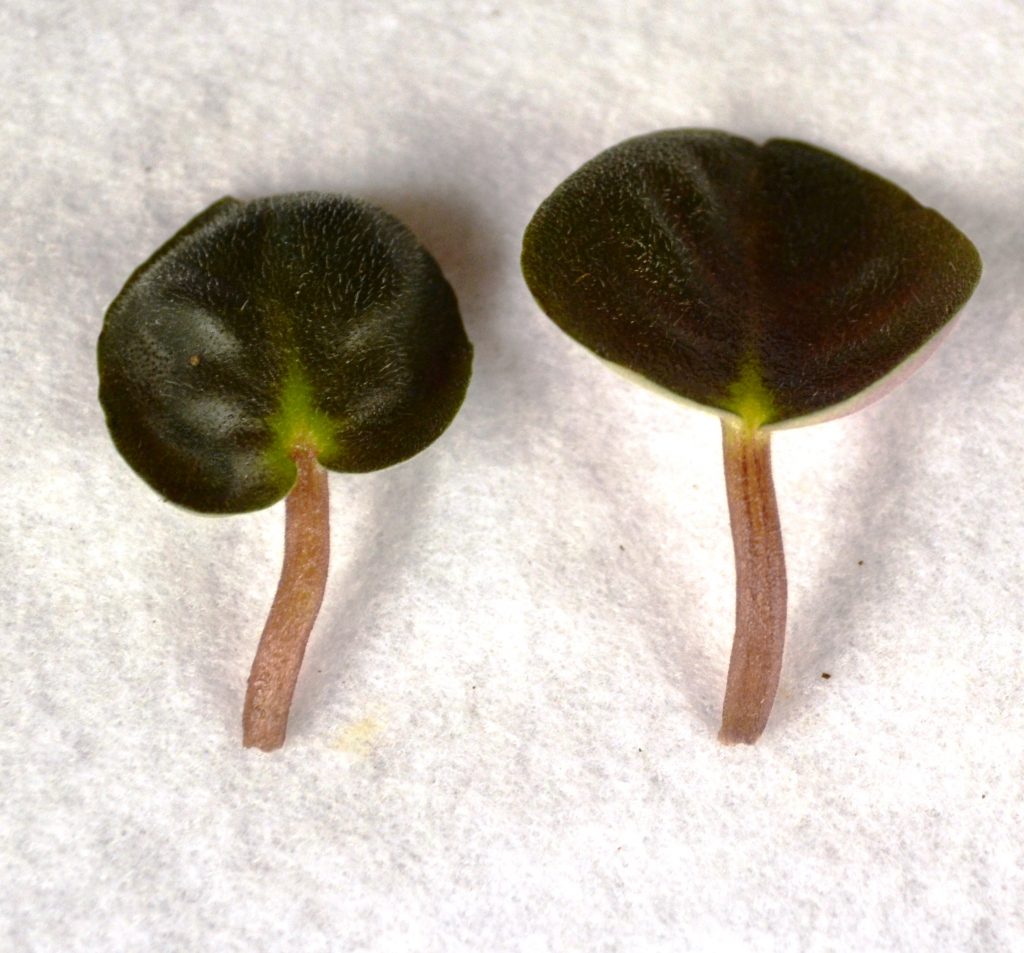
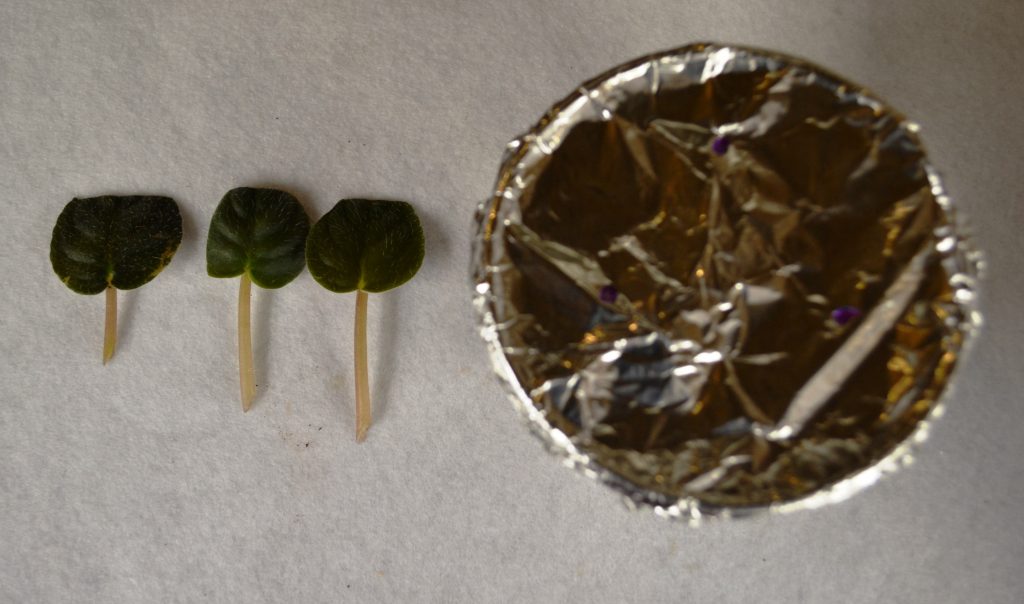
Once the leaf is cut to the correct length, place
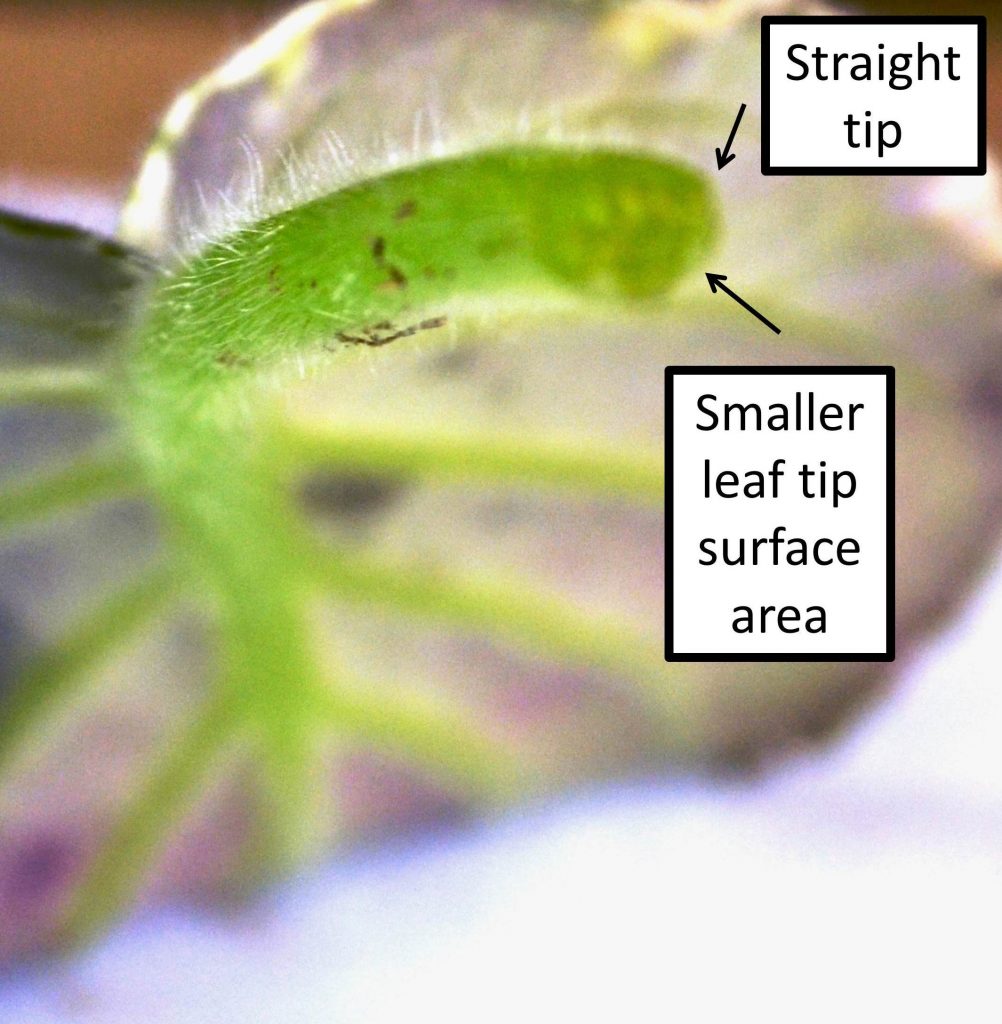
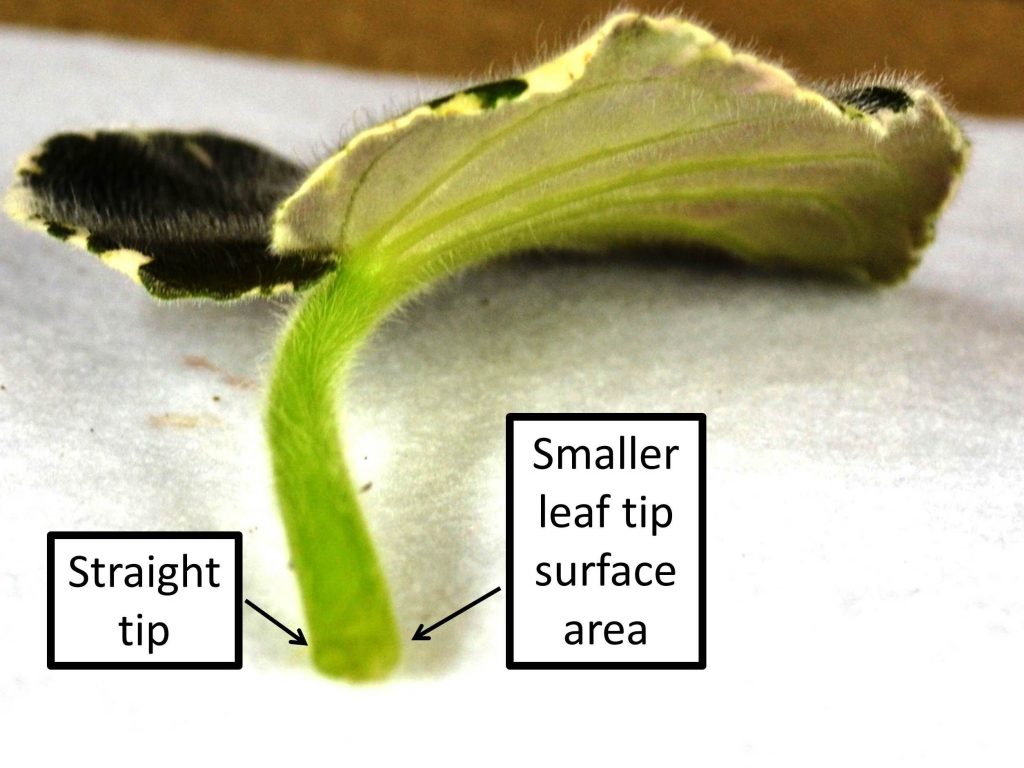
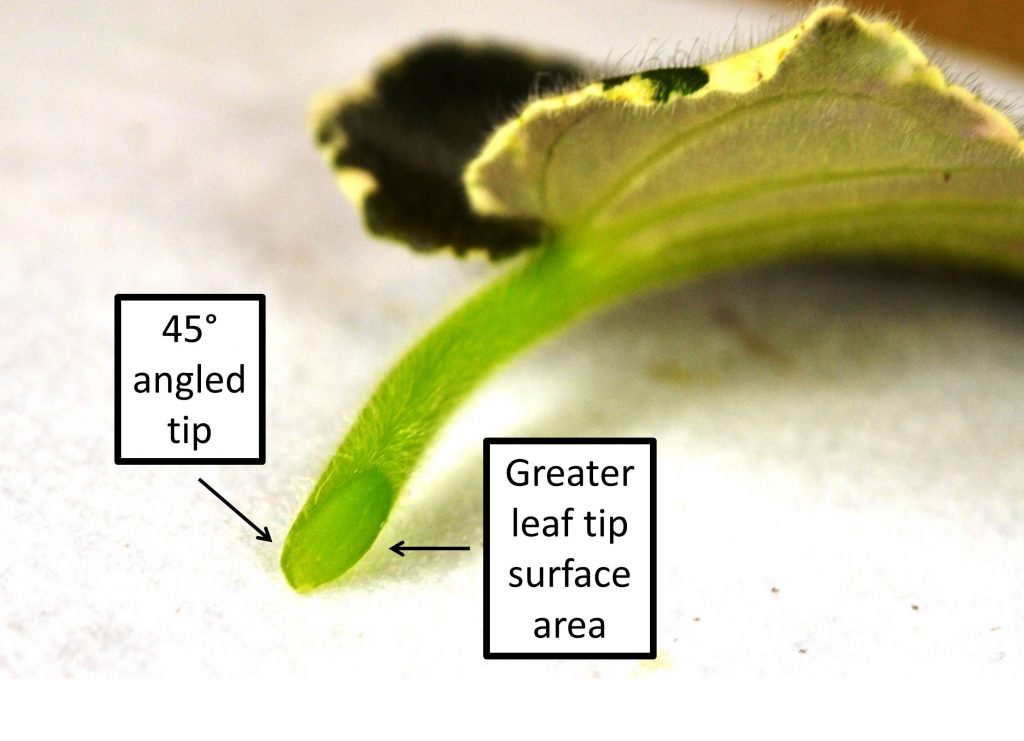
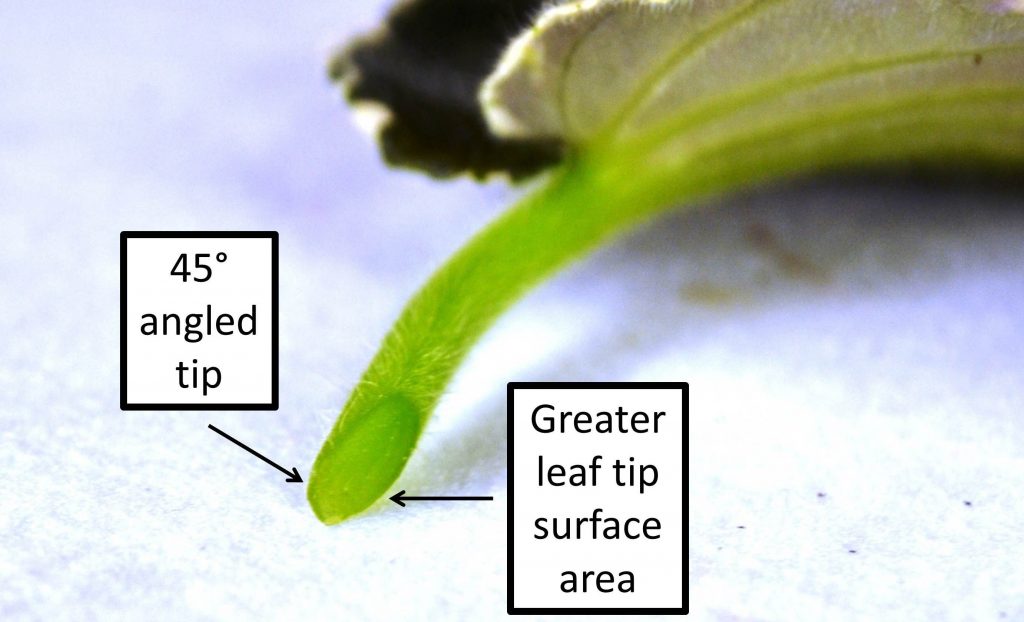
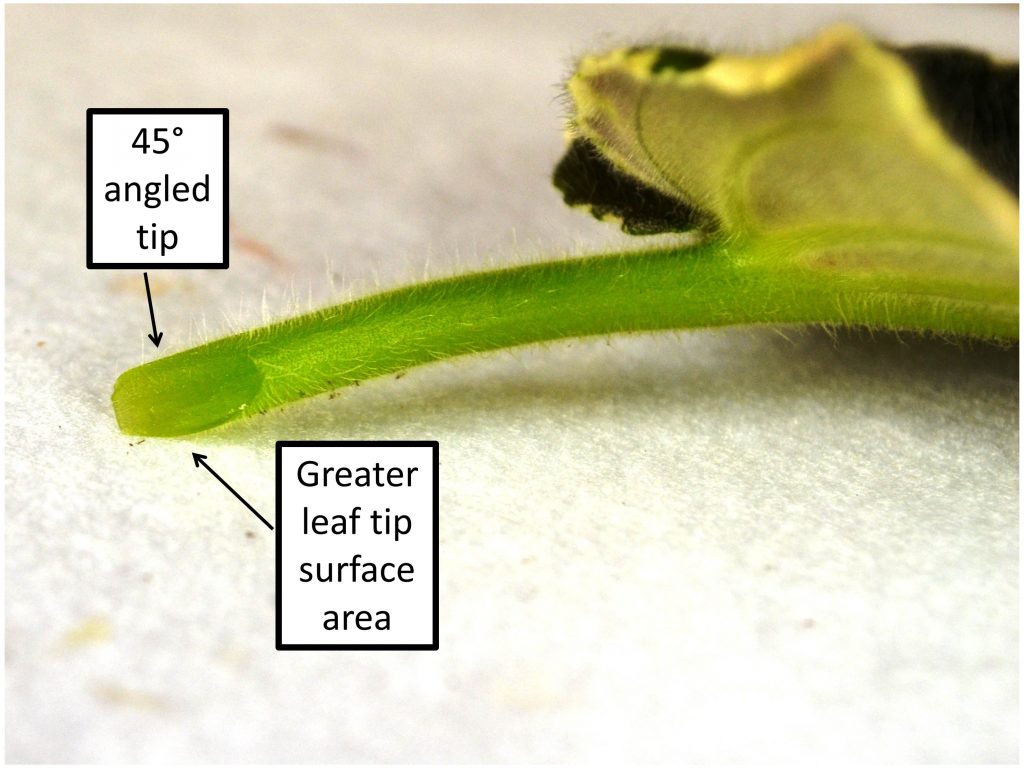
the leaf on a table with the fuzzy/hairy side of the leaf up.
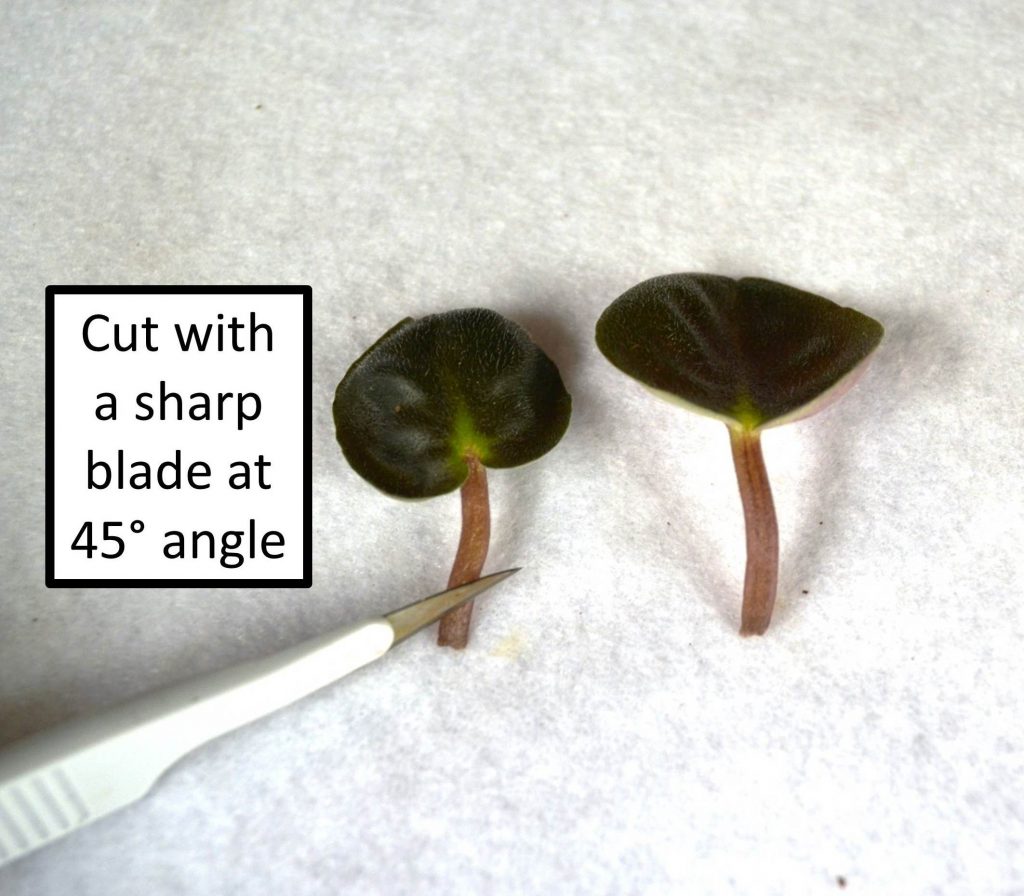
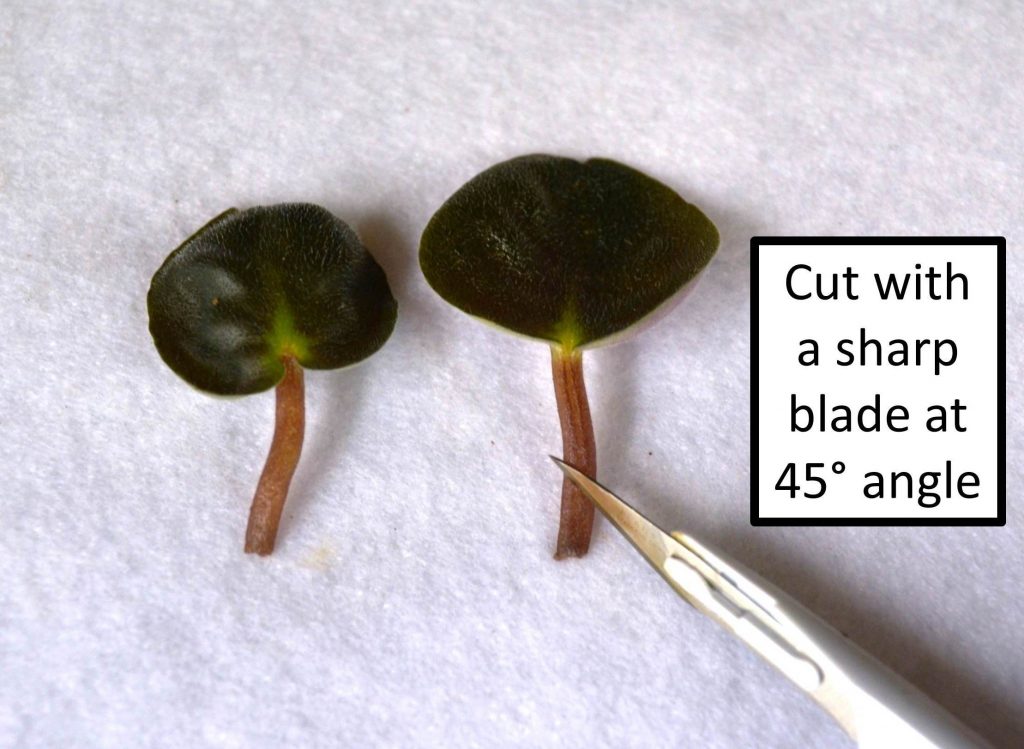
Cut the tip of the leaf at a 45°angle.
Try to make a long angled cut, at least 0.5 inch in length.
Make sure it’s a nice clean cut; remove any
hanging bits of plant tissue from the angled tip.
Remember to clean the blade with 70% alcohol between each use. Can dilute 100% /99%alcohol to prepare 70% alcohol (Mix 70ml 100% alcohol with 30ml water to prepare 70% alcohol).
These are a few ethanol or isopropylalcohol examples (70% or 90%), can be used to disinfect your work bench, your plant stand, tools and pots.
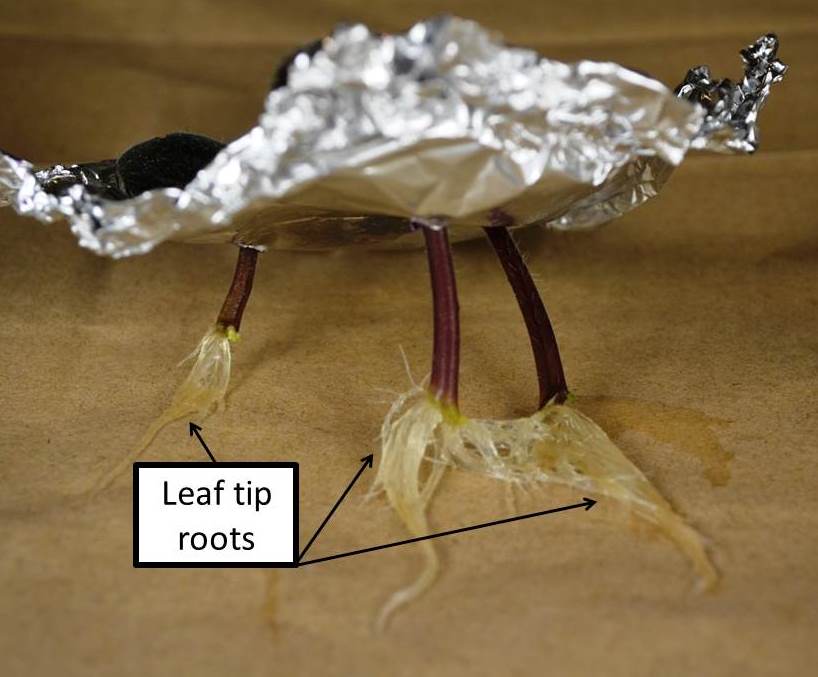
By cutting the leaf tip at an angle, we are
creating a larger surface area for root production from the leaf tip compared
to a straight cut of the leaf tip.
The angled cut end will now produce roots when
potted up in rooting soil mix.
It is not necessary, but I have found that when
I slice off the top of the leaf too, it creates roots and plantlets faster,
compared to when I don’t slice off the leaf top.
By slicing off the top of the leaf, it also
focuses all the leaf’s energy into producing roots from the cut tip instead of
continuing to grow the leaf.
Whether to use rooting hormone for propagating African Violets?
Personally, I do not use rooting hormone powder on my leaves when I propagate them. I have however, heard of others regularly using rooting hormone powder.
Rooting hormone powder assists the leaf in growing stronger roots.
To use rooting hormone powder, work in a well-ventilated area, wear gloves and if possible eye googles and face mask for precaution.
Gently dip the freshly cut tip of the African Violet leaf stem into rooting hormone powder.
The rooting hormone powder should lightly dust/coat the tip of the leaf.
Shake off any excess powder from the tip of the African Violet leaf and proceed to the next step of putting down leaves in rooting soil mix.
Below are some safety items which can be useful while working with rooting hormone for African Violet leaf cuttings:
How to put down
leaves in rooting soil mix for propagating African Violets?
Prepare the pots/containers filled with rooting soil mix and watered.
Remember to label the pots and prepare plant labels for the containers.
Using a pencil, chopstick or knitting needle, make a thin small hole in the rooting soil mix, just wide enough for the leaf stem to fit and around half an inch deep.
Insert the angled cut end of the leaf stem into the hole and fill in with soil mix, in such a way that the leaf stem sits just below the soil.
If the leaf stem seems unstable/wobbly or is not staying upright, can place two small toothpicks behind the stem to keep it upright or can gently push the leaf stem slightly deeper into the rooting soil mix.
When inserting the leaf stem into the soil, don’t place it straight down into the soil, but at a slight angle.
Now, the leaf cutting pots need to have their own humid mini-greenhouse environment, to encourage root production.
You can place the pots in a sealed Ziploc bag to increase humidity. Can open up the bags a little if the soil seems too damp and if the humidity becomes too high (water droplets are forming inside of the bag and start creating a pool of water in the base of the bag).
The pots can also be covered with plastic cups inverted over the top. If the humidity is too high (water droplets start covering the inside of the inverted cups and the soil routinely stays damp), you can poke holes in the plastic cup cover.
If using a plastic take out container, poke a few holes in the take out lid and cover the container with the lid.
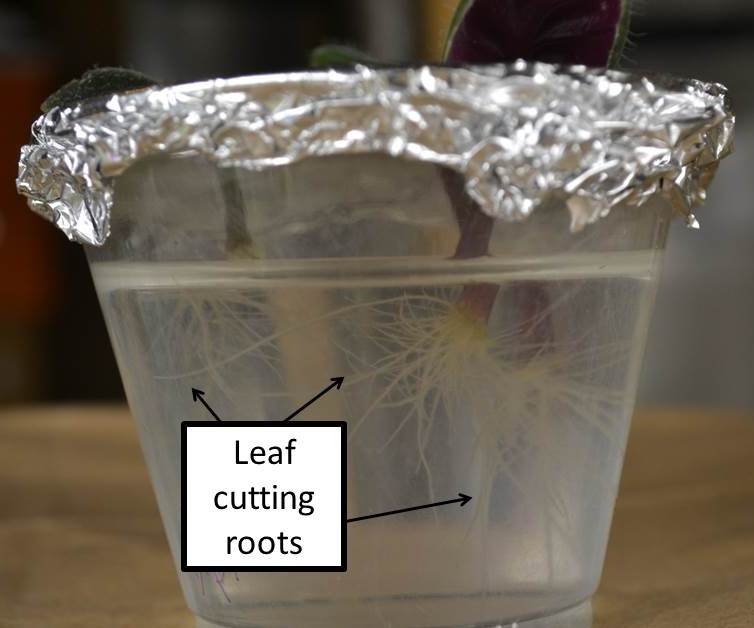
How to propagate
African Violet leaf cuttings in water?
African Violet leaves can also be propagated in water.
The leaf is similarly prepared as mentioned above.
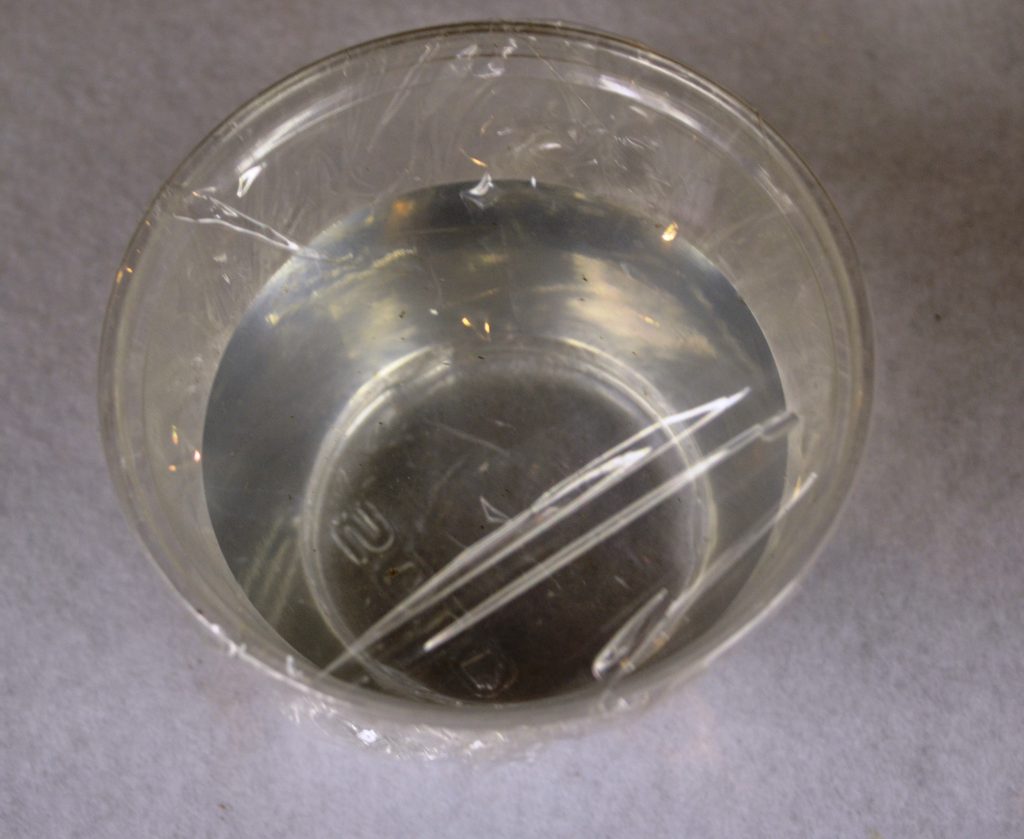
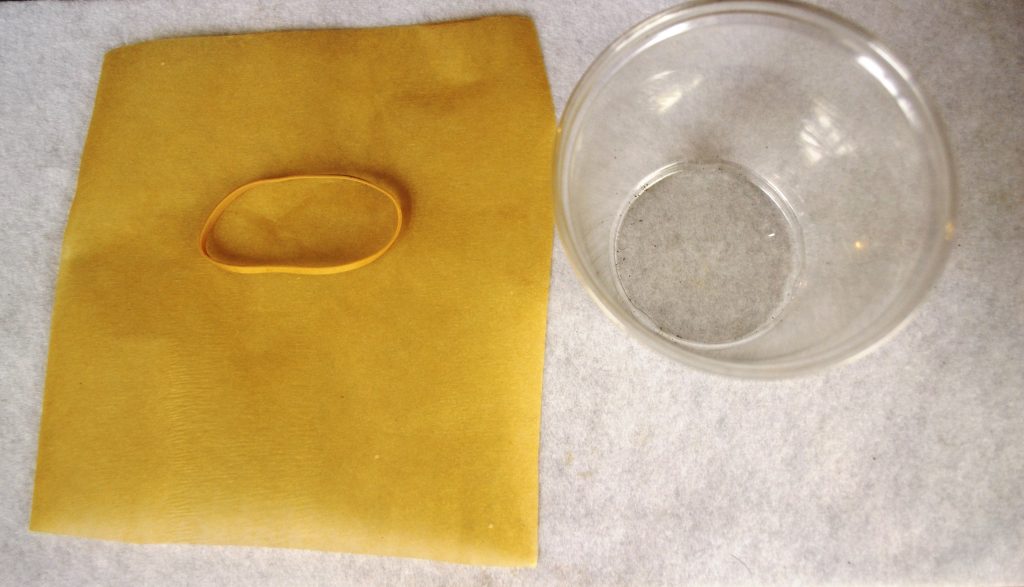
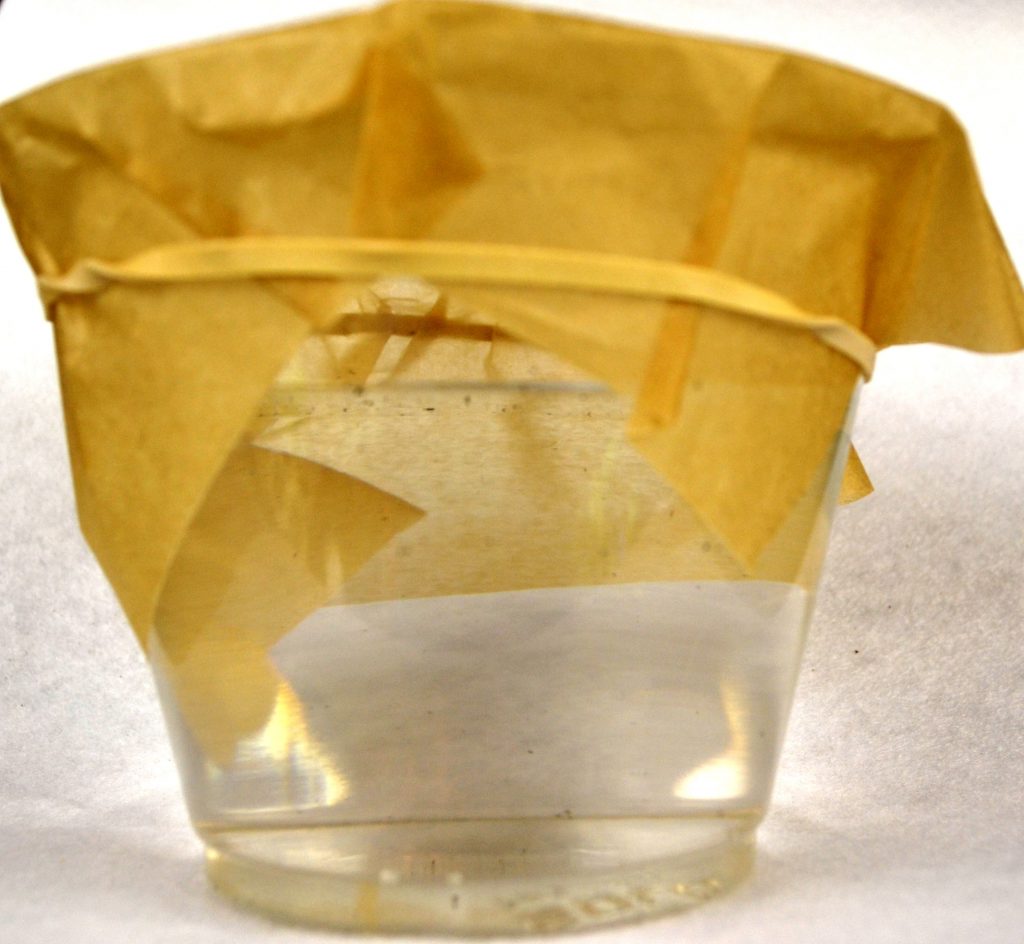
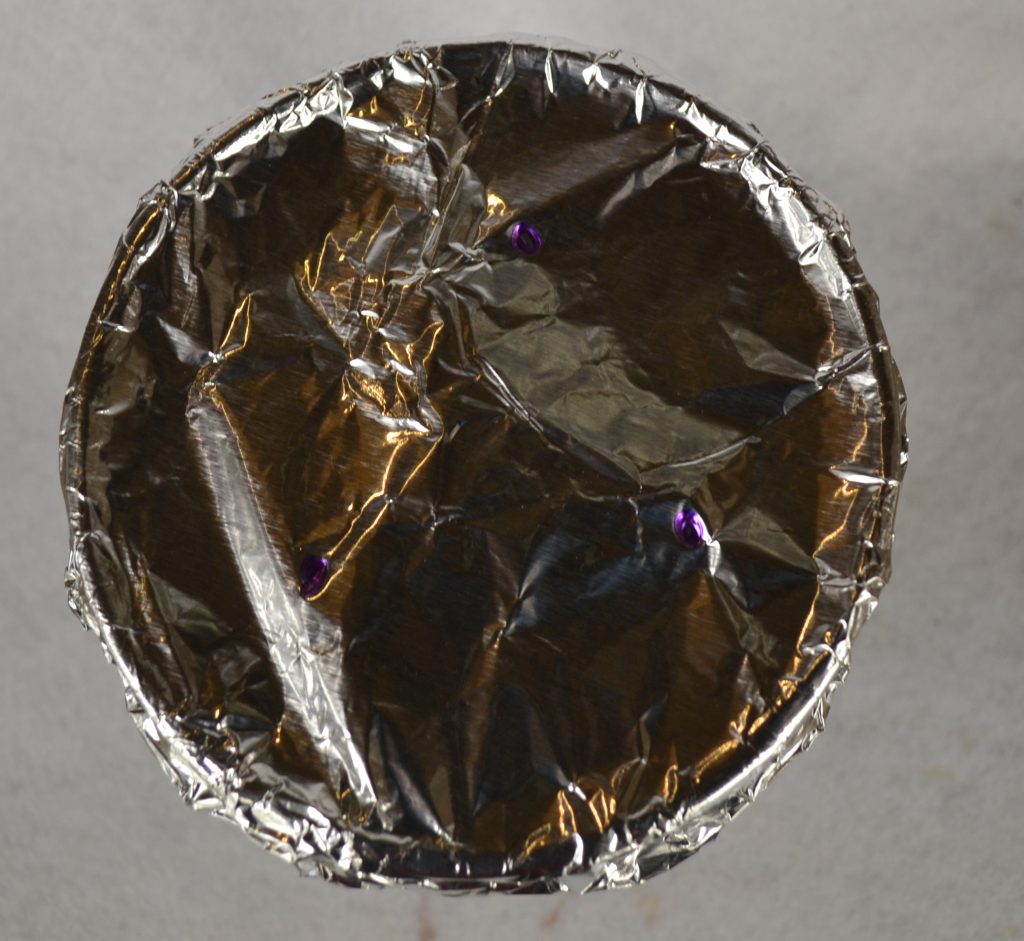
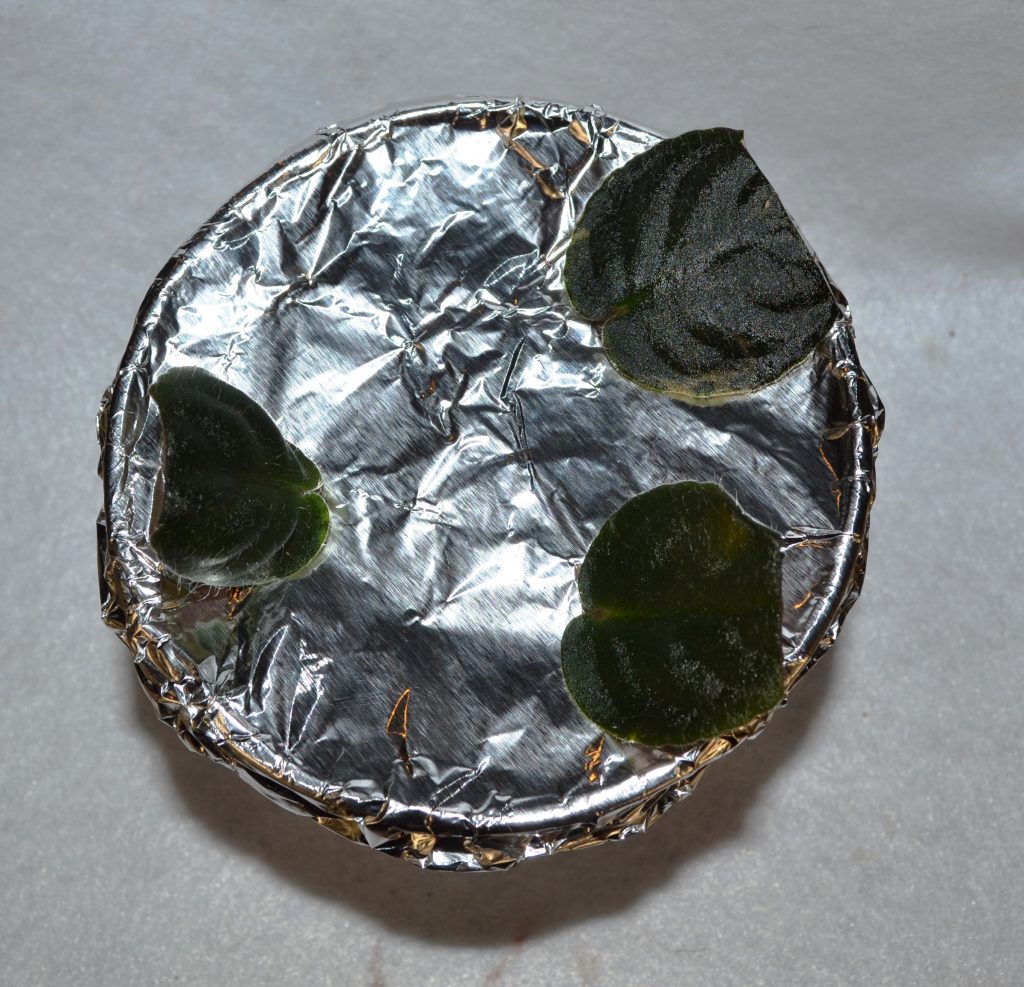
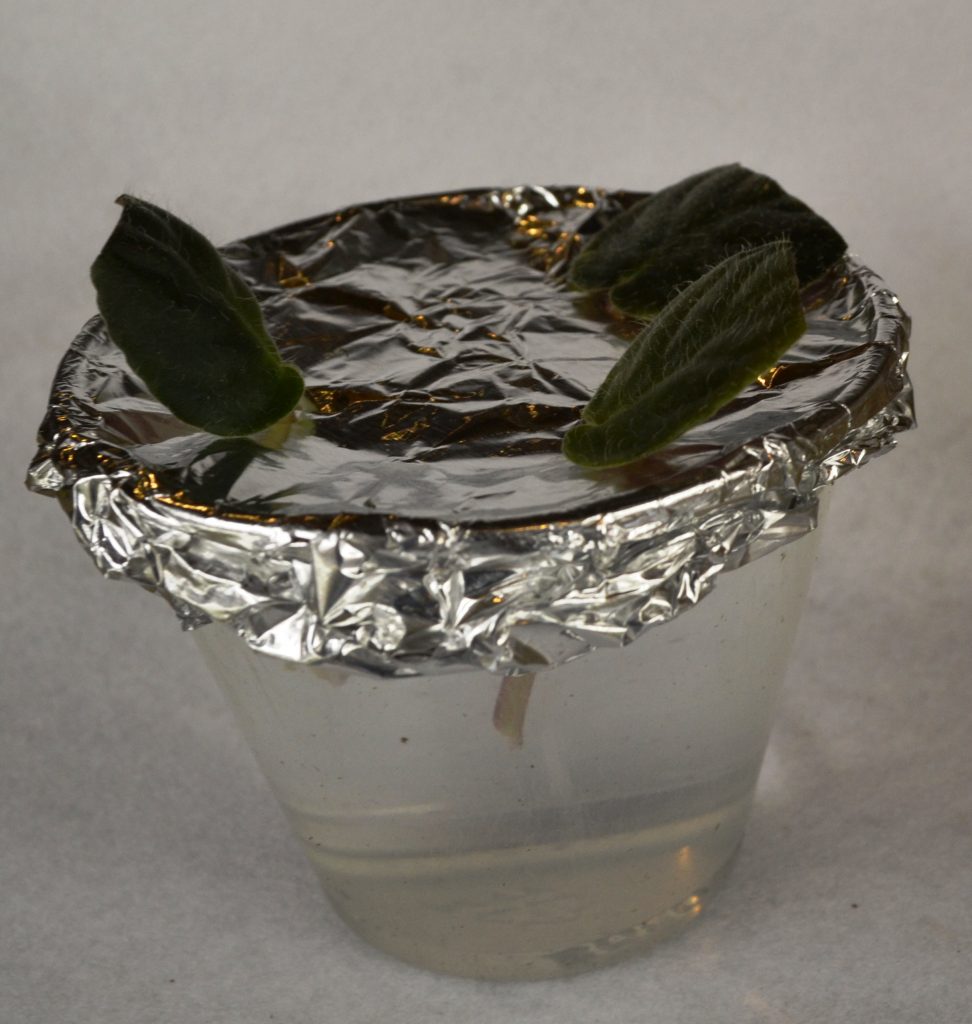
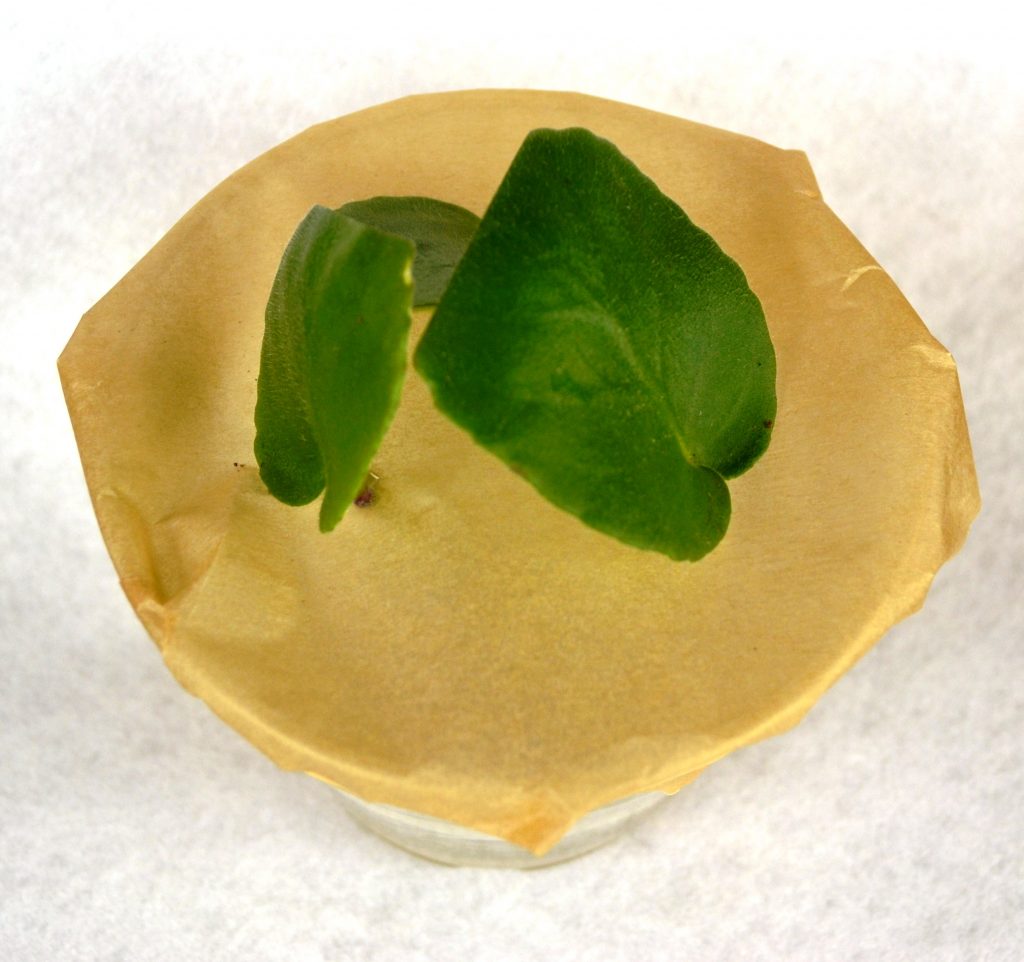
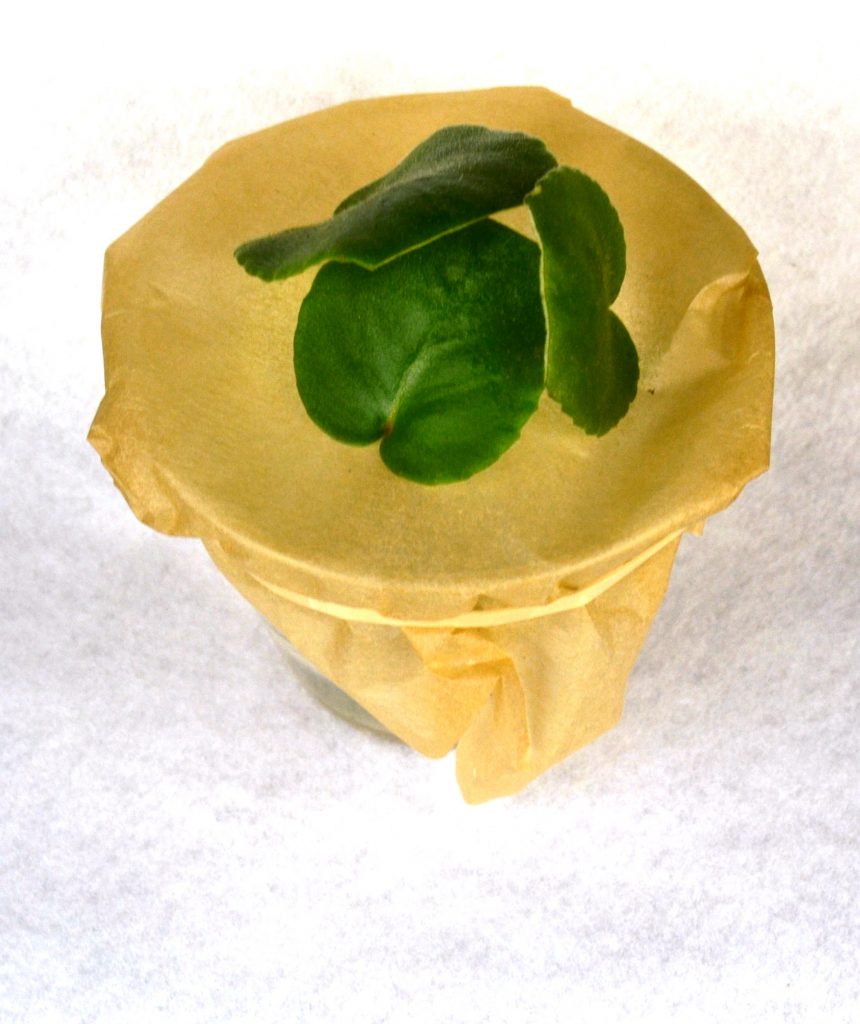
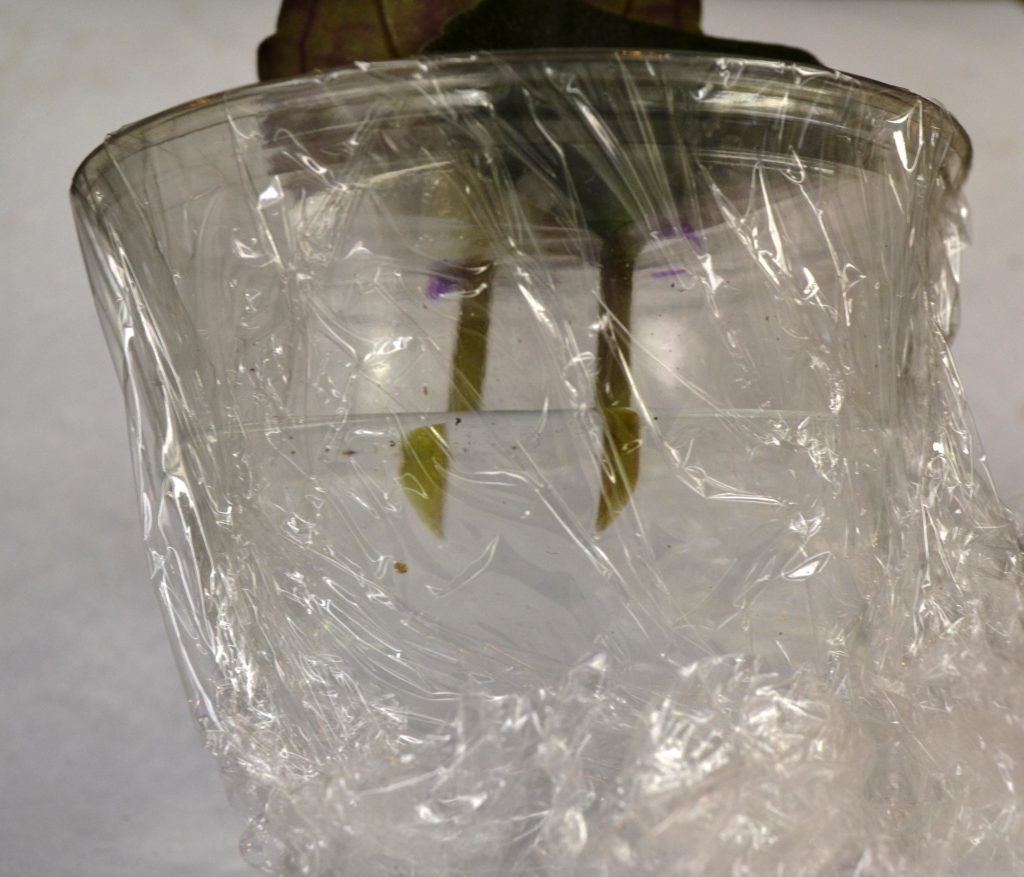
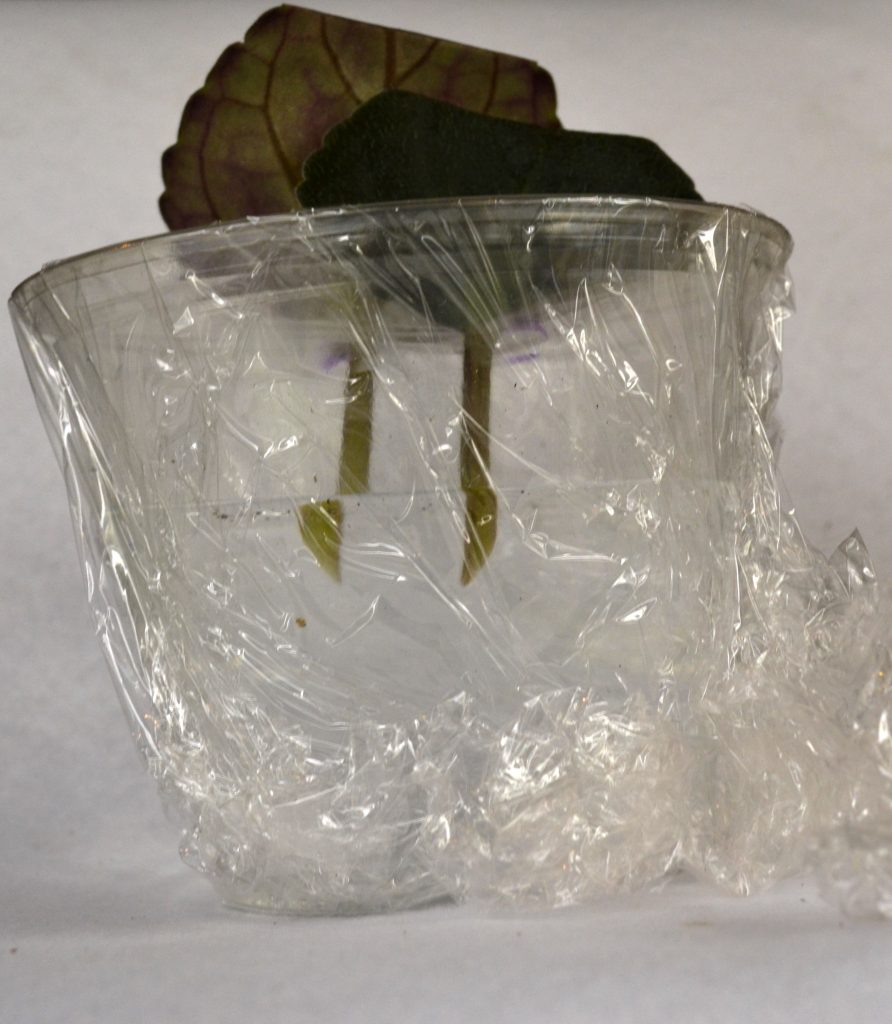
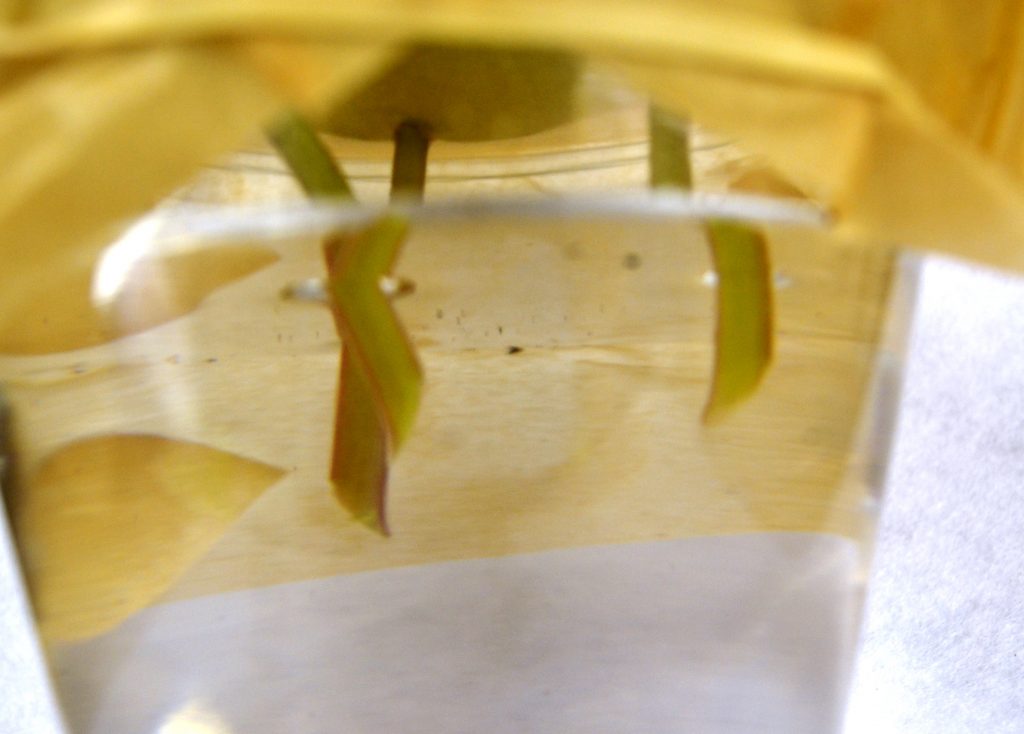
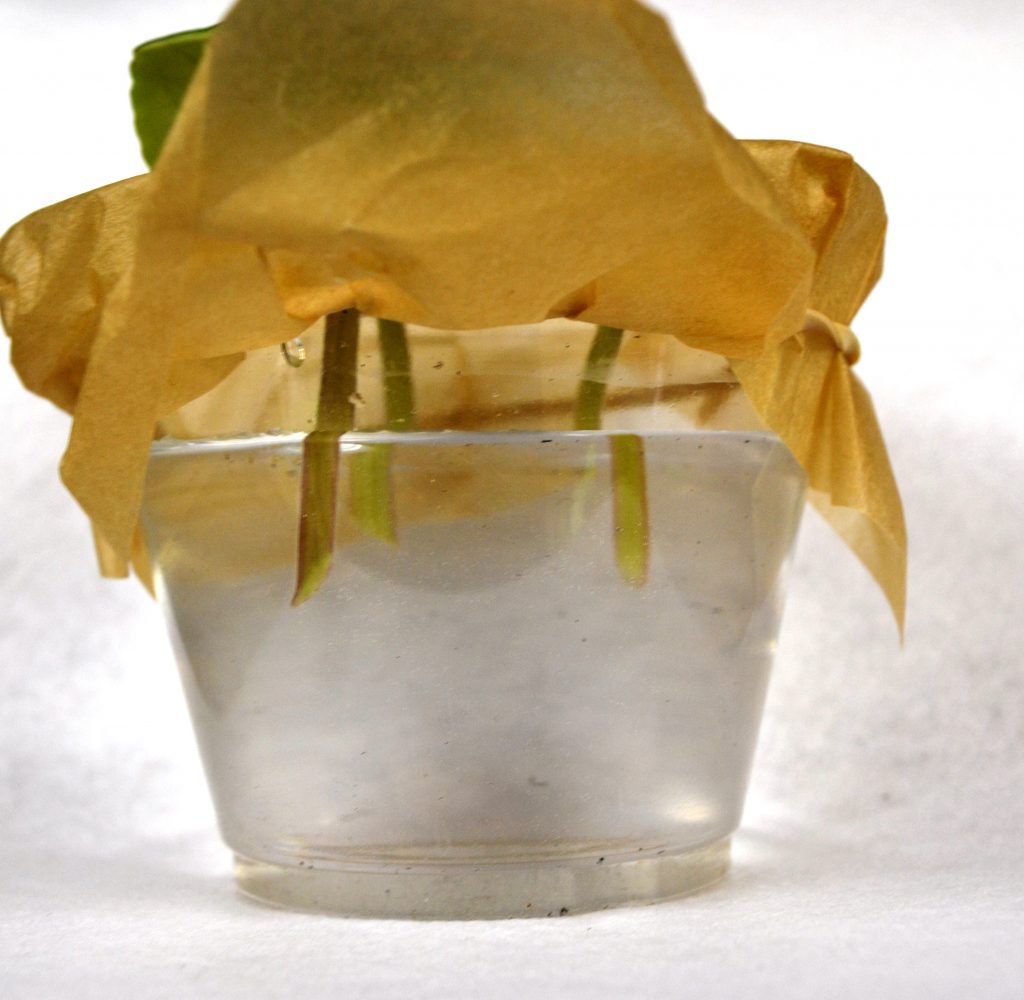
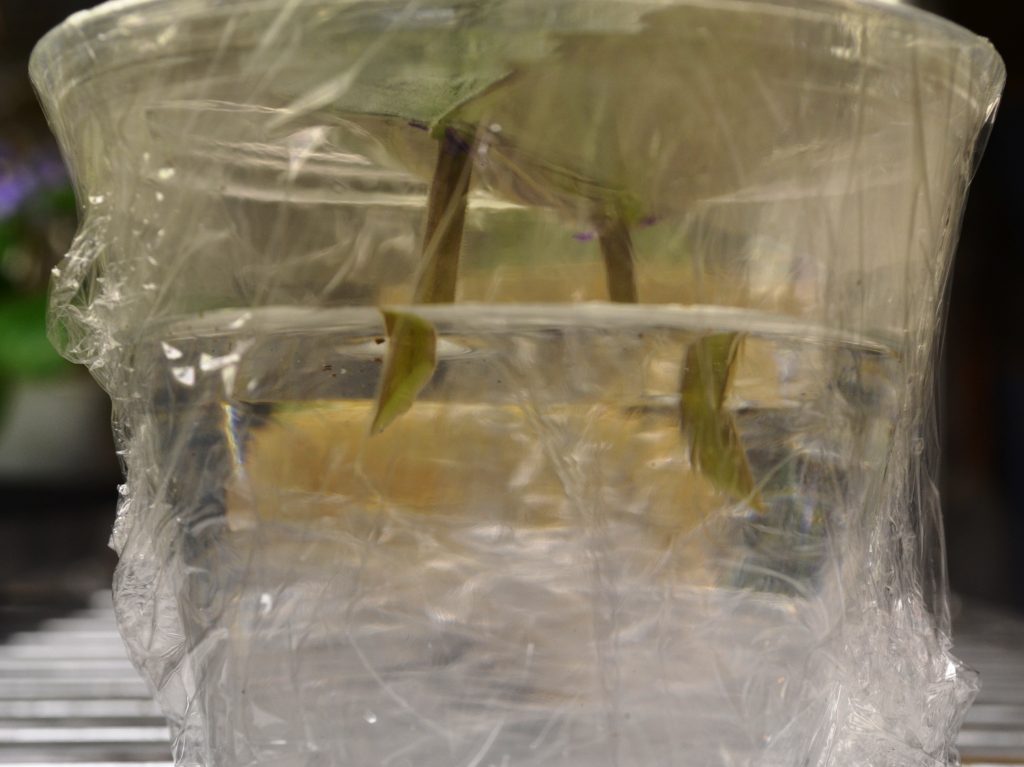
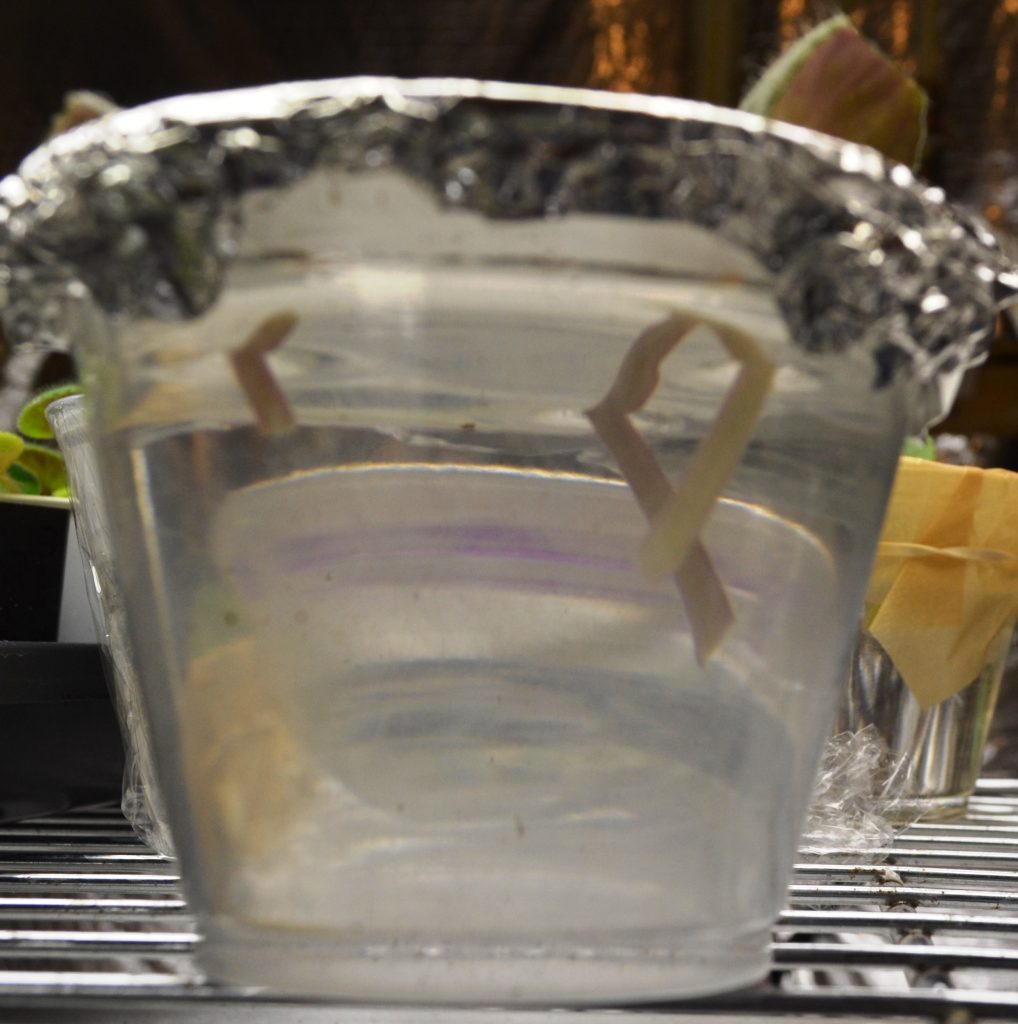
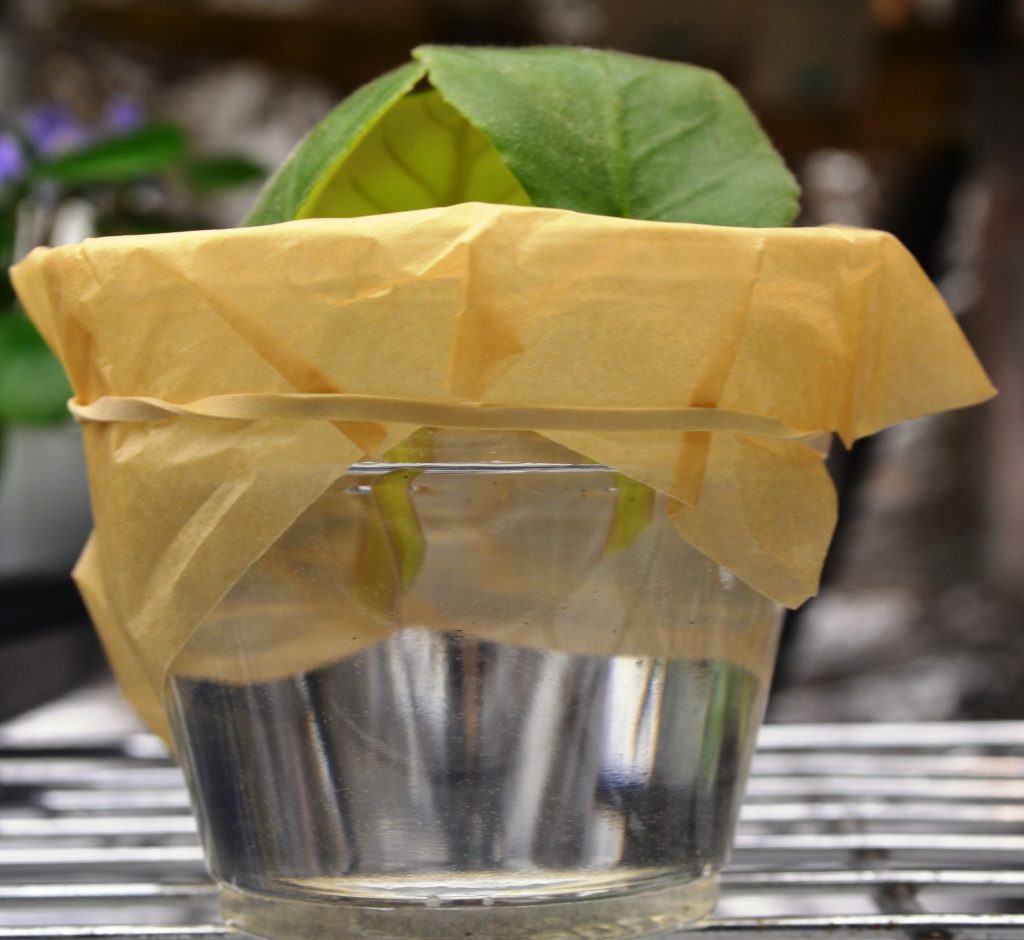
For the container, you can use a glass canning jar / baby food jar, a plastic cup or a small bottle with a narrow opening.
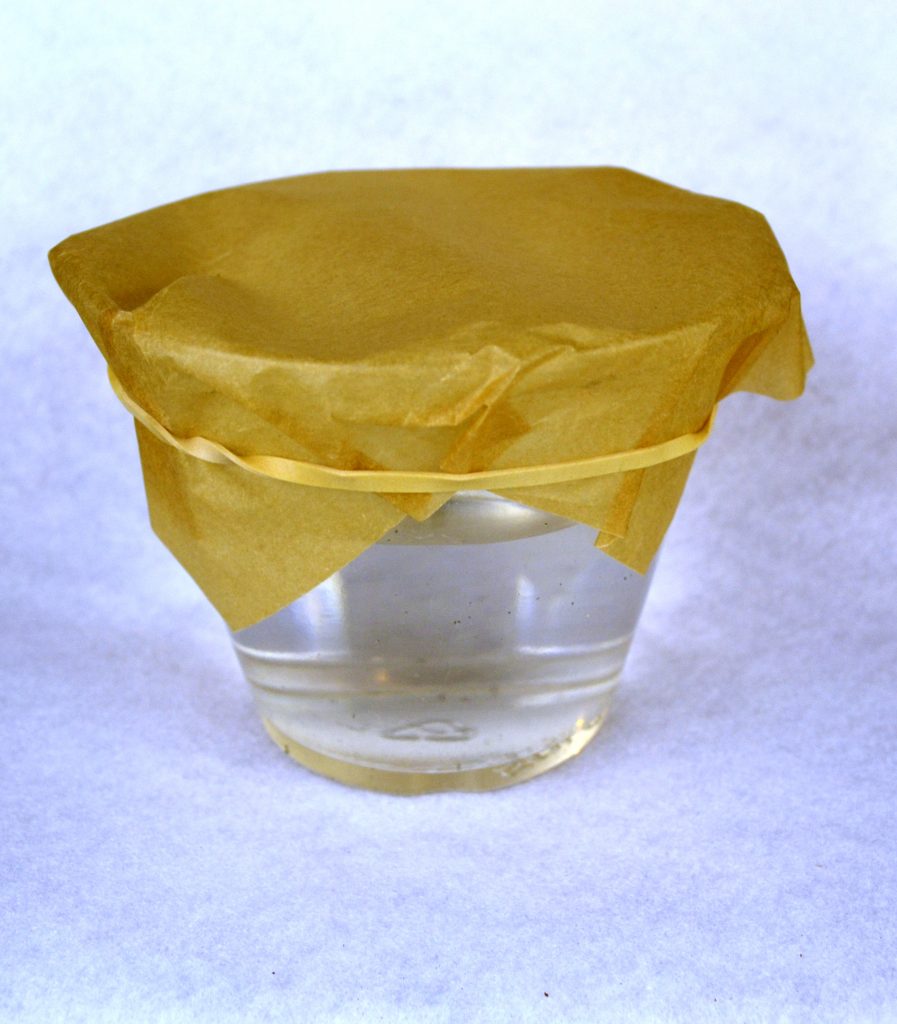
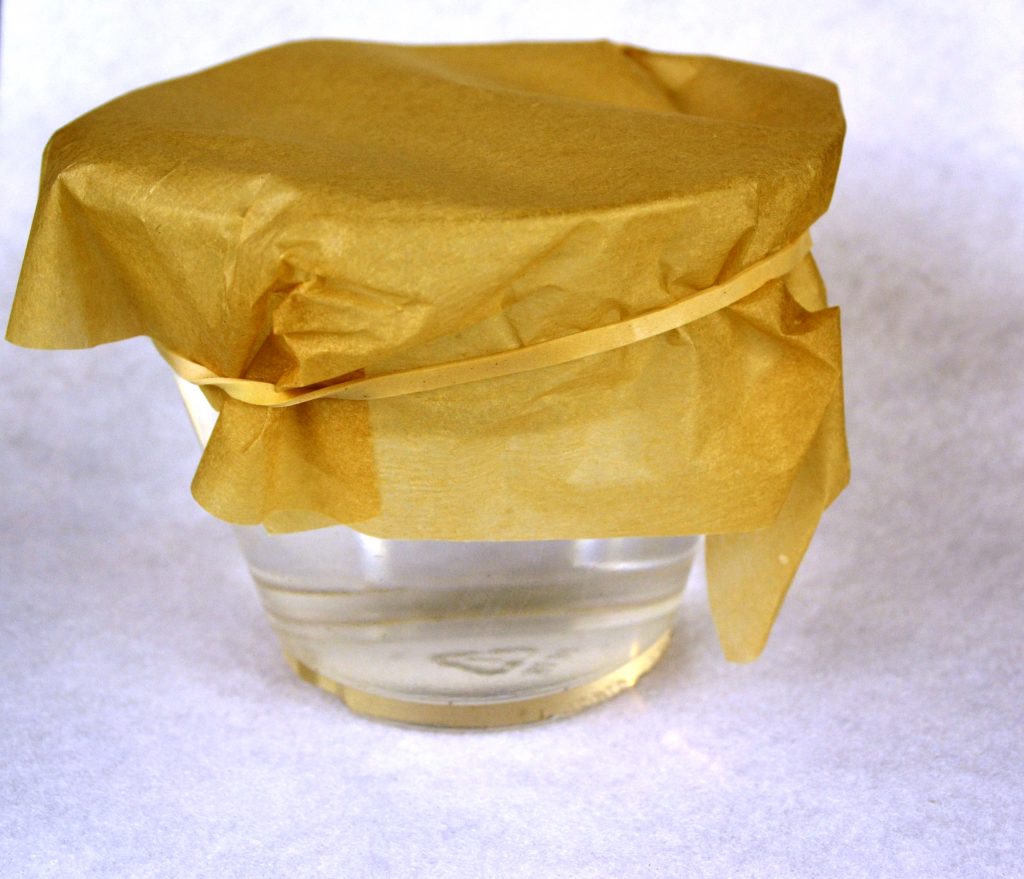
First fill the container with lukewarm (room temperature) water.
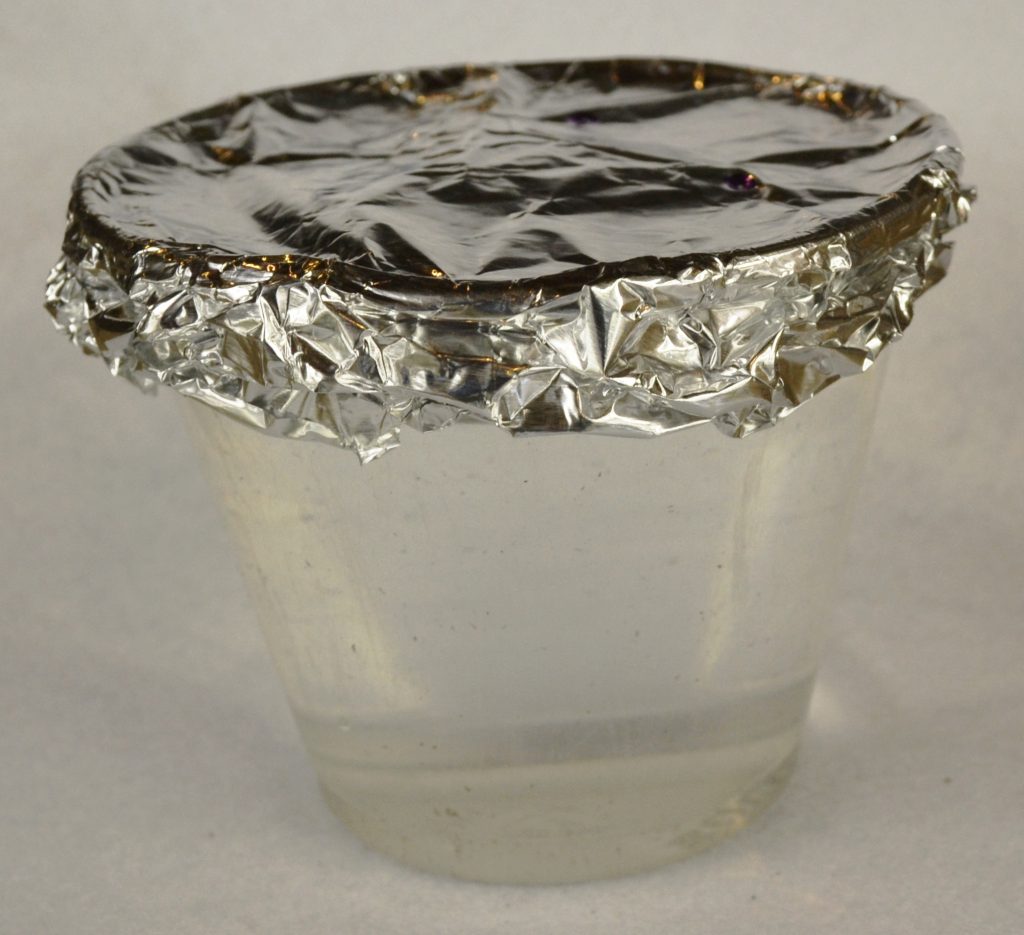
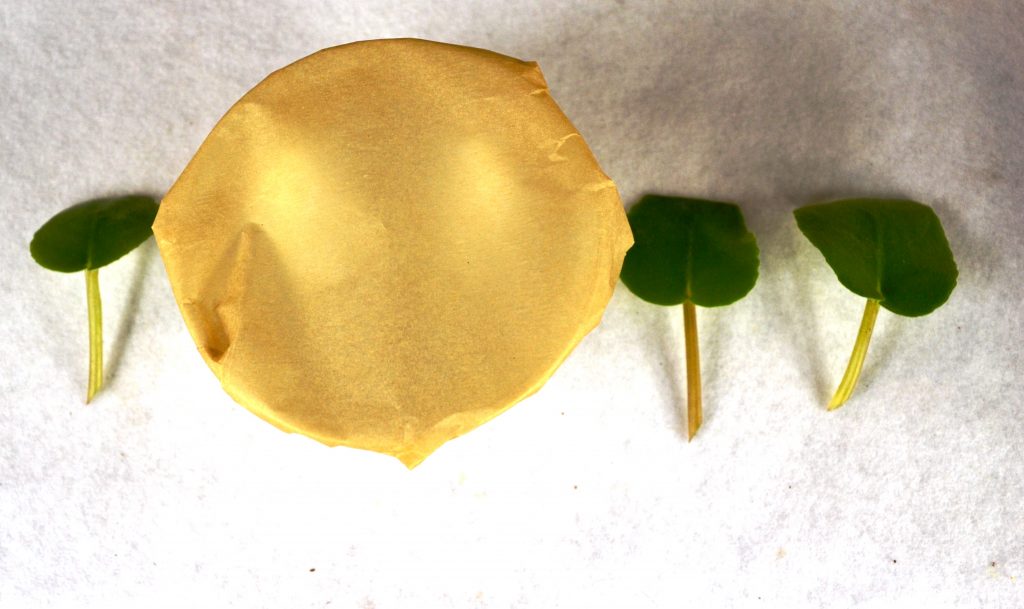
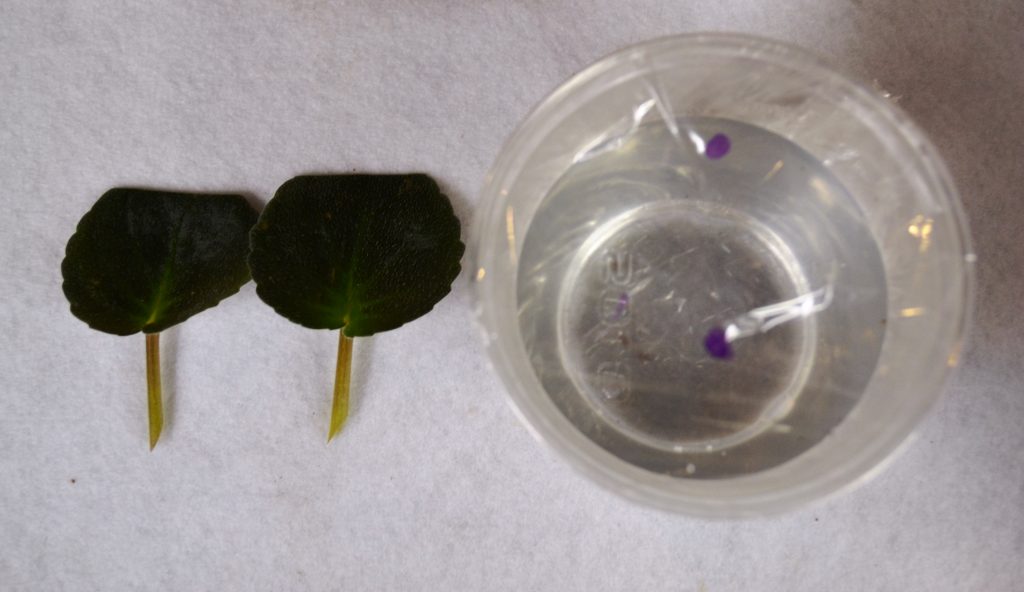
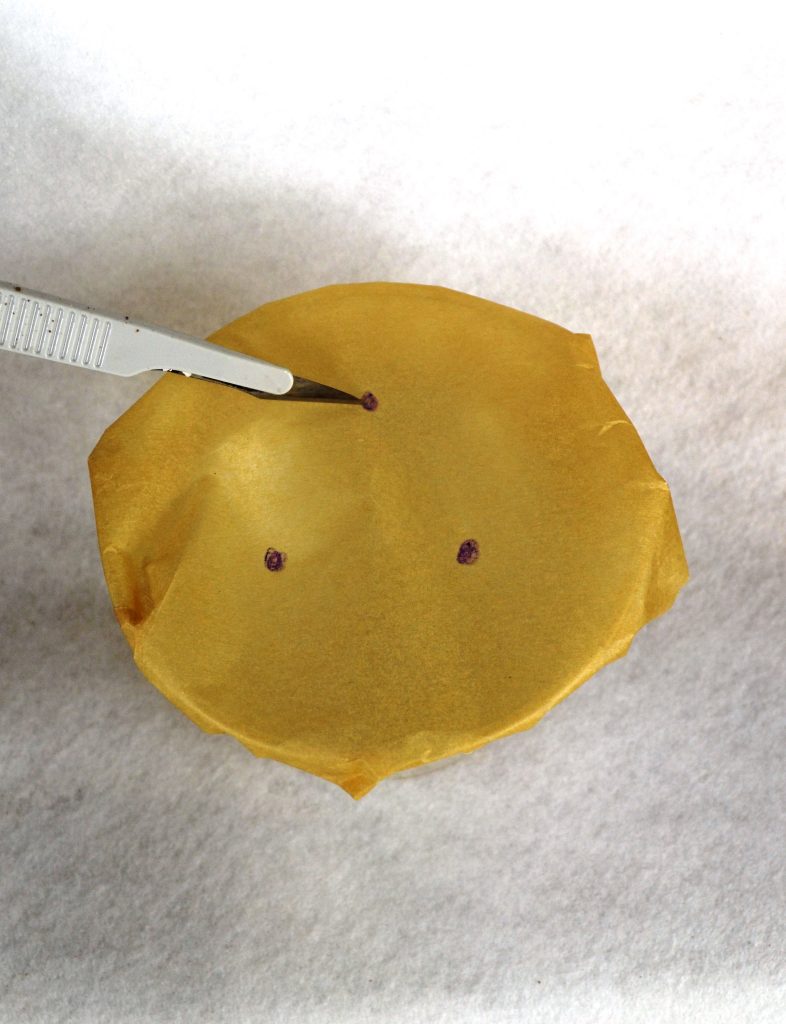
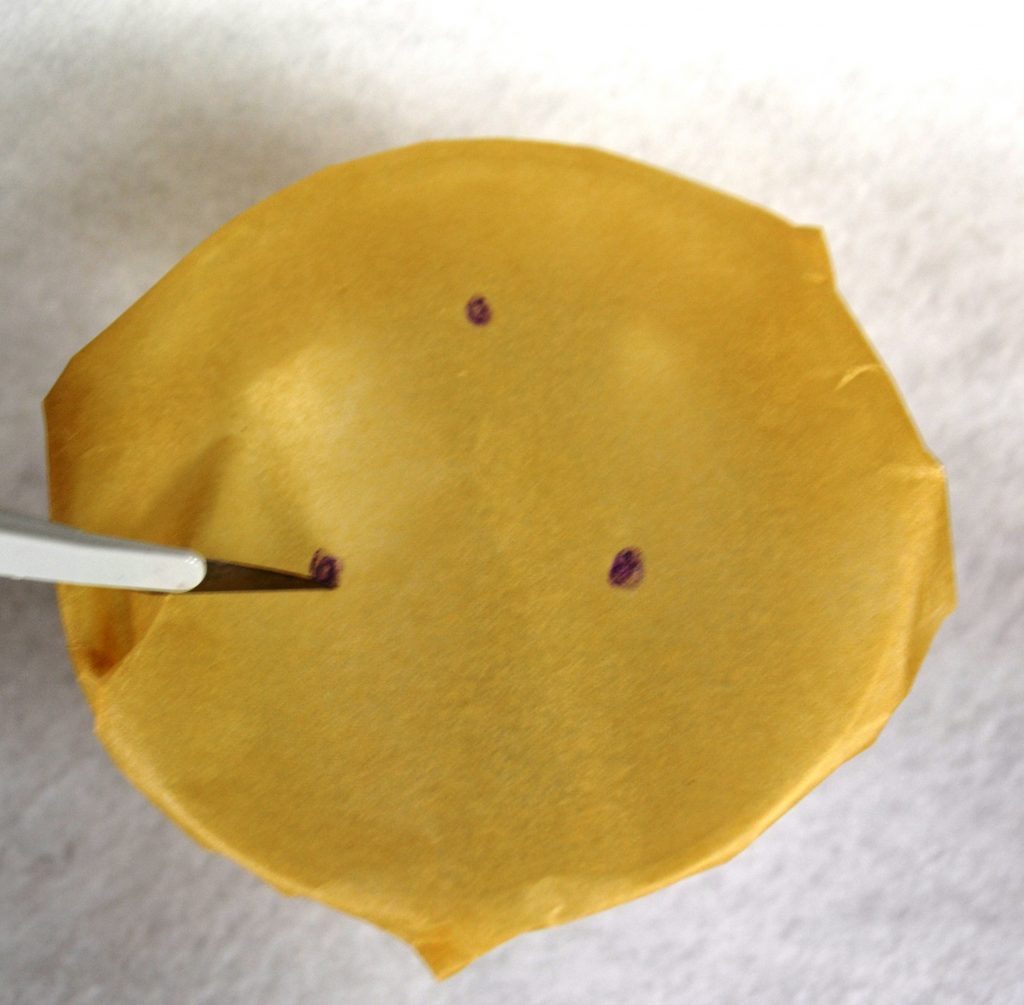
If using parchment paper, you can secure it over the top of the jar with an elastic band or wire tie.
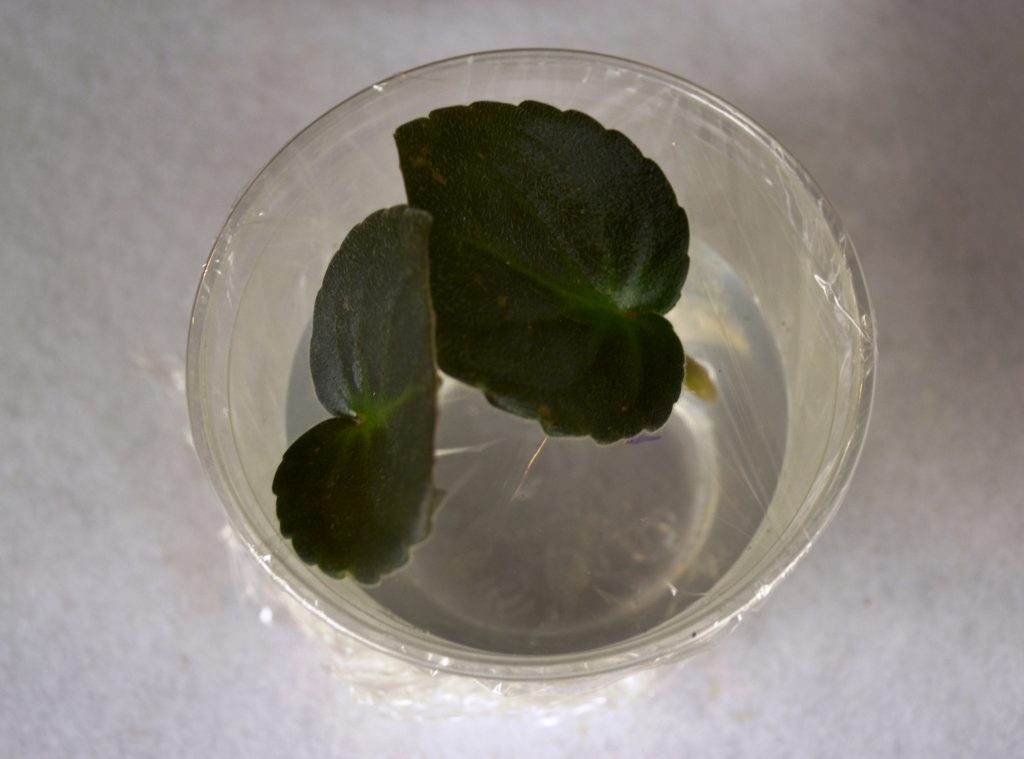
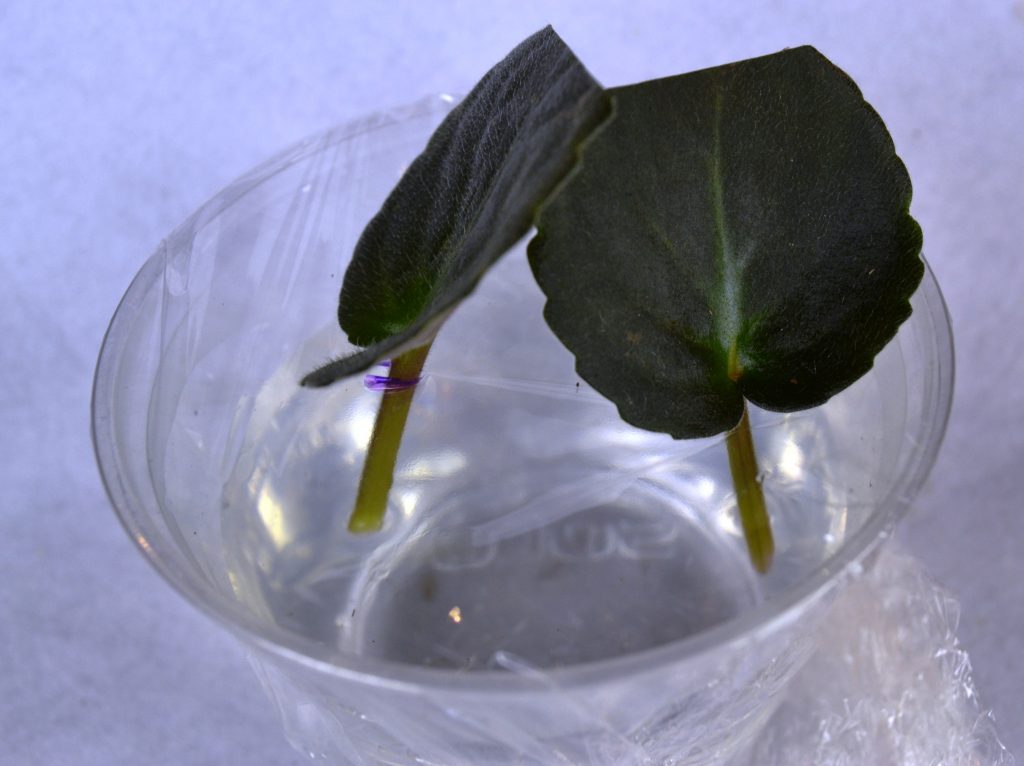
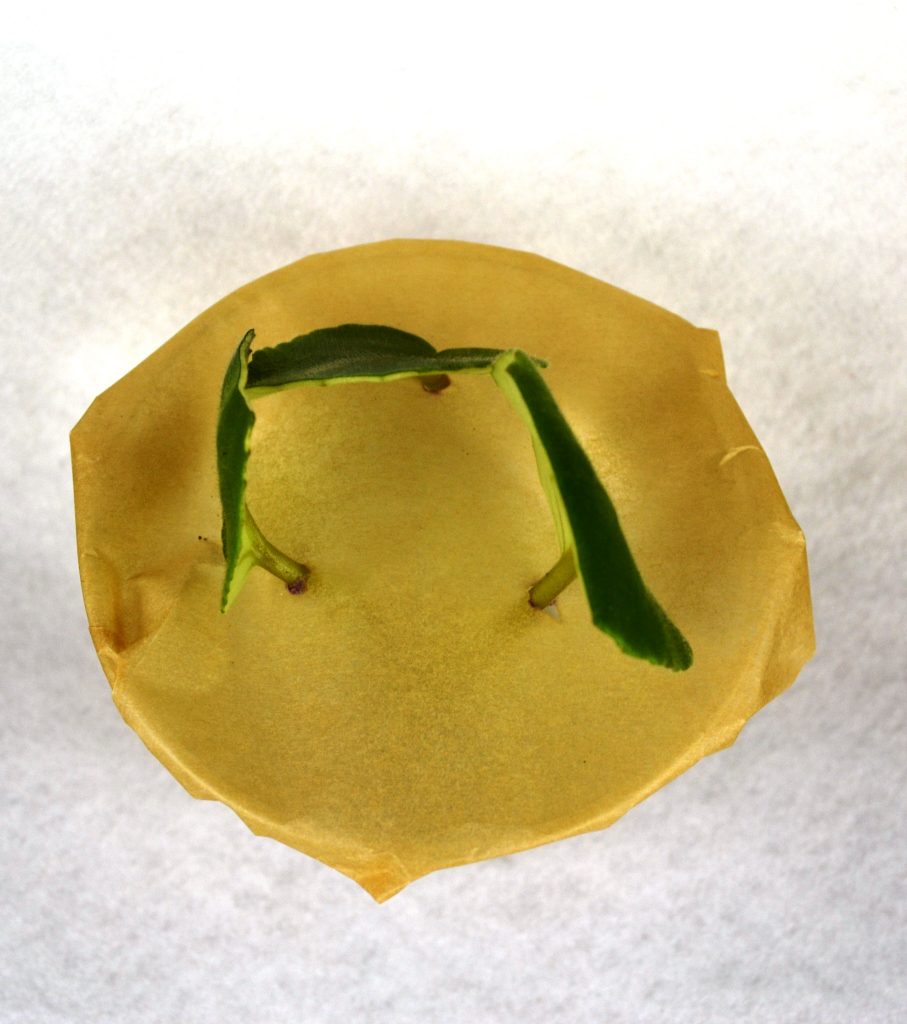
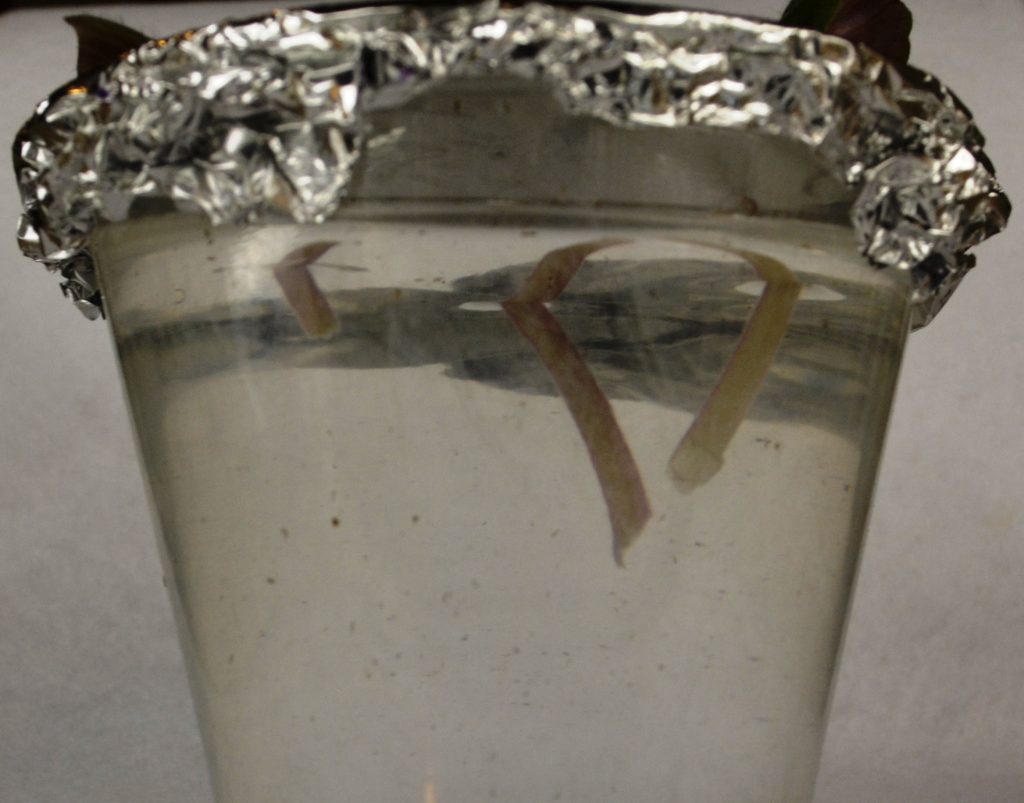
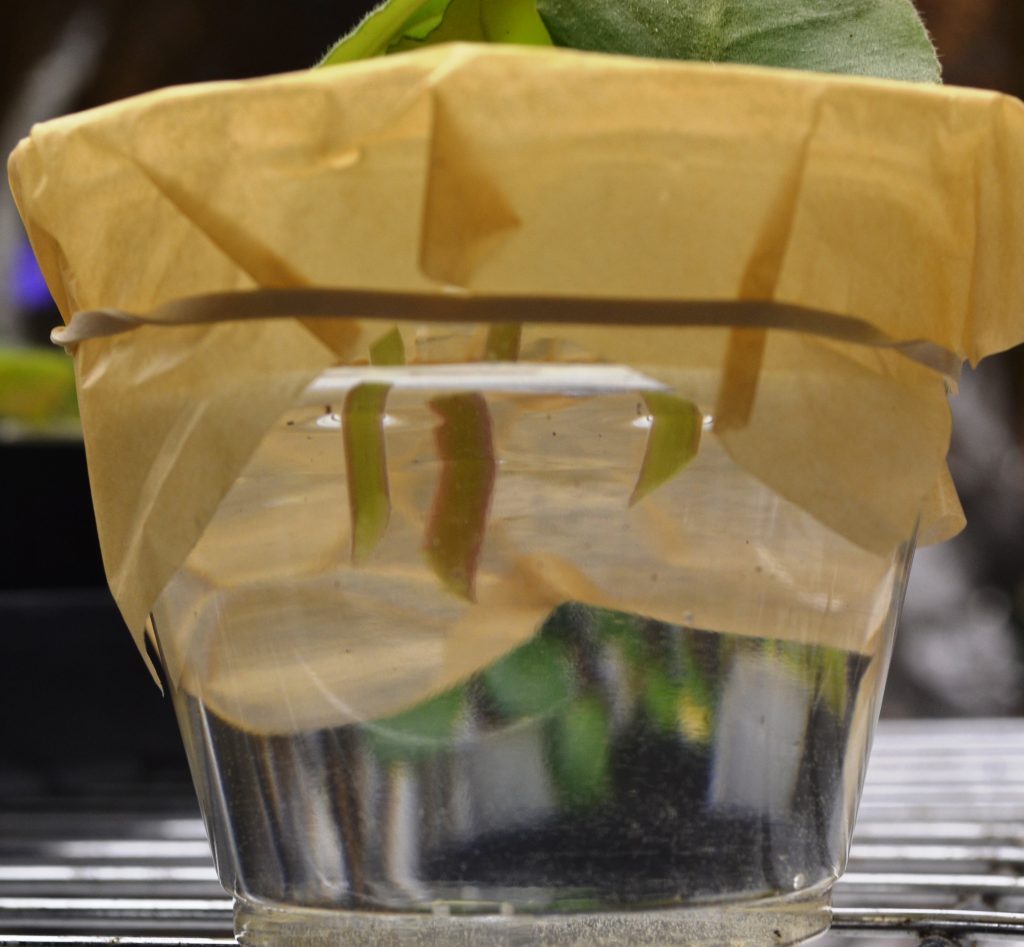
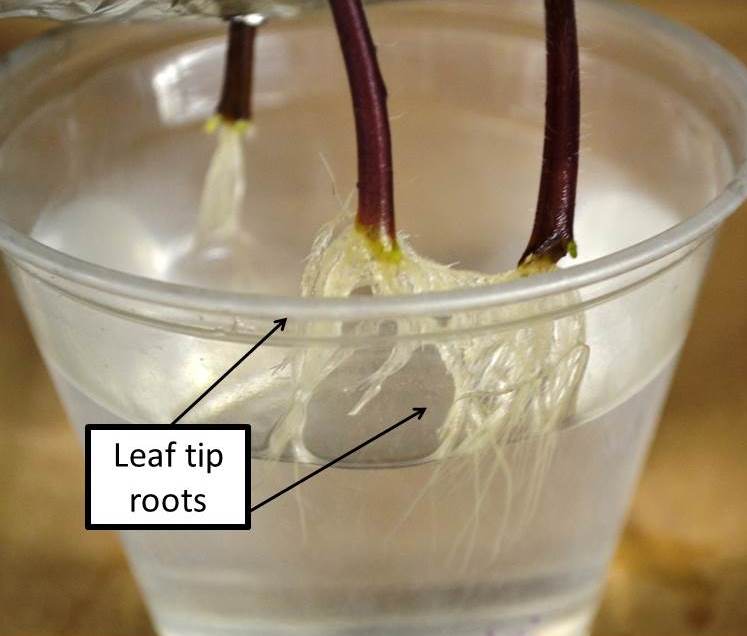
Then poke a small hole in the middle of the saran wrap, foil or parchment paper. The size of the hole, should be enough for the leaf stem to go all the way in the container and the leaf to stay on top.
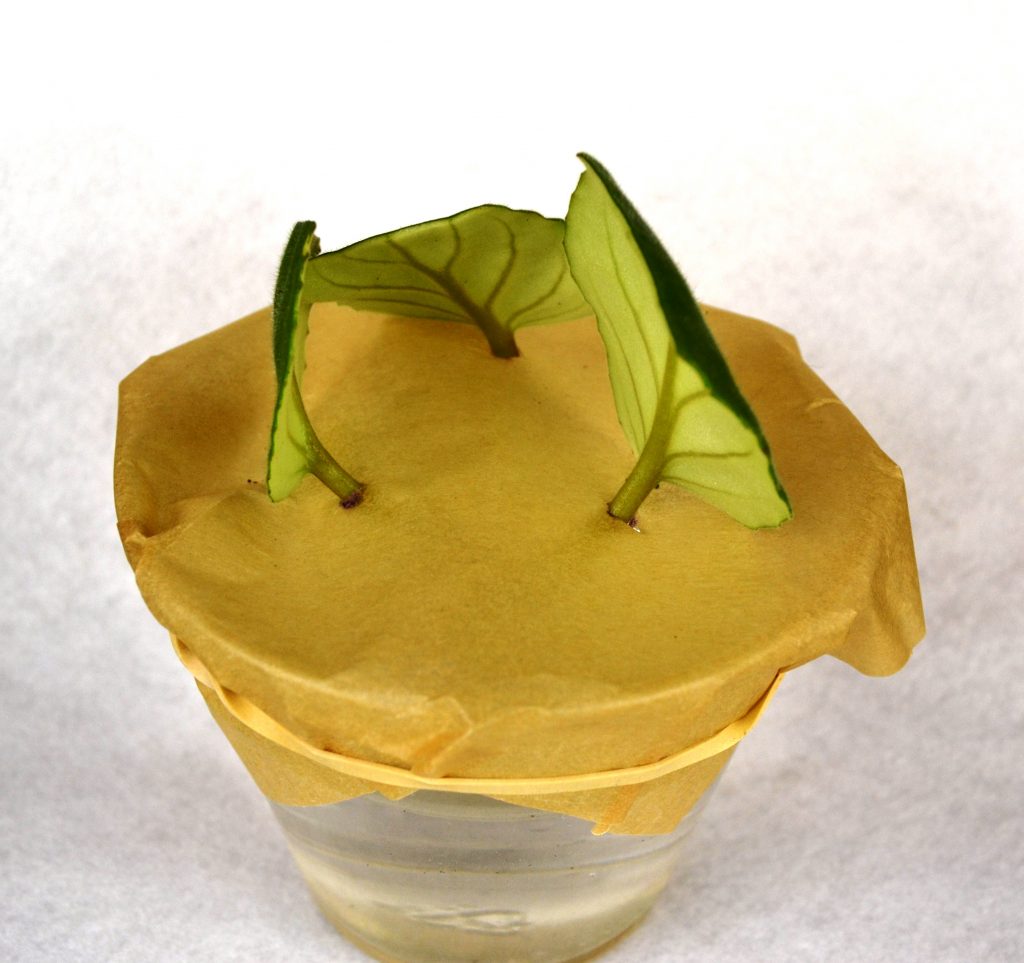
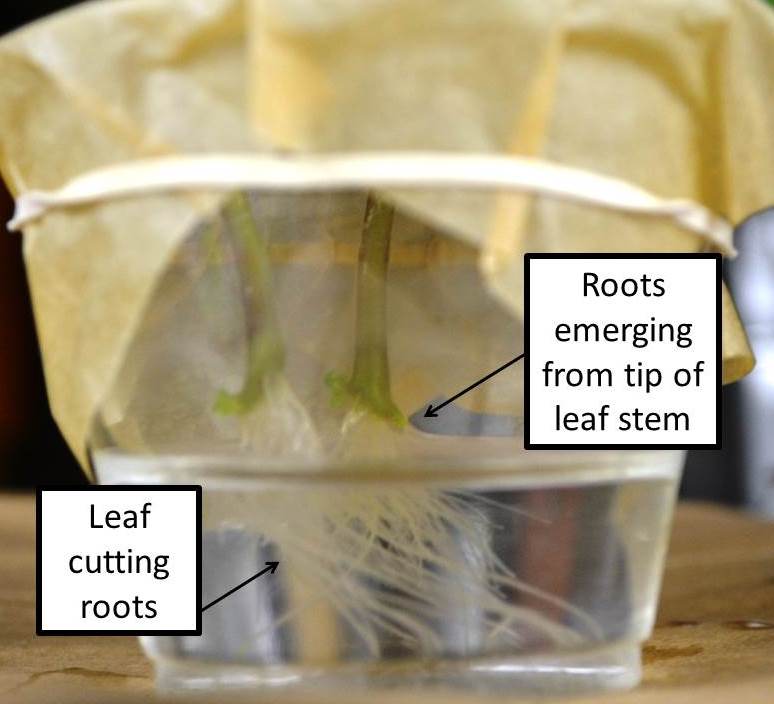
The leaf stem should be submerged in water and
the leaf top should be above water.
Place the container in a bright location
receiving indirect light. If using fluorescent lights, can place on a light
stand receiving minimum 12 hrs. of light each day.
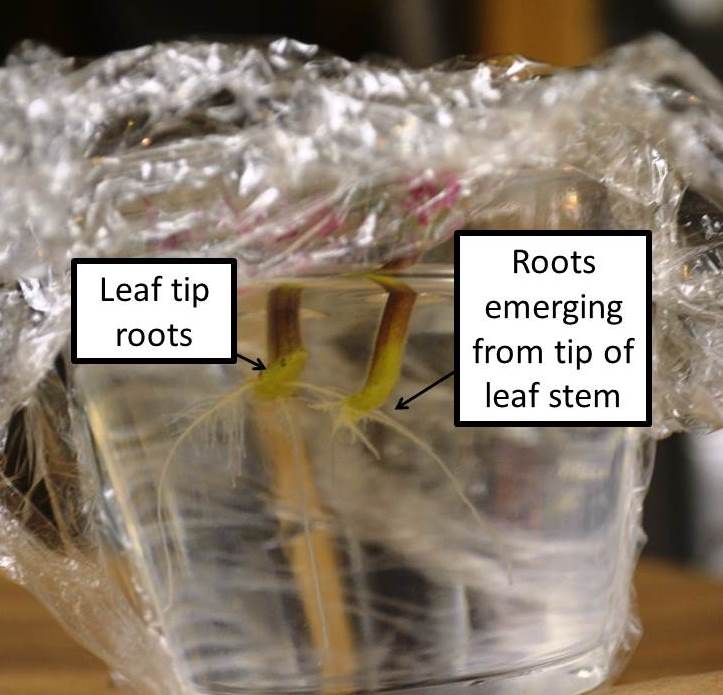
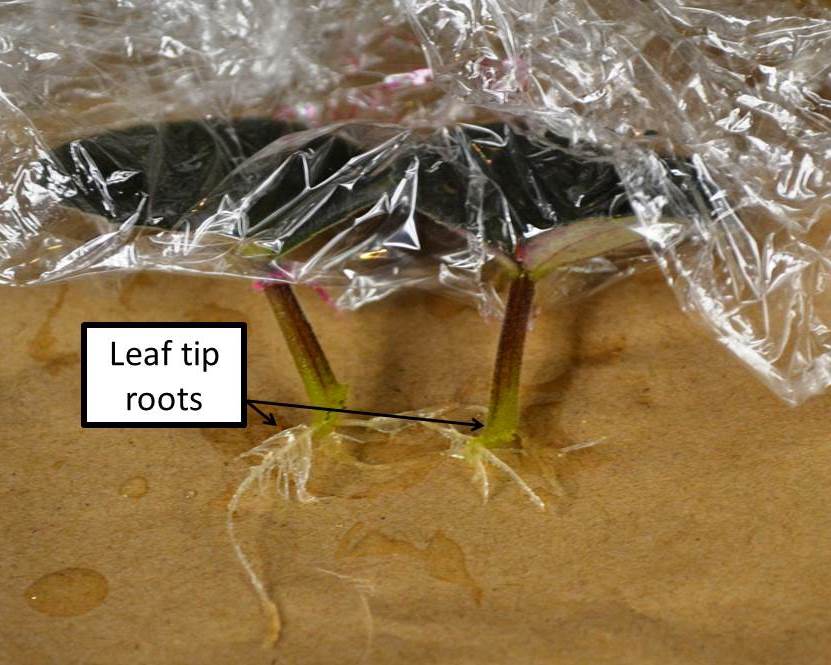
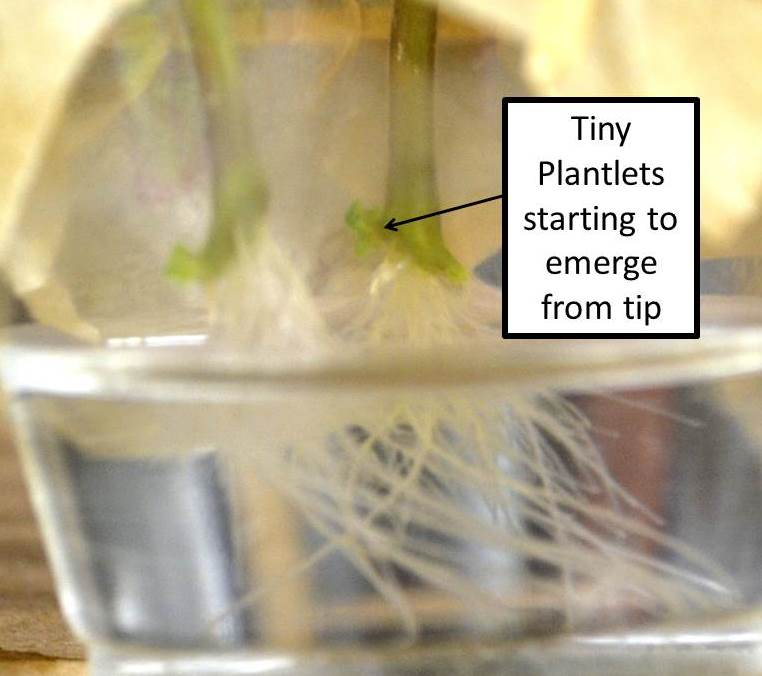
After 3-5 weeks, roots from the tip of the leaf
stem will become visible. This is when you can pot-up the leaves in rooting
soil mix as described above.
How much light do
African Violet leaf cuttings need?
The leaf cutting pots need minimum 12hrs. of
light each day. This can be fluorescent lights or indirect natural light (east
facing window).
The pots should be in a warm area away from any
cold drafts.
The leaf cutting pots should be kept under
consistent light with no major changes until new baby plantlets are seen.
How to water African
Violet leaf cuttings?
Leaf cutting pots in Ziploc baggies or closed containers, do not need to be frequently watered, as long as the humidity is 60-70% inside the bags/cups.
If water droplets are seen inside the bags/cups, then the humidity level is ok and the soil will be damp from this humidity.
If the humidity levels increase and the inside of the Ziploc bags become wet, the soil is consistently wet and water starts to pool at the base of the bag, then it’s time to remove the pot from the bag. Place the pot on a newspaper and allow to sit for 2-3hrs, till excess water is absorbed. The clean out the Ziploc bag, remove the water, wipe the interior dry. Place the pot back into the bag.
If the humidity levels increase and the inside of the cup/container lid becomes wet, the soil is consistently wet and water starts to pool on the inside, then prop open the lid with a plant label or on the edge of the container.
If the soil appears dry to touch and the pot /container is light weight, it is time to water the leaves. Always use lukewarm (room temperature) water.
Below are commercially available humidity – temperature meters. I use the AcuRite meter to measure humidity/temperature.
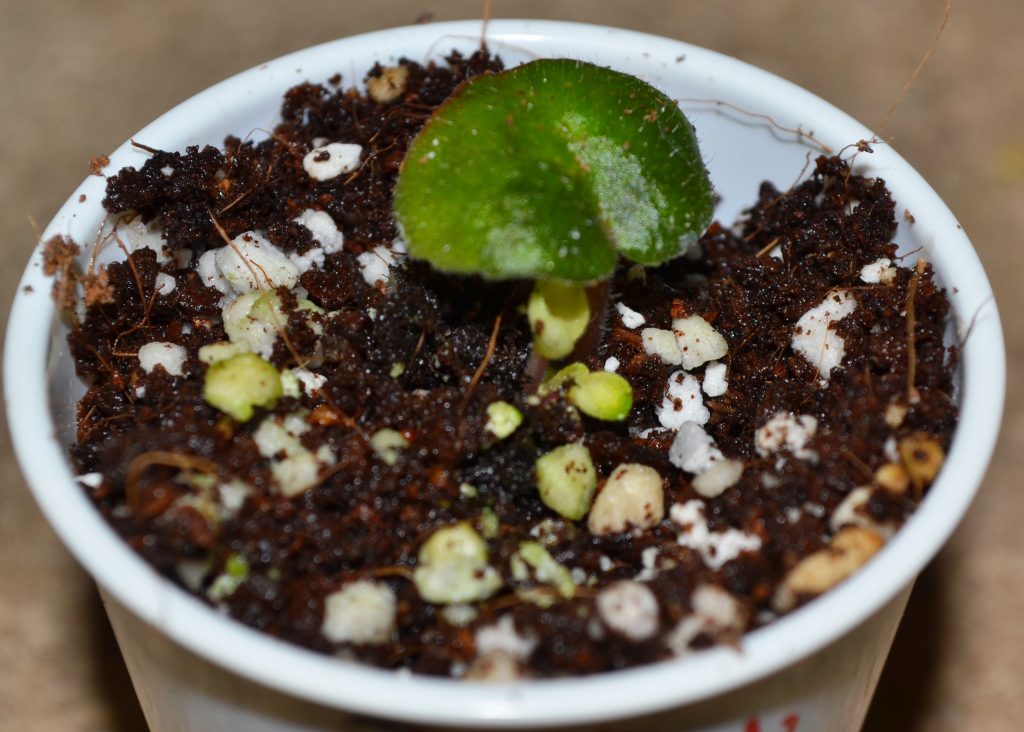
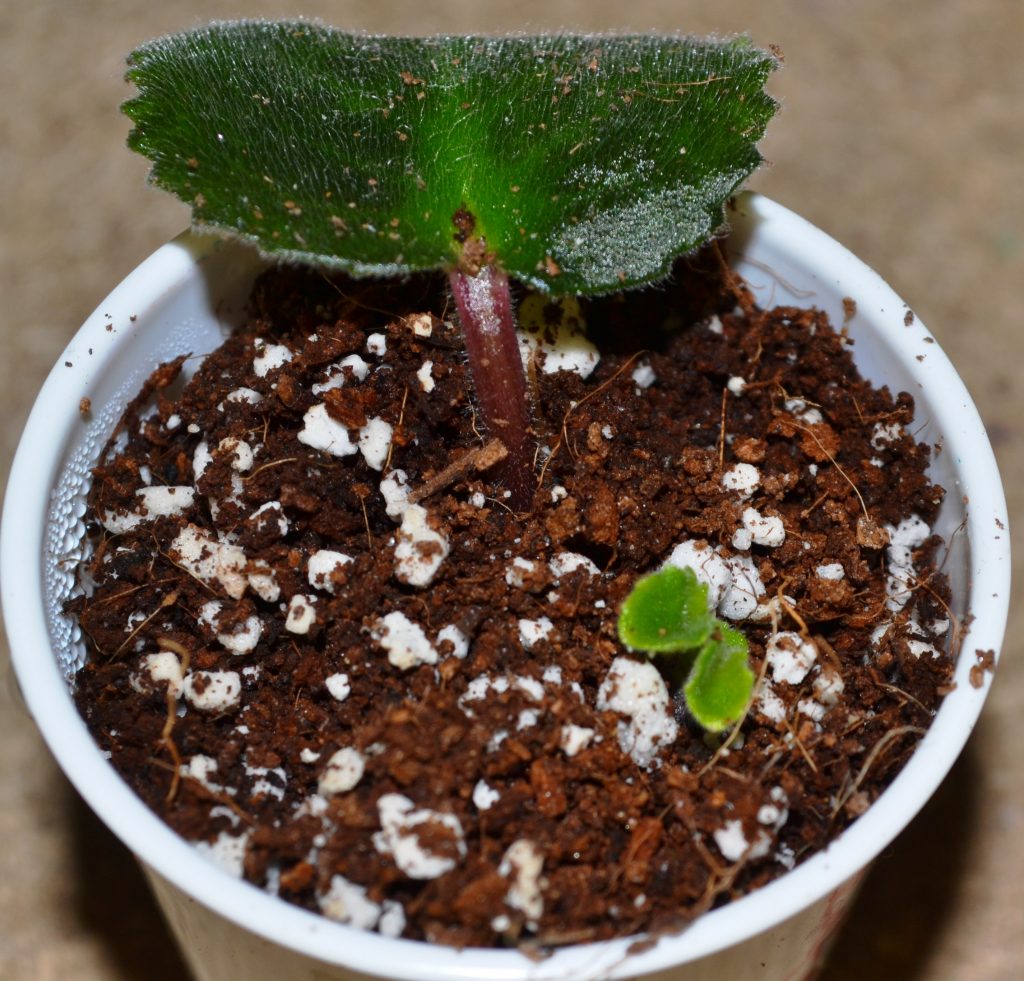
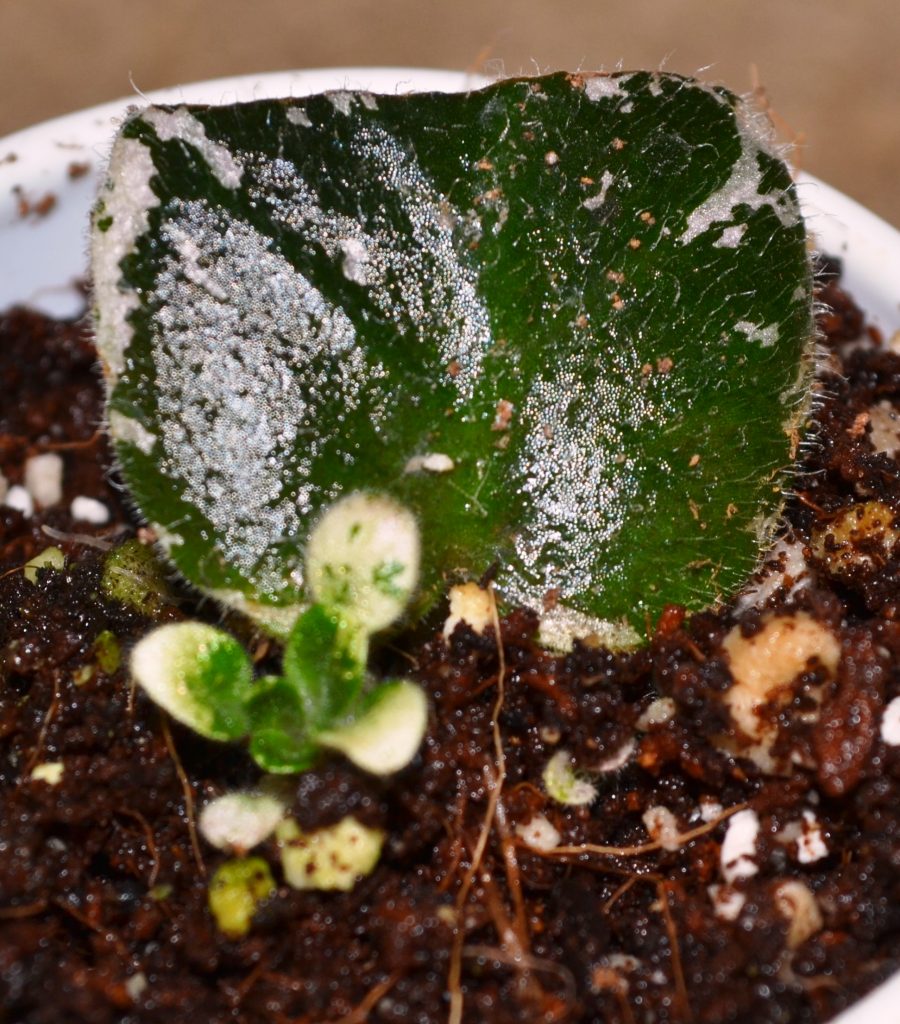
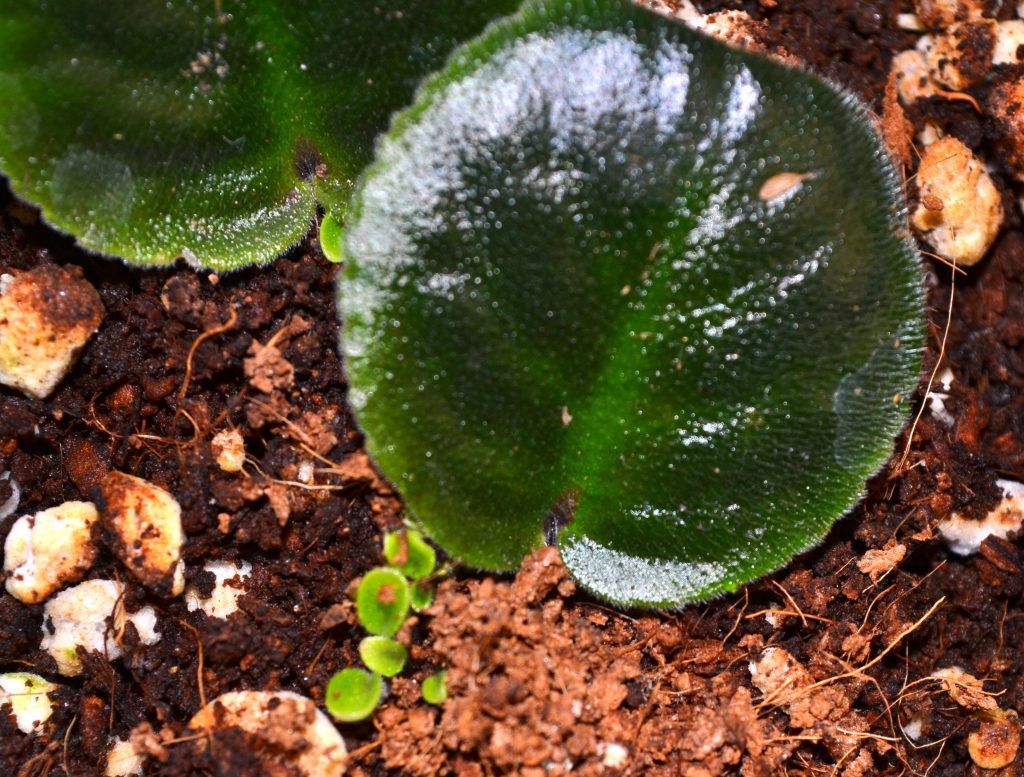
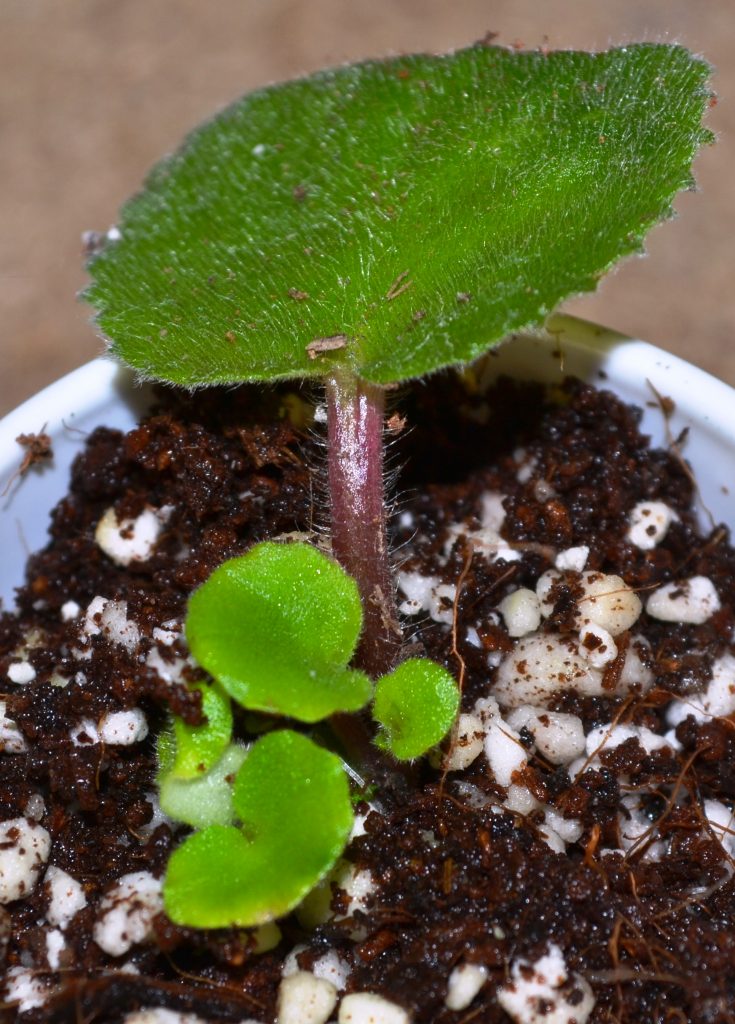
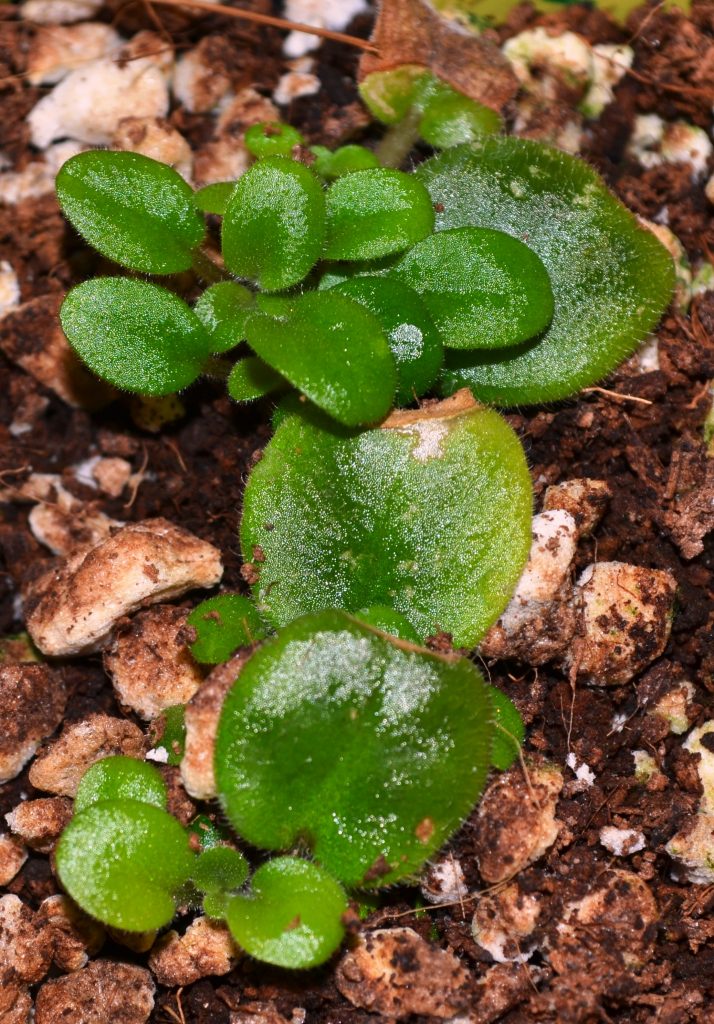
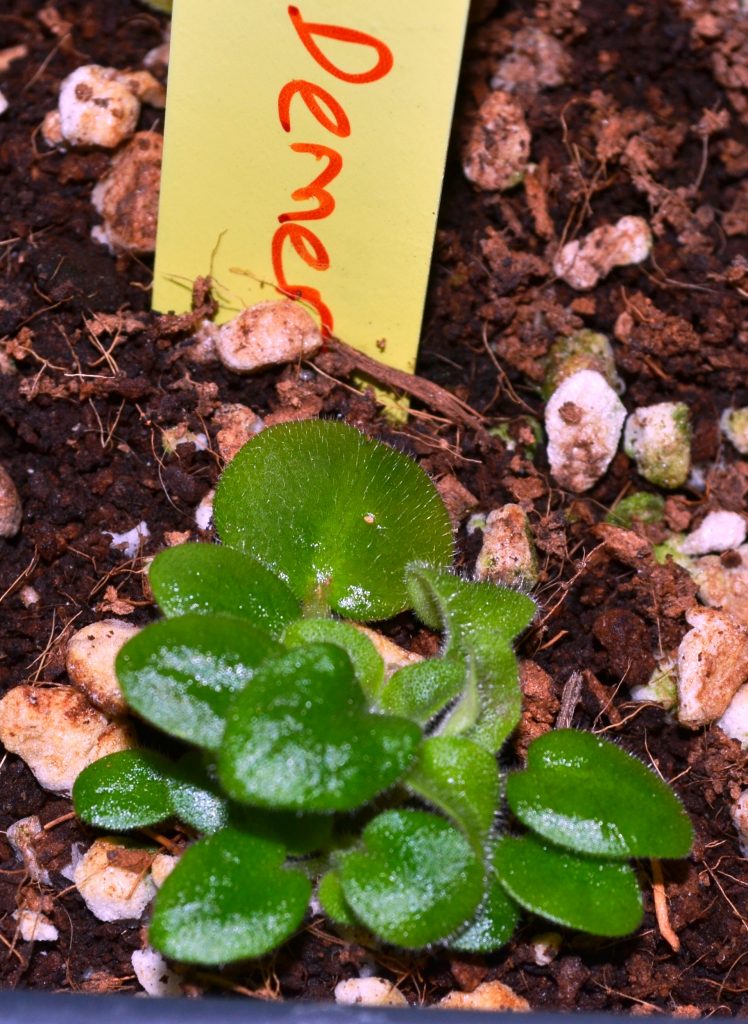
When can you start to
see new growth from African Violet leaf cuttings?
After 3 months you can start to see green growth emerging from the base of the leaf.
As soon as you notice green growth, you can open up the Ziploc bag, still continuing with the same light and watering schedule. The same can be done for leaf cuttings in containers, the lid can be propped up open.
The reason to do this is to gently acclimatize the baby plantlets to the outside environment.
You can also start to fertilize the baby plantlets with a mild fertilizer (dilute 1/4tsp 7-7-7 fertilizer in 1 gallon of water). I would recommend optimara fertilizer (https://amzn.to/3oXUvCB), dilute to 1/8th tsp per gallon.
Examples of commercially available African Violet fertilizers below:
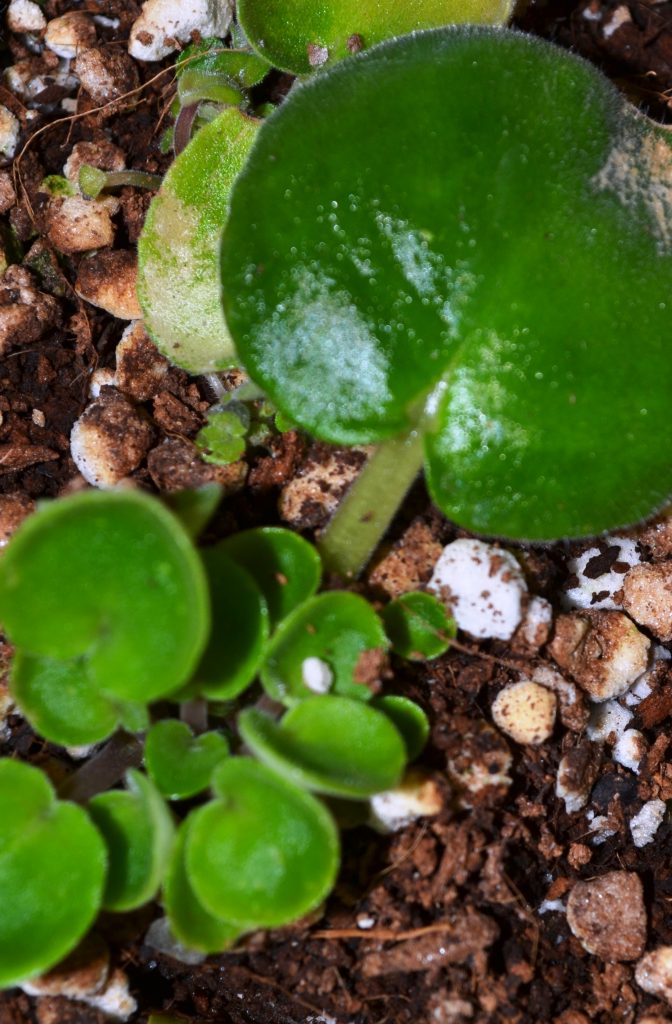
Once the baby plantlets start to grow and become an inch in height, you can remove the pots from the Ziploc bags. Similarly, for leaf cuttings in containers, you can remove the lid and keep the containers open.
This should help the baby plantlets to harden off and become comfortable at the temperature and humidity levels in your plant area.
Examples of self watering pots for African Violet plants as shown below:
*Our Affiliate Programs: We are a participant in the Amazon Services LLC Associates Program, an affiliate advertising program designed to provide a means for us to earn fees by linking to Amazon.com and affiliated sites. Though we do link to many items on Amazon out of convenience to our readers, we do also participate in other affiliate programs that also pay us a commission for any purchases you might make through our links (at no additional cost to you!).
Like this article?
Share on Facebook
Share on Twitter
Share on Linkdin
Share on Pinterest
babyviolets
Leave a comment
76 Responses
Perfect explanation, I learned a lot, now I can start babysitting my violets. Thank you so much!
does it help propagation if a grow light (red & blue) is used on the newly planted leaves when using the dirt method or the water method. I have both going with the some variety to see which does better. Just not sure about he light.
Thanks
Hello Betsy,
Thank you for your question. A balance of red/blue light would work well for leaves. However, if you can adjust the red/blue and only have blue output initially, that would help the root and leaf growth. Then once you see new growth from the leaves, you can slowly switch back to red/blue. I personally have not done this myself. I use my 4ft (homedepot.sjv.io/KM517) or 3ft (homedepot.sjv.io/4vVb0) LED shoplight for my baby plantlets, they seem to be doing well. For my leaves, I use regular fluorescent shoplights. Let me know how your experiment goes, if you see any difference.
regards,
BV
Hello Mary, thank you for your question. My LED lights are 9-12 inches from the top of my plants. Some people, do change the distance of the plant, depending upon whether you are growing a standard, semi-mini or trailer plants. I do not do that, I keep the distance same. Usually, for standard plants can keep distance 10-12″ from top of plant, for semi-miniature plants 6-8″ above top of plant and for trailers can keep 8-9″ above top of plant. If you have fluorescent lights, I would recommend, 8″-10″ from top of plant. Hope this helps, regards, BV
Hello! Thank you for helping me get new violet plants from a plant that was knocked over and broke several leaves off. I have 4 sets of “babies” as I call them. My question is what do I do with the single adult leaf after the babies are well established? It looks a little awkward.
Thank you!
Hello Cindy,
Thank you for your question. Glad to hear the babies are doing well. You can keep the leaf on the babies, till the babies grow bigger in size. Sometimes the leaf will dry up or rot, by the time the babies are bigger, that’s ok too. If the leaf is still there and your babies are bigger, you can discard the leaf. However, if you would like more babies, you can slice off the top a little and then repot the leaf. You can get more babies, it may take longer, since the leaf is now older. Hope this helps.
regards,
BV
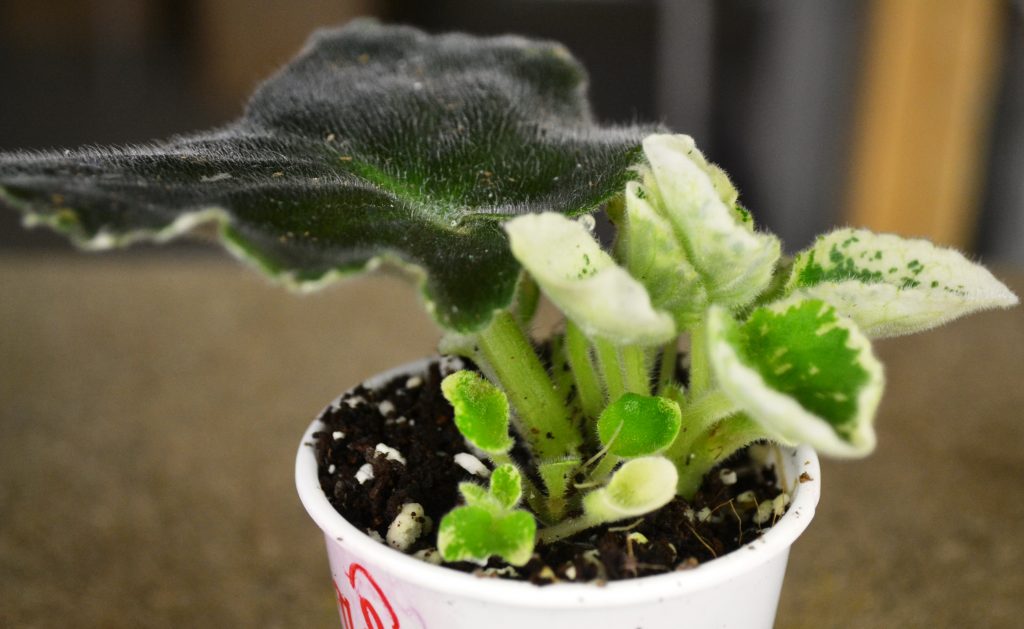
Hi Cathy,
Thank you for your question. Variegation is a genetic mutation and are passed down through generations. So yes, the yellow or white leaves will turn green over time. Yes, the white leaves can produce green babies with variegation. When you first propagate violets from a green variegated leaf, if the babies are yellow/white in color, wait till the leaves are bigger and they develop green in the leaves. This will make it easier for the baby to survive, once its separated. Hope this helps, BV.
This is what I needed to know and have looked and looked for an answer to. Thank you so much as I wasn’t sure if I should be fertilizing these anemic looking babies or what to do.
I want to add that this is the best information that exists on the web regarding propagation of African Violets. You have a gift in your ability to communicate.
Thank you so much for your kind words, I really appreciate it. I am happy to hear you found the article useful. Hopefully I will be able to keep on writing more and coming up new articles.
regards,
BV
This information about the white babies is what I have been searching for forever. Thanks so much. I wasn’t sure if they needed fertilizer or what to do. Also I want to say this is the best information for the newbie that I have ever seen on propagation. You’re ability to communicate is a gift. Thanks for sharing it with us.
How often should I check the incubating leafs for proper moisture when in a closed container. I have not seen any condensation inside the clear container ..
Hello Deborah,
thank you for your question. If you see no condensation, then you can check to see if the soil seems dry visually or dry to touch. If it is then you can go ahead and give it some water. Sometimes if the soil is dry, the leaf will be slightly limp or wilted. Make sure to check at least once a week for dryness. Especially if you dont see condensation. Hope this helps, regards, BV
I am wondering why my perlite turns green after a short period of time following planting leaves. I assume this is either Choriphil or algae? Am I doing something wrong?
Hello Carole,
Yes you are correct, perlite turning green is the algae. This can occur when the humidity and moisture in your plant area is high. Nothing to worry about, this is normal. BV
Great to see the detail description about the propagation. Have already bookmarked your page. A quick question about the water propagation method, when will we decide the rooting system is healthy enough to put it back to the soil? Anything that we have to take extra care while moving the environment from water to soil?
Hello,
thank you for your question. As long as the roots are at least 1 – 2 inches in length and they seem to a thick bunch, that should be enough to put in soil. If they have tiny baby plantlets on them, then they are absolutely ready to be in soil, you can plant the stem with babies 1 inch inside the soil, can gently cover babies with soil, do not pack the soil, the babies will grow out on top from beneath soil. When moving the rooted leaf from water to soil, use a small pot, around 2″, make sure the soil mix is light with at least 50% perlite and plant the rooted stem at least 1 inch or more inside the soil. Do not water too much at first, keep the soil lightly watered to avoid rotting the leaf. Hope this helps, regards, BV
THANK YOU‼️
I have been reading & reading any articles I could find, trying to get a simple, clear answer to “How long should the roots be, before removing the stem from the water & planting it in a pot?”!
You are the only one who clarified that for me❣️
I’ve propagated several leaves in potting mix, but this is my first experience trying it in water!
Thank you, again❣️
Was wondering how long it would take? I have two leaves in soil for close to 3 months both have roots. You answered it perfectly. Thanks so much this will help..
A couple of my Violets leaves are showing a peach/orange color on the leaves, almost like a blush from the stem towards the leaf tip. I can’t find anything on this. One of the Violets is a Cabbage Patch and I don’t believe it is a natural coloring and not all the leaves have it. I ordered this plant online and it did not arrive in very good condition as it had soiled spilled all over the leaves and I didn’t think it would survive but I cleaned it up and babied it along and then I finally just planted a couple of the best leaves and now have this baby that has about 6 leaves. The original plant developed powdery mildrew and I treated that with a cinnamon water spray and later tried Neem Oil, but not sure if either of those could have caused this miscoloring in my baby plant. Any ideas?
Hello Carole,
thank you for your message. The orange color, could be left over fertilizer salts or over fertilization. Once the soil dries out, put a clear saucer under your pot, you can pour water into the soil from the top and if the drained water is dark brown/ orange in color, it could be excess fertilizer salts. Yes, brown /rust colored spots, can occur, if the neem oil droplets were large, left sitting on the leaves and under bright lights. For now, since it just has 6 leaves, I would recommend, putting it into a ziploc baggie and sealing it up. Keep in a nice place with indirect bright light and leave it for 1-2 months. If condensation starts to develop or the soil looks really wet, can open up the bag and allow soil to dry out a little, before closing it up again. Hope this helps,
regards,
BV
Hello Victoria,
thank you for your question. The main reason for leaves rotting, is too compact soil. Is your soil just peat moss? or full of dirt? It needs perlite in it, to give it a lighter feel and allow for water drainage. When too much water is reserved in the soil, it can lead to leaf rotting. I would suggest to mix coarse perlite with your soil. This is the perlite I would recommend https://amzn.to/35qowUf. The perlite comes in a huge bag, can try to find a smaller bag or this one will last you a few years. If your soil already has perlite, then try to water less frequently. If your leaf pot is in a enclosed ziploc bag, then condensation might be developing inside the bag, causing the soil to always remain wet. You can open up the bag, whenever you see water droplets inside, allow the soil to dry out a little, can wipe the water droplets with a napkin inside the bag and then re-close the bag. If your leaf pot is inside a humidity dome, try opening the vents, this will allow air circulation and not cause the soil to get wet inside the enclosed humidity dome. Hope this helps, BV
Hello,
thank you for your question. It would depend on the strength of the baby plant, being potted up. If it roots well within 2-3 months, it can start blooming within 2-3 months. I would say total 6 months average, before a baby plant blooms true. Sometimes, the first bloom cycle are not that close to the description, then once the plant settles, from the second cycle, you will see larger, stronger blooms matching the description. Hope this helps, regards, BV.
Hello Dori,
thank you for your question. It can take upto 5 months for the leaves to start emerging baby plantlet leaves. That’s the average time in my plant room conditions. It may be slightly quicker or longer for you. However, a strong root system is a good start, the leaf needs to anchor itself, before it can start producing little plantlets. Your on the right route, you should see new babies soon!
Hope this helps,
BV
Good Day…extremely thorough, thank you! How large should the babies be before you repot them and what is the best soil medium to use at this stage? One more, is it recommended to take the whole cluster, mom/babies, and repot together?
Pardon if this is a repeat question.
Thx much,
Dot
Hello Dot,
thank you for your kind words, glad to be of help. When you say babies, I am assuming babies which have grown from a propagated leaf. Size of babies depends on whether they are a semi miniature or a standard size violet. If you have a semi-miniature or miniature African Violet leaves, the plantlets should have at least four dime sized leaves. This equals to each leaf being around 0.5”- 0.7” inches in diameter.
If your plantlets are of a standard variety African Violet, then the leaves should be the size of a nickel, which is around 0.8” inches in diameter. Also check the root system, gently tug the leaf/baby plantlet cluster and see if it is firmly anchored in the soil. If it is, this means your plantlets have developed a root system. Generally, once the babies are ready to be re-potted, it is recommended to separate the mother leaf from the babies and then re-pot the babies individually. There may be 1-2 clusters of baby leaves attached to the mother leaf, these clusters will further separate into individual baby plants. Regarding soil, an equal ratio of peat moss to perlite (1:1) will work fine for the babies. You can mix 3 cups peat moss with 3 cups coarse perlite. I dont use any special mix, as long as its light and airy it will work well. Hope this helps,
regards,
BV
Hello Lois,
thank you for your question. An ice tray would be too shallow. Also the leaf stem may not stay upright. I would recommend small 2-inch pots (can fit 2 large leaves or 4 small leaves). Its easier to control watering in a smaller sized individual pot. Something similar to these, https://amzn.to/2luTu1N. Otherwise, can use plastic mouthwash cups, small condiment cups, take out containers or plastic trays/tubs. I would use smaller sized trays, so its easier to manage. Hope this helps, regards,BV
I followed the aluminum foil/water in a cup method to grow roots on a cut leaf. I now see roots but also tiny plantlets sprouting from the submerged stem but they are underwater. Should I now remove the leaf from the cup and plant in soil?
Hello Victoria,
thank you for your question. As long as the roots are at least 1 – 2 inches in length and they seem to a thick bunch, that should be enough to put in soil. If they have tiny baby plantlets on them, then they are absolutely ready to be in soil, you can plant the stem with babies 1 inch inside the soil, can gently cover babies with soil, do not pack the soil, the babies will grow out on top from beneath soil. When moving the rooted leaf from water to soil, use a small pot, around 2″, make sure the soil mix is light with at least 50% perlite and plant the rooted stem at least 1 inch or more inside the soil. Do not water too much at first, keep the soil lightly watered to avoid rotting the leaf. Hope this helps, regards, BV
Thank you so much for the response with such detailed information. I just recently discovered your website and it’s the best store of knowledge I’ve ever encountered in one place! About so called “miniature violets” that are sold. Are they really a variety of violet that is genetically miniaturized and will stay small, or just baby violet plants that haven’t grown to full size? The retailer who was selling them couldn’t provide an answer.
Hello Victoria,
thank you for your kind words, appreciate it!. Yes, these mini plants are really miniature violets which are genetically miniature and are hybridized to specifically be miniature in size. They are not baby mature plants, if that makes sense. If the description says Miniature violet type, then its a miniature. If it says baby plantlet, baby plant, starter plant, then its a smaller violet which hasnt grown to full size. Can find more details about the sizes of AV’s here, https://www.babyviolets.com/african-violet-plant-type/. Hope this helps, regards, BV
I just wanted to say that I now have a baby violet plant with several leaves that I grew from your probagation method of using a plastic cup/aluminum foil. The leaves are not deep green yet and at the base of the plant are a few very tiny pale leaves. Are these what are referred to as “suckers” and should be removed? Also, how long before my baby plant blooms? Based on the timeline from June 2021 from cutting to baby plant, it’s 7 months old and now rooted in soil in a 2″ plastic pot. I still keep it in the zip lock bag but fully opened. Should I remove it now from the bag?
Hello Victoria,
thank you for your message. Yes, you can remove the plant from the ziploc bag. If possible could you send a picture of your plant to babyvioletss@gmail.com, I can take a better look. They may be suckers, if the tiny pale leaves are originating between two leaves. It will take another 2-3 months before the plant blooms. The weather needs to be warm, around steady 65-70F for the plant to bloom. Also will need to fertilize the plant, which can speed up the process of blooms and new leaves, I would recommend the optimara fertilizer, I use 1/2tsp in 1 gallon water, https://amzn.to/3oXUvCB , it has worked well for me. Hope this helps, regards, BV
Hi BV,
I was able to snap a foto and attach to an email for you to see the small leaf at the base of the baby plant. Am so proud of it, having propagated from a leaf cutting by following your instructions! The method of inserting a cut leaf through aluminum foil covering water in a cup worked really well; the small hole in the foil kept the leaf stable.
I’m sad to report that after a year of successfully propagating from a cut leaf in water to a plantlet then potting it in a 2 inch container has
deceased 🙁
HI BV,
The baby violet plant was doing so well but I was concerned how it would manage while I was out of town for 4 days so I made sure it was watered thoroughly but I may have overdone it. Slowly but surely I watched each mature leaf and crown leaf go limp and shrivel up. And I babied that plantlet for a year! So is it better to underwater then overwater?
Hello Victoria, yes you are correct, its better to underwater than to overwater. If you are going out of town, you can water slightly to make soil little bit moist (as long as its not bone dry) and then place the plant in a ziploc baggie. It should be fine for 1-2 weeks in the bag. regards, BV
What age or size should a leaf be before we can propagate it?
Hello Valerie,
thank you for your question. The leaf used for propagation, needs to be healthy and mature (1 yr or older plant, not a baby plant). Choose a leaf from the middle row of your plant. They can be any size, as long as they are from the middle row. The leaves closer to the crown, center row are too young and the leaves on the outer row of the plant are too old. You can also visit, my article about leaf propagation, more tips there on how to choose a leaf for propagation, https://www.babyviolets.com/african-violet-leaf-propagation-how-to-produce-baby-plantlets/. Hope this helps, regards, BV
I have several baby violet plants, all started from
a common African Violet. The starter leaves were dark green, but the new plants (several months old) all have have lighter green leaves. Is this normal? I have been using Schultz African Violet fertilizer.
Hello Lyn,
thank you for your question. Yes, this seems to be normal, as the inner leaves move outwards and become older they do become darker in shade. Also, if you just applied fertilizer, then the new inner leaf growth will be bright green. The change in color, can also occur if there has been a change in environment, such as you moved the plant to a new location, used fertilizer or change in light. As your plant grow older, after a year or so, it will start to look like your normal plant.
regards,
BV
Hello Mel,
thank you for your question. I have not heard this before. For me personally, babies produce easily from the stem of the leaf (once its sliced diagonally). Cutting off the tip/top portion of the leaf does help too along with the slicing the stem diagonally. I havent tried producing babies from the tip of the leaf. regards, BV
Because I was curious, I put just a leaf tip ( about 3/4”) in loose potting mix, and it did produce babies, so it does work. I didn’t time it to see if it was any faster. Just thought you’d like to know it works. It could come in handy if a large number of plantlets are needed, but there are not very many mature leaves available.
Hello Mel,
Great to hear your propagation experiment worked!! Its fun to see the first babies pop up. Enjoy your journeym it will get much more exciting…
regards,
BV
Wow I have learned a lot tonight by reading this information. I have been gifted two leaf cuttings that are growing roots and a tiny baby in spagnum moss. Should I move them into a perlite mix at any time soon or leave them where they are. How will I know when to put them into a soil mix? Thank you. as you can tell I am a newbie.
Bernie
Hello Bernie,
thank you for your question. I personally dont have experience propagating leaves in moss. However, if the leaf/baby plant look healthy (bright green color/firm stems) then I wouldnt disturb them just yet. Let the roots grow more dense and longer (around an a few 2-3cm long) and the baby plantlet develop at least one row of leaves (around 1/2 inch in size). Then you can carefully remove some of the excess moss, make sure not to disturb the roots too much, you can keep a little bit of the moss closer to the leaf/ plantet roots. No need to remove all the moss from the leaf/plantlet. Then can re-pot your leaf/plantlet into soil mix (peat moss/perlite). On the other hand, if the plantlets have grown to a larger size (1/2 -1 inch), they have substantial roots developed, you could separate them from the mother leaf and re-pot the plantlet into peatmoss + perlite soil mix. Either way it should work fine. Make sure to place the newly potted leaf or plantlet into a ziploc baggie for 2 weeks, keep an eye on them every few days. Hope this helps, BV
Have you ever tried to propagate an African violet that has broken off at the stem? I didn’t think it would work, but it did. I took off all the older leaves and then cut about half of the stem off. Then I placed the stem in water to root. I had to make sure the water level always reached the stem so even with the cling wrap cover, it needed to be checked. It rooted nicely and now is in a soil mixture like the one you recommend. I had searched the Internet trying to find out if this was possible. After many searches, I gave up and decided to try it anyway. Glad I did. The plant with stem is more advanced than the about 11 older leaves I took from it and rooted in water since the stem already had young leaves. I knew it was time to put it in soil when the leaves started growing in the rooting water. Of the 11, I have six of the babies growing tiny leaves in soil now; the others have rooted well but not gotten any leaves yet. At least I saved the plant and I am enjoying the babies. By the way, I am using seed starter since it has the ingredients you listed and no food to harm the very young roots. Thank you for all of your great information. Just wanted to share my joy.
Thank you Carole for your kind words. Glad to hear you are experimenting and learning along the way, its definitely more fun! Happy to hear the propagation worked well, patience is the key word, I am sure in due time, you will have beautiful plantlets coming along. Regards, BV
I have several plantlets that I propagated from leave cuttings about 21/2 years ago. The plants seem very healthy and are now in 4” pots. Unfortunately they have NEVER bloomed and I can’t figure out why. They get indirect sunlight and I have been giving them fertilizer. Do you have any suggestions?
Thanks so much!
Hello Joanne, thank you for your question. Hmm…you seem to be doing everything right. You can try this optimara fertilizer https://amzn.to/3oXUvCB, it has worked well for me in terms of blooms and it is at a reasonable price. I also had a similar problem a few years back, I was using miracle gro fertilizer, which only produced healthy leaves, once I switched to optimara, I saw buds within a few weeks. If you already using this fertilizer, then I can suggest to increase the humidity in your plant area, can put the plant in a ziploc baggie for 2 weeks, to encourage buds, then can remove from bag and place it back into its original position. Hope this helps, regards, BV
Thank you for your website. Your detailed and careful work is much appreciated. I can’t seem to find the answer to my question anywhere, however. I have a single no-Id violet variety, a friend sent leaves all the way across the country, and then a plant light. With the light and her wicking instructions, I did it! From the original cutting I needed to separate crowns and propagated a few more plants. One plant, however, was much slower to develop and had light color on the edge of the leaves, looking almost like a variegation, but also there was a little dry browning, so I was never sure if something was wrong. Now it has bloomed, and the flower is completely different than the other plants! Is it even possible for a plant to variegate itself from a cutting? Aren’t they supposed to be genetic clones? There is no other violet for it to hybridize with! Thank you in advance for your opinion.
Paula
Hello Paula,
thank you for your question. I am so glad you are experimenting with the violets. Yes, that it is possible for the baby plantlet flower to be different from the mother leaf. The percentage of generic clones is higher, but there is a small percentage that the flowers will be different. The main mother plant has two sets of genes, one dominant and one recessive. The main flower color will be decided by the dominant gene, but sometimes the recessive gene will take over and the flower color will change. The genetics can change, due to external factors, like temperature, humidity or light. Hope this helps, regards, BV
It does help, thank you! After I posted my question, I also found your section on sports, and now I’m the proud mom of my own sport, it looks like. The parent is a deep smallish purple and the sport is a bigger flower, palest lavender with a darker, frillier edge. A second plant of it bloomed a nearly white flower. I still don’t know what is going on with the leaves’ tendency to damage on the edge, but I suspect that not every genetic mutation is a good one. But I can groom those leaves away, and grin like crazy every time I see my sport. I tended to them last week, and have more leaves going, no telling what might happen next! Thank you!!
Hi, I love all the information! My water leaf prop has very long roots (2-3 inches) but no babies yet. The leaf is starting to curl backwards and stiffen up. Is this normal or do I need to change something? I’m afraid to put it in soil because I overwatered the mother plant and killed it. I’m trying to wait until babies show up.
Thanks!
Hello Kyra, thank you for your question. I am actually writing a post about how and when to pot up leaves started in water. Since the roots are long, I would pot it up now and wait for babies. Usually the babies produced in water wont be that strong and after potting them up, not sure if they will all survive. You can gently remove the rooted leaf from the water, being careful not to damage the roots. Moisten your potting mix first, do not use dry soil, add the moist soil to a pot, make a small hole in center. Place the rooted leaf into the soil, making sure that the roots are covered by the potting mix. Do not water initially, once the top soil seems dry, can add a little water. Hope this helps, regards, BV
Hello Kyra, Yes, either way is fine, can place in ziploc bag if you wont have enough time to keep an eye on it or if its in a location where you usually pass by, then can water only when dry. regards, BV
I planted leaves in dampened soil and added a dribble of water to each. Each leaf is in a separate take out clear container with a domed lid (take out container). A slight film of moisture is forming on part of the domed lid, just enough to create a haze, no large water drops. Can I assume that the moisture level is OK and I won’t need to water until this moisture stops forming?
Hello John,
Yes you are doing everything correctly. Yes the moisture level sounds right. You only need to water if when you lift the take out container it seems light in weight. You can tell the difference, over time, right after watering or if there is heavy condensation, the container will feel heavy or have some weight to it. Over time, as the soil dry outs, it will start to feel ligher. Another way to know if the color of the soil. Moist soil will look darker brown, light weight or dry soil will look lighter brown. Hope this helps and hope your leaves are doing well. I was on holiday so it took me a while to check the comments on the site. regards, BV
STORE WILL BE CLOSED from April 30th due to a cross country move. Will re-open in late summer / early fall. Please place your orders soon!! Shipping is $13 for the first plant and $1 extra for each additional plant added to the order.
Our Plants Are Well Rooted Small Starter Plants In 2" Pots. Learn More About Our Plants & Shipping Method in the "About" tab.
Dismiss


76 Responses
Perfect explanation, I learned a lot, now I can start babysitting my violets. Thank you so much!
does it help propagation if a grow light (red & blue) is used on the newly planted leaves when using the dirt method or the water method. I have both going with the some variety to see which does better. Just not sure about he light.
Thanks
Hello Betsy,
Thank you for your question. A balance of red/blue light would work well for leaves. However, if you can adjust the red/blue and only have blue output initially, that would help the root and leaf growth. Then once you see new growth from the leaves, you can slowly switch back to red/blue. I personally have not done this myself. I use my 4ft (homedepot.sjv.io/KM517) or 3ft (homedepot.sjv.io/4vVb0) LED shoplight for my baby plantlets, they seem to be doing well. For my leaves, I use regular fluorescent shoplights. Let me know how your experiment goes, if you see any difference.
regards,
BV
I purchased the Home Depot shop light 3 foot length. What distance should the light be from the plantlets? Thanks
Hello Mary, thank you for your question. My LED lights are 9-12 inches from the top of my plants. Some people, do change the distance of the plant, depending upon whether you are growing a standard, semi-mini or trailer plants. I do not do that, I keep the distance same. Usually, for standard plants can keep distance 10-12″ from top of plant, for semi-miniature plants 6-8″ above top of plant and for trailers can keep 8-9″ above top of plant. If you have fluorescent lights, I would recommend, 8″-10″ from top of plant. Hope this helps, regards, BV
Hello! Thank you for helping me get new violet plants from a plant that was knocked over and broke several leaves off. I have 4 sets of “babies” as I call them. My question is what do I do with the single adult leaf after the babies are well established? It looks a little awkward.
Thank you!
Hello Cindy,
Thank you for your question. Glad to hear the babies are doing well. You can keep the leaf on the babies, till the babies grow bigger in size. Sometimes the leaf will dry up or rot, by the time the babies are bigger, that’s ok too. If the leaf is still there and your babies are bigger, you can discard the leaf. However, if you would like more babies, you can slice off the top a little and then repot the leaf. You can get more babies, it may take longer, since the leaf is now older. Hope this helps.
regards,
BV
My question is about propagating leaves from veragated African violets.
Some of the leaves are 75% or more white…. will they reproduce and grow like the full green leaves?
The reason I ask is that In propagating Hoyas, the white leaf will not.
Hi Cathy,
Thank you for your question. Variegation is a genetic mutation and are passed down through generations. So yes, the yellow or white leaves will turn green over time. Yes, the white leaves can produce green babies with variegation. When you first propagate violets from a green variegated leaf, if the babies are yellow/white in color, wait till the leaves are bigger and they develop green in the leaves. This will make it easier for the baby to survive, once its separated. Hope this helps, BV.
This is what I needed to know and have looked and looked for an answer to. Thank you so much as I wasn’t sure if I should be fertilizing these anemic looking babies or what to do.
I want to add that this is the best information that exists on the web regarding propagation of African Violets. You have a gift in your ability to communicate.
Hello Carole,
Thank you so much for your kind words, I really appreciate it. I am happy to hear you found the article useful. Hopefully I will be able to keep on writing more and coming up new articles.
regards,
BV
This information about the white babies is what I have been searching for forever. Thanks so much. I wasn’t sure if they needed fertilizer or what to do. Also I want to say this is the best information for the newbie that I have ever seen on propagation. You’re ability to communicate is a gift. Thanks for sharing it with us.
Hello Carole,
Glad to hear the articles are useful. Thank you for taking the time to read the articles. Appreciate your kindness! regards, BV
How often should I check the incubating leafs for proper moisture when in a closed container. I have not seen any condensation inside the clear container ..
Hello Deborah,
thank you for your question. If you see no condensation, then you can check to see if the soil seems dry visually or dry to touch. If it is then you can go ahead and give it some water. Sometimes if the soil is dry, the leaf will be slightly limp or wilted. Make sure to check at least once a week for dryness. Especially if you dont see condensation. Hope this helps, regards, BV
Thank you BV. I am anxiously awaiting a success with my first set of propagating leaves.
I will post when I get some little leaves popping up.
I am wondering why my perlite turns green after a short period of time following planting leaves. I assume this is either Choriphil or algae? Am I doing something wrong?
Thanks if you know the answer.
Carole
Hello Carole,
Yes you are correct, perlite turning green is the algae. This can occur when the humidity and moisture in your plant area is high. Nothing to worry about, this is normal. BV
Great to see the detail description about the propagation. Have already bookmarked your page. A quick question about the water propagation method, when will we decide the rooting system is healthy enough to put it back to the soil? Anything that we have to take extra care while moving the environment from water to soil?
Hello,
thank you for your question. As long as the roots are at least 1 – 2 inches in length and they seem to a thick bunch, that should be enough to put in soil. If they have tiny baby plantlets on them, then they are absolutely ready to be in soil, you can plant the stem with babies 1 inch inside the soil, can gently cover babies with soil, do not pack the soil, the babies will grow out on top from beneath soil. When moving the rooted leaf from water to soil, use a small pot, around 2″, make sure the soil mix is light with at least 50% perlite and plant the rooted stem at least 1 inch or more inside the soil. Do not water too much at first, keep the soil lightly watered to avoid rotting the leaf. Hope this helps, regards, BV
THANK YOU‼️
I have been reading & reading any articles I could find, trying to get a simple, clear answer to “How long should the roots be, before removing the stem from the water & planting it in a pot?”!
You are the only one who clarified that for me❣️
I’ve propagated several leaves in potting mix, but this is my first experience trying it in water!
Thank you, again❣️
Thank you for your kind words Shauna.
I can’t seem to find the answer.
Was wondering how long it would take? I have two leaves in soil for close to 3 months both have roots. You answered it perfectly. Thanks so much this will help..
Thank you Gwendolyn, glad to be of help, regards, BV
A couple of my Violets leaves are showing a peach/orange color on the leaves, almost like a blush from the stem towards the leaf tip. I can’t find anything on this. One of the Violets is a Cabbage Patch and I don’t believe it is a natural coloring and not all the leaves have it. I ordered this plant online and it did not arrive in very good condition as it had soiled spilled all over the leaves and I didn’t think it would survive but I cleaned it up and babied it along and then I finally just planted a couple of the best leaves and now have this baby that has about 6 leaves. The original plant developed powdery mildrew and I treated that with a cinnamon water spray and later tried Neem Oil, but not sure if either of those could have caused this miscoloring in my baby plant. Any ideas?
Hello Carole,
thank you for your message. The orange color, could be left over fertilizer salts or over fertilization. Once the soil dries out, put a clear saucer under your pot, you can pour water into the soil from the top and if the drained water is dark brown/ orange in color, it could be excess fertilizer salts. Yes, brown /rust colored spots, can occur, if the neem oil droplets were large, left sitting on the leaves and under bright lights. For now, since it just has 6 leaves, I would recommend, putting it into a ziploc baggie and sealing it up. Keep in a nice place with indirect bright light and leave it for 1-2 months. If condensation starts to develop or the soil looks really wet, can open up the bag and allow soil to dry out a little, before closing it up again. Hope this helps,
regards,
BV
I have a problem with my leaves rotting. They usually rot before any babies appear. Why is this happening to me?
Hello Victoria,
thank you for your question. The main reason for leaves rotting, is too compact soil. Is your soil just peat moss? or full of dirt? It needs perlite in it, to give it a lighter feel and allow for water drainage. When too much water is reserved in the soil, it can lead to leaf rotting. I would suggest to mix coarse perlite with your soil. This is the perlite I would recommend https://amzn.to/35qowUf. The perlite comes in a huge bag, can try to find a smaller bag or this one will last you a few years. If your soil already has perlite, then try to water less frequently. If your leaf pot is in a enclosed ziploc bag, then condensation might be developing inside the bag, causing the soil to always remain wet. You can open up the bag, whenever you see water droplets inside, allow the soil to dry out a little, can wipe the water droplets with a napkin inside the bag and then re-close the bag. If your leaf pot is inside a humidity dome, try opening the vents, this will allow air circulation and not cause the soil to get wet inside the enclosed humidity dome. Hope this helps, BV
How long will it take after you replant the baby plants before they will bloom
Hello,
thank you for your question. It would depend on the strength of the baby plant, being potted up. If it roots well within 2-3 months, it can start blooming within 2-3 months. I would say total 6 months average, before a baby plant blooms true. Sometimes, the first bloom cycle are not that close to the description, then once the plant settles, from the second cycle, you will see larger, stronger blooms matching the description. Hope this helps, regards, BV.
thank you so very much your page is great !
Hello,
I’ve started my leaves out in soil and although they have beautiful roots growing, I have yet to sprout any baby leaves. It’s been two months.
Hello Dori,
thank you for your question. It can take upto 5 months for the leaves to start emerging baby plantlet leaves. That’s the average time in my plant room conditions. It may be slightly quicker or longer for you. However, a strong root system is a good start, the leaf needs to anchor itself, before it can start producing little plantlets. Your on the right route, you should see new babies soon!
Hope this helps,
BV
Good Day…extremely thorough, thank you! How large should the babies be before you repot them and what is the best soil medium to use at this stage? One more, is it recommended to take the whole cluster, mom/babies, and repot together?
Pardon if this is a repeat question.
Thx much,
Dot
Hello Dot,
thank you for your kind words, glad to be of help. When you say babies, I am assuming babies which have grown from a propagated leaf. Size of babies depends on whether they are a semi miniature or a standard size violet. If you have a semi-miniature or miniature African Violet leaves, the plantlets should have at least four dime sized leaves. This equals to each leaf being around 0.5”- 0.7” inches in diameter.
If your plantlets are of a standard variety African Violet, then the leaves should be the size of a nickel, which is around 0.8” inches in diameter. Also check the root system, gently tug the leaf/baby plantlet cluster and see if it is firmly anchored in the soil. If it is, this means your plantlets have developed a root system. Generally, once the babies are ready to be re-potted, it is recommended to separate the mother leaf from the babies and then re-pot the babies individually. There may be 1-2 clusters of baby leaves attached to the mother leaf, these clusters will further separate into individual baby plants. Regarding soil, an equal ratio of peat moss to perlite (1:1) will work fine for the babies. You can mix 3 cups peat moss with 3 cups coarse perlite. I dont use any special mix, as long as its light and airy it will work well. Hope this helps,
regards,
BV
Can you ice trays for leaf cuttings? Are they too shallow? I have some in a plastic tray and some are doing OK, others slowly wilted and died.
Hello Lois,
thank you for your question. An ice tray would be too shallow. Also the leaf stem may not stay upright. I would recommend small 2-inch pots (can fit 2 large leaves or 4 small leaves). Its easier to control watering in a smaller sized individual pot. Something similar to these, https://amzn.to/2luTu1N. Otherwise, can use plastic mouthwash cups, small condiment cups, take out containers or plastic trays/tubs. I would use smaller sized trays, so its easier to manage. Hope this helps, regards,BV
I followed the aluminum foil/water in a cup method to grow roots on a cut leaf. I now see roots but also tiny plantlets sprouting from the submerged stem but they are underwater. Should I now remove the leaf from the cup and plant in soil?
Hello Victoria,
thank you for your question. As long as the roots are at least 1 – 2 inches in length and they seem to a thick bunch, that should be enough to put in soil. If they have tiny baby plantlets on them, then they are absolutely ready to be in soil, you can plant the stem with babies 1 inch inside the soil, can gently cover babies with soil, do not pack the soil, the babies will grow out on top from beneath soil. When moving the rooted leaf from water to soil, use a small pot, around 2″, make sure the soil mix is light with at least 50% perlite and plant the rooted stem at least 1 inch or more inside the soil. Do not water too much at first, keep the soil lightly watered to avoid rotting the leaf. Hope this helps, regards, BV
Thank you so much for the response with such detailed information. I just recently discovered your website and it’s the best store of knowledge I’ve ever encountered in one place! About so called “miniature violets” that are sold. Are they really a variety of violet that is genetically miniaturized and will stay small, or just baby violet plants that haven’t grown to full size? The retailer who was selling them couldn’t provide an answer.
Hello Victoria,
thank you for your kind words, appreciate it!. Yes, these mini plants are really miniature violets which are genetically miniature and are hybridized to specifically be miniature in size. They are not baby mature plants, if that makes sense. If the description says Miniature violet type, then its a miniature. If it says baby plantlet, baby plant, starter plant, then its a smaller violet which hasnt grown to full size. Can find more details about the sizes of AV’s here, https://www.babyviolets.com/african-violet-plant-type/. Hope this helps, regards, BV
I just wanted to say that I now have a baby violet plant with several leaves that I grew from your probagation method of using a plastic cup/aluminum foil. The leaves are not deep green yet and at the base of the plant are a few very tiny pale leaves. Are these what are referred to as “suckers” and should be removed? Also, how long before my baby plant blooms? Based on the timeline from June 2021 from cutting to baby plant, it’s 7 months old and now rooted in soil in a 2″ plastic pot. I still keep it in the zip lock bag but fully opened. Should I remove it now from the bag?
Hello Victoria,
thank you for your message. Yes, you can remove the plant from the ziploc bag. If possible could you send a picture of your plant to babyvioletss@gmail.com, I can take a better look. They may be suckers, if the tiny pale leaves are originating between two leaves. It will take another 2-3 months before the plant blooms. The weather needs to be warm, around steady 65-70F for the plant to bloom. Also will need to fertilize the plant, which can speed up the process of blooms and new leaves, I would recommend the optimara fertilizer, I use 1/2tsp in 1 gallon water, https://amzn.to/3oXUvCB , it has worked well for me. Hope this helps, regards, BV
Hi BV,
I was able to snap a foto and attach to an email for you to see the small leaf at the base of the baby plant. Am so proud of it, having propagated from a leaf cutting by following your instructions! The method of inserting a cut leaf through aluminum foil covering water in a cup worked really well; the small hole in the foil kept the leaf stable.
I’m sad to report that after a year of successfully propagating from a cut leaf in water to a plantlet then potting it in a 2 inch container has
deceased 🙁
HI BV,
The baby violet plant was doing so well but I was concerned how it would manage while I was out of town for 4 days so I made sure it was watered thoroughly but I may have overdone it. Slowly but surely I watched each mature leaf and crown leaf go limp and shrivel up. And I babied that plantlet for a year! So is it better to underwater then overwater?
Hello Victoria, yes you are correct, its better to underwater than to overwater. If you are going out of town, you can water slightly to make soil little bit moist (as long as its not bone dry) and then place the plant in a ziploc baggie. It should be fine for 1-2 weeks in the bag. regards, BV
What age or size should a leaf be before we can propagate it?
Hello Valerie,
thank you for your question. The leaf used for propagation, needs to be healthy and mature (1 yr or older plant, not a baby plant). Choose a leaf from the middle row of your plant. They can be any size, as long as they are from the middle row. The leaves closer to the crown, center row are too young and the leaves on the outer row of the plant are too old. You can also visit, my article about leaf propagation, more tips there on how to choose a leaf for propagation, https://www.babyviolets.com/african-violet-leaf-propagation-how-to-produce-baby-plantlets/. Hope this helps, regards, BV
I have several baby violet plants, all started from
a common African Violet. The starter leaves were dark green, but the new plants (several months old) all have have lighter green leaves. Is this normal? I have been using Schultz African Violet fertilizer.
Hello Lyn,
thank you for your question. Yes, this seems to be normal, as the inner leaves move outwards and become older they do become darker in shade. Also, if you just applied fertilizer, then the new inner leaf growth will be bright green. The change in color, can also occur if there has been a change in environment, such as you moved the plant to a new location, used fertilizer or change in light. As your plant grow older, after a year or so, it will start to look like your normal plant.
regards,
BV
I read somewhere that babies will be produced more quickly from the tip of the leaf rather than from the stem portion. Any thoughts on this?
Hello Mel,
thank you for your question. I have not heard this before. For me personally, babies produce easily from the stem of the leaf (once its sliced diagonally). Cutting off the tip/top portion of the leaf does help too along with the slicing the stem diagonally. I havent tried producing babies from the tip of the leaf. regards, BV
Because I was curious, I put just a leaf tip ( about 3/4”) in loose potting mix, and it did produce babies, so it does work. I didn’t time it to see if it was any faster. Just thought you’d like to know it works. It could come in handy if a large number of plantlets are needed, but there are not very many mature leaves available.
Hello Mel,
Great to hear your propagation experiment worked!! Its fun to see the first babies pop up. Enjoy your journeym it will get much more exciting…
regards,
BV
Wow I have learned a lot tonight by reading this information. I have been gifted two leaf cuttings that are growing roots and a tiny baby in spagnum moss. Should I move them into a perlite mix at any time soon or leave them where they are. How will I know when to put them into a soil mix? Thank you. as you can tell I am a newbie.
Bernie
Hello Bernie,
thank you for your question. I personally dont have experience propagating leaves in moss. However, if the leaf/baby plant look healthy (bright green color/firm stems) then I wouldnt disturb them just yet. Let the roots grow more dense and longer (around an a few 2-3cm long) and the baby plantlet develop at least one row of leaves (around 1/2 inch in size). Then you can carefully remove some of the excess moss, make sure not to disturb the roots too much, you can keep a little bit of the moss closer to the leaf/ plantet roots. No need to remove all the moss from the leaf/plantlet. Then can re-pot your leaf/plantlet into soil mix (peat moss/perlite). On the other hand, if the plantlets have grown to a larger size (1/2 -1 inch), they have substantial roots developed, you could separate them from the mother leaf and re-pot the plantlet into peatmoss + perlite soil mix. Either way it should work fine. Make sure to place the newly potted leaf or plantlet into a ziploc baggie for 2 weeks, keep an eye on them every few days. Hope this helps, BV
Have you ever tried to propagate an African violet that has broken off at the stem? I didn’t think it would work, but it did. I took off all the older leaves and then cut about half of the stem off. Then I placed the stem in water to root. I had to make sure the water level always reached the stem so even with the cling wrap cover, it needed to be checked. It rooted nicely and now is in a soil mixture like the one you recommend. I had searched the Internet trying to find out if this was possible. After many searches, I gave up and decided to try it anyway. Glad I did. The plant with stem is more advanced than the about 11 older leaves I took from it and rooted in water since the stem already had young leaves. I knew it was time to put it in soil when the leaves started growing in the rooting water. Of the 11, I have six of the babies growing tiny leaves in soil now; the others have rooted well but not gotten any leaves yet. At least I saved the plant and I am enjoying the babies. By the way, I am using seed starter since it has the ingredients you listed and no food to harm the very young roots. Thank you for all of your great information. Just wanted to share my joy.
Thank you Carole for your kind words. Glad to hear you are experimenting and learning along the way, its definitely more fun! Happy to hear the propagation worked well, patience is the key word, I am sure in due time, you will have beautiful plantlets coming along. Regards, BV
I have several plantlets that I propagated from leave cuttings about 21/2 years ago. The plants seem very healthy and are now in 4” pots. Unfortunately they have NEVER bloomed and I can’t figure out why. They get indirect sunlight and I have been giving them fertilizer. Do you have any suggestions?
Thanks so much!
Hello Joanne, thank you for your question. Hmm…you seem to be doing everything right. You can try this optimara fertilizer https://amzn.to/3oXUvCB, it has worked well for me in terms of blooms and it is at a reasonable price. I also had a similar problem a few years back, I was using miracle gro fertilizer, which only produced healthy leaves, once I switched to optimara, I saw buds within a few weeks. If you already using this fertilizer, then I can suggest to increase the humidity in your plant area, can put the plant in a ziploc baggie for 2 weeks, to encourage buds, then can remove from bag and place it back into its original position. Hope this helps, regards, BV
Thank you for your website. Your detailed and careful work is much appreciated. I can’t seem to find the answer to my question anywhere, however. I have a single no-Id violet variety, a friend sent leaves all the way across the country, and then a plant light. With the light and her wicking instructions, I did it! From the original cutting I needed to separate crowns and propagated a few more plants. One plant, however, was much slower to develop and had light color on the edge of the leaves, looking almost like a variegation, but also there was a little dry browning, so I was never sure if something was wrong. Now it has bloomed, and the flower is completely different than the other plants! Is it even possible for a plant to variegate itself from a cutting? Aren’t they supposed to be genetic clones? There is no other violet for it to hybridize with! Thank you in advance for your opinion.
Paula
Hello Paula,
thank you for your question. I am so glad you are experimenting with the violets. Yes, that it is possible for the baby plantlet flower to be different from the mother leaf. The percentage of generic clones is higher, but there is a small percentage that the flowers will be different. The main mother plant has two sets of genes, one dominant and one recessive. The main flower color will be decided by the dominant gene, but sometimes the recessive gene will take over and the flower color will change. The genetics can change, due to external factors, like temperature, humidity or light. Hope this helps, regards, BV
It does help, thank you! After I posted my question, I also found your section on sports, and now I’m the proud mom of my own sport, it looks like. The parent is a deep smallish purple and the sport is a bigger flower, palest lavender with a darker, frillier edge. A second plant of it bloomed a nearly white flower. I still don’t know what is going on with the leaves’ tendency to damage on the edge, but I suspect that not every genetic mutation is a good one. But I can groom those leaves away, and grin like crazy every time I see my sport. I tended to them last week, and have more leaves going, no telling what might happen next! Thank you!!
Hi, I love all the information! My water leaf prop has very long roots (2-3 inches) but no babies yet. The leaf is starting to curl backwards and stiffen up. Is this normal or do I need to change something? I’m afraid to put it in soil because I overwatered the mother plant and killed it. I’m trying to wait until babies show up.
Thanks!
Hello Kyra, thank you for your question. I am actually writing a post about how and when to pot up leaves started in water. Since the roots are long, I would pot it up now and wait for babies. Usually the babies produced in water wont be that strong and after potting them up, not sure if they will all survive. You can gently remove the rooted leaf from the water, being careful not to damage the roots. Moisten your potting mix first, do not use dry soil, add the moist soil to a pot, make a small hole in center. Place the rooted leaf into the soil, making sure that the roots are covered by the potting mix. Do not water initially, once the top soil seems dry, can add a little water. Hope this helps, regards, BV
Thank you! Should I place it in a ziplock bag or just continue to water when dry? Looking forward to your new post! Kyra
Hello Kyra, Yes, either way is fine, can place in ziploc bag if you wont have enough time to keep an eye on it or if its in a location where you usually pass by, then can water only when dry. regards, BV
I planted leaves in dampened soil and added a dribble of water to each. Each leaf is in a separate take out clear container with a domed lid (take out container). A slight film of moisture is forming on part of the domed lid, just enough to create a haze, no large water drops. Can I assume that the moisture level is OK and I won’t need to water until this moisture stops forming?
Hello John,
Yes you are doing everything correctly. Yes the moisture level sounds right. You only need to water if when you lift the take out container it seems light in weight. You can tell the difference, over time, right after watering or if there is heavy condensation, the container will feel heavy or have some weight to it. Over time, as the soil dry outs, it will start to feel ligher. Another way to know if the color of the soil. Moist soil will look darker brown, light weight or dry soil will look lighter brown. Hope this helps and hope your leaves are doing well. I was on holiday so it took me a while to check the comments on the site. regards, BV