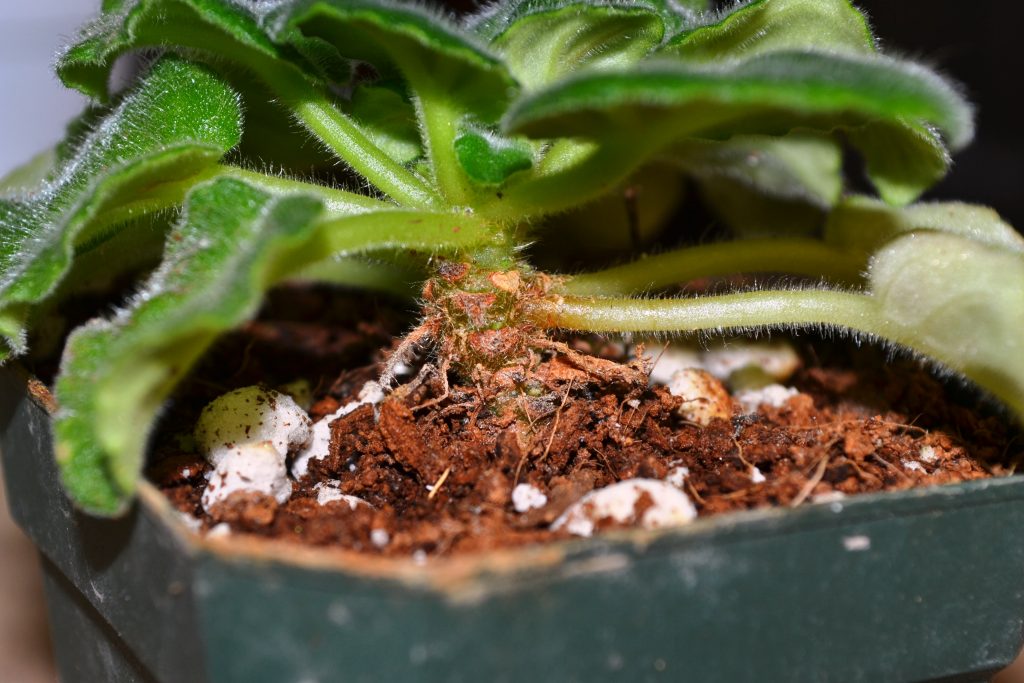
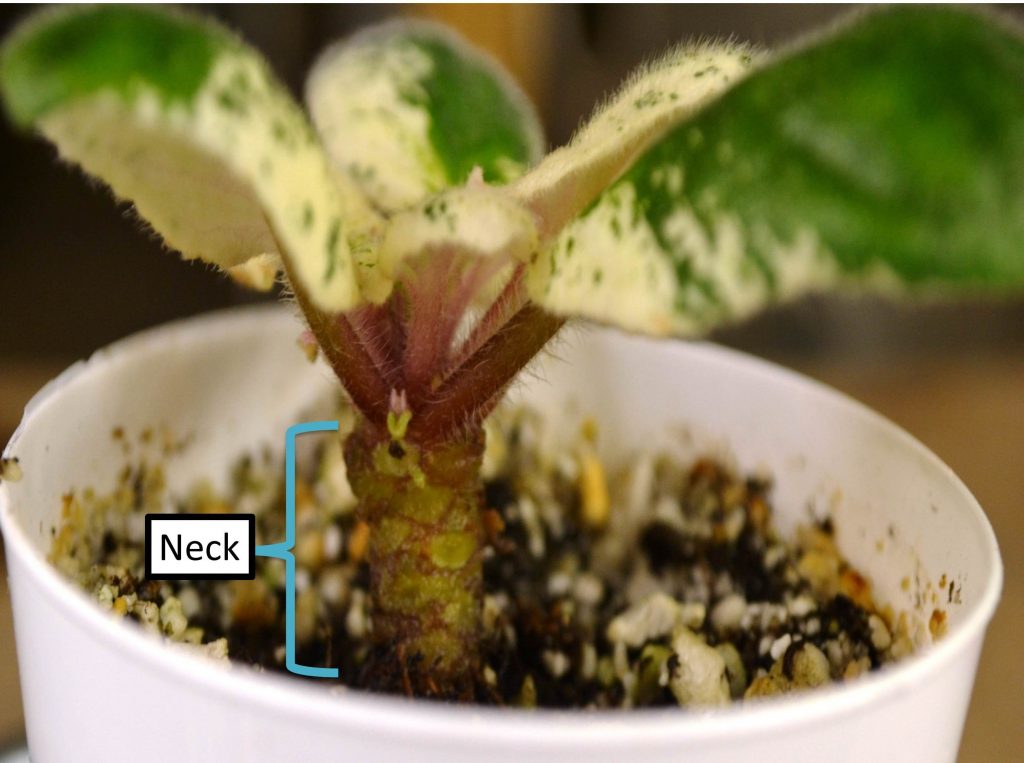
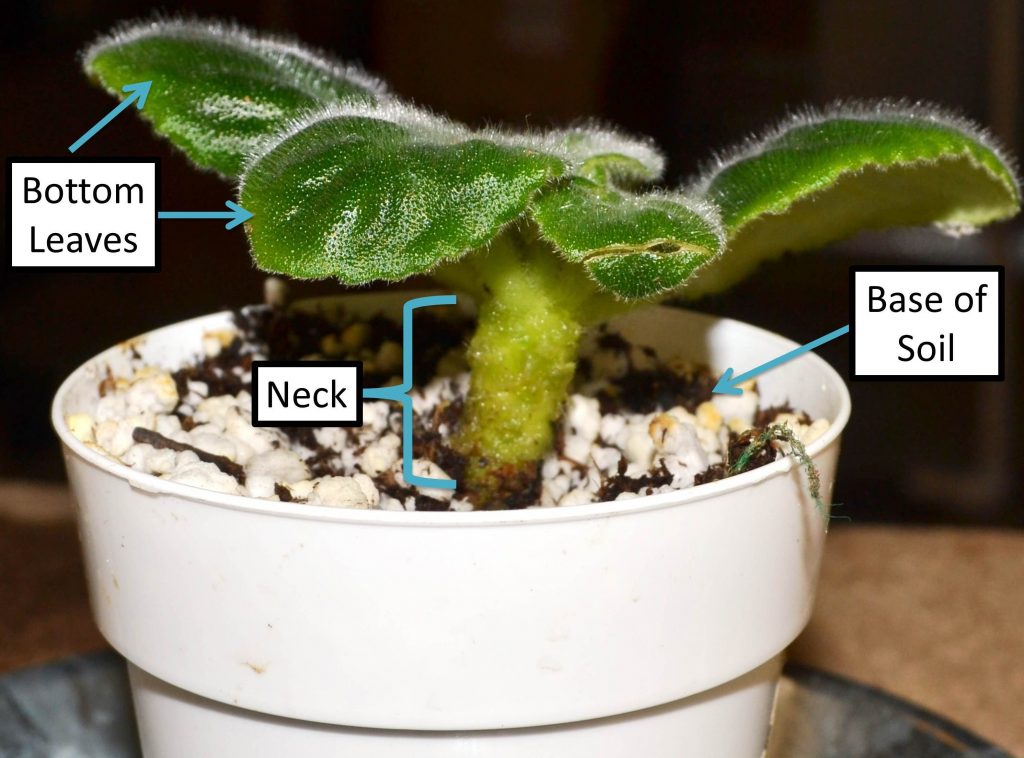
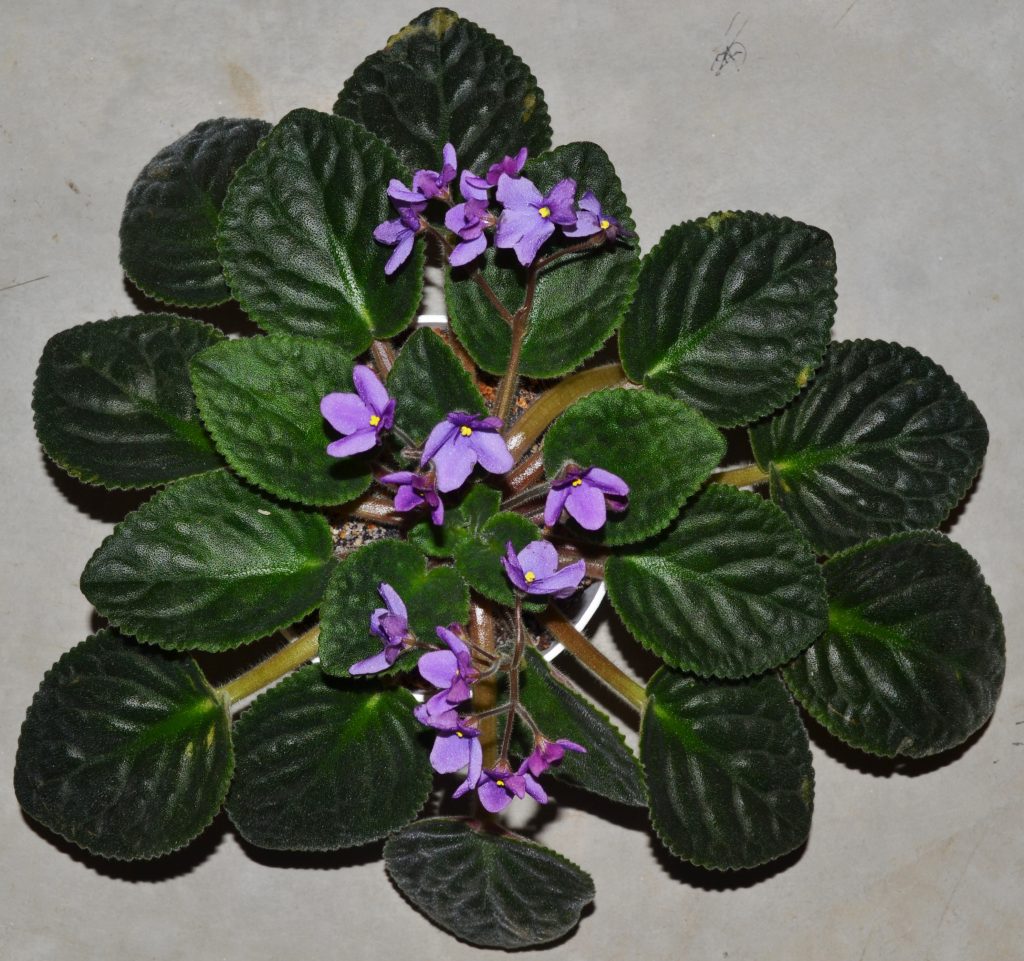
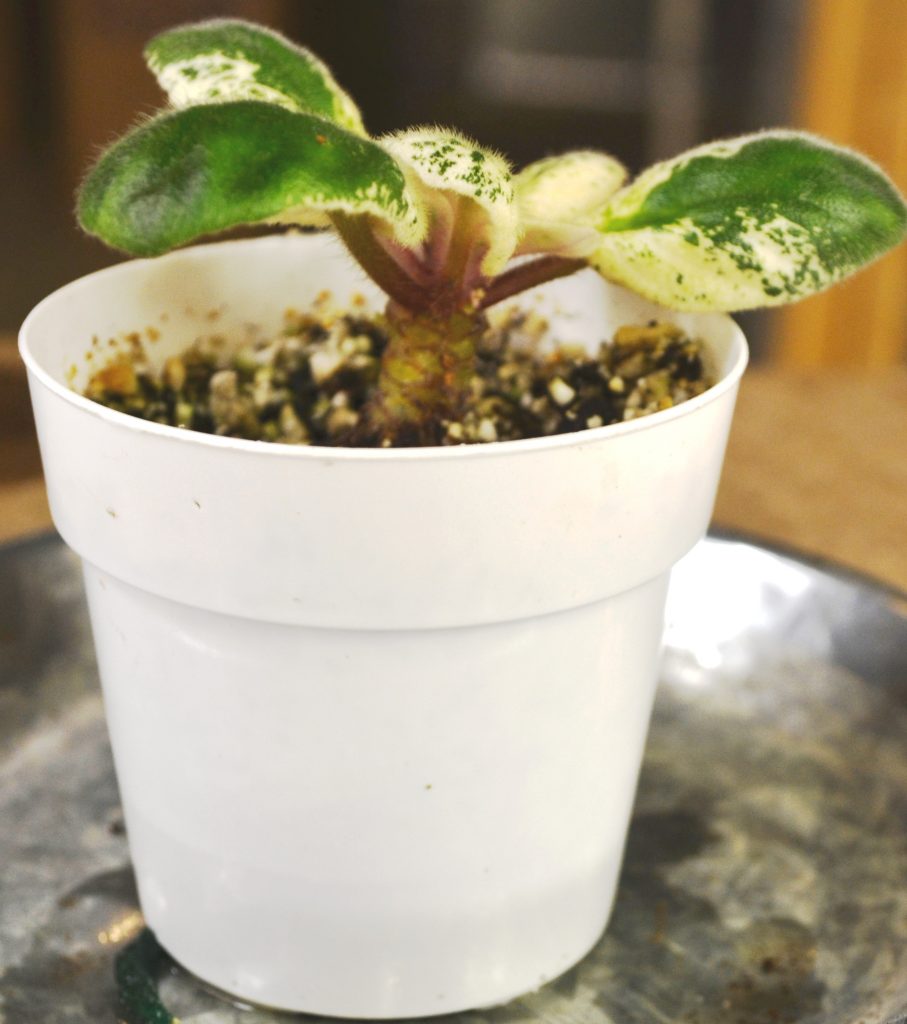
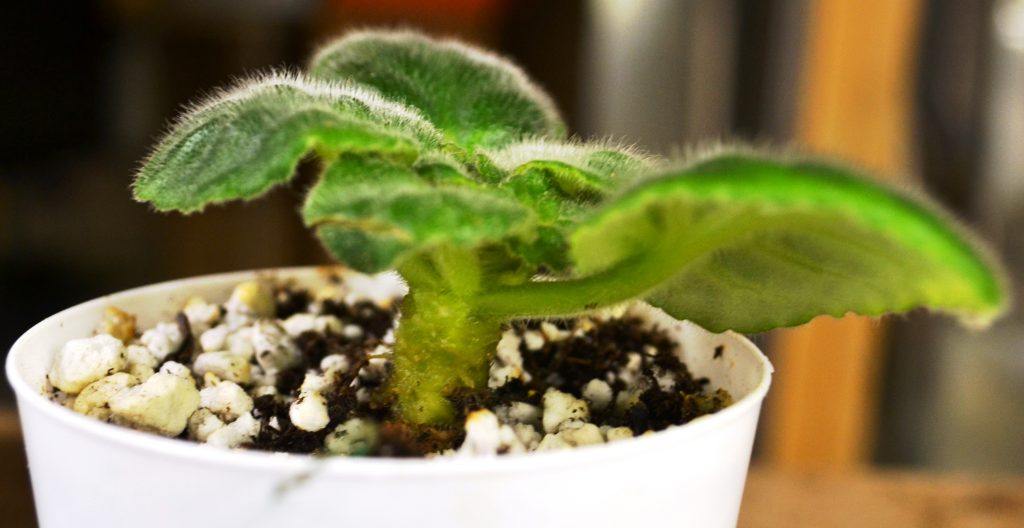
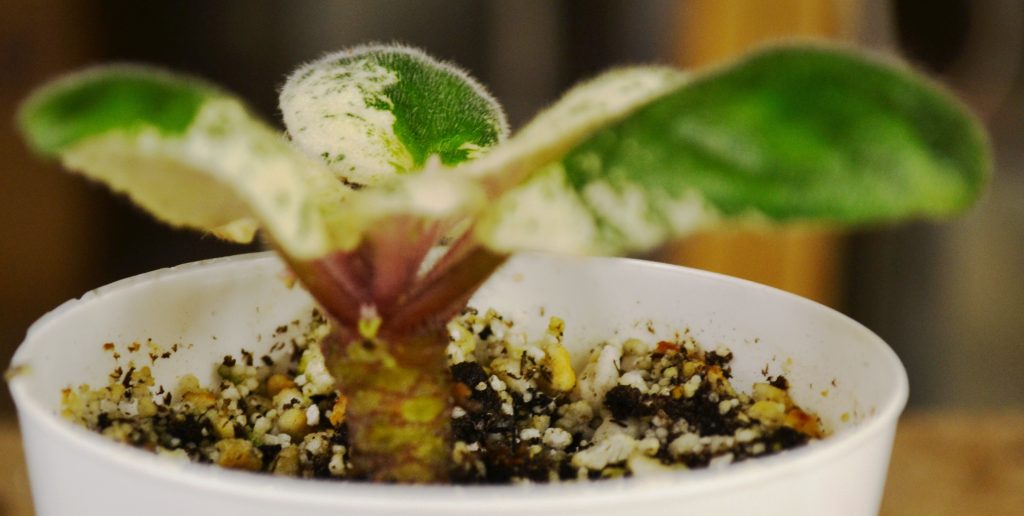
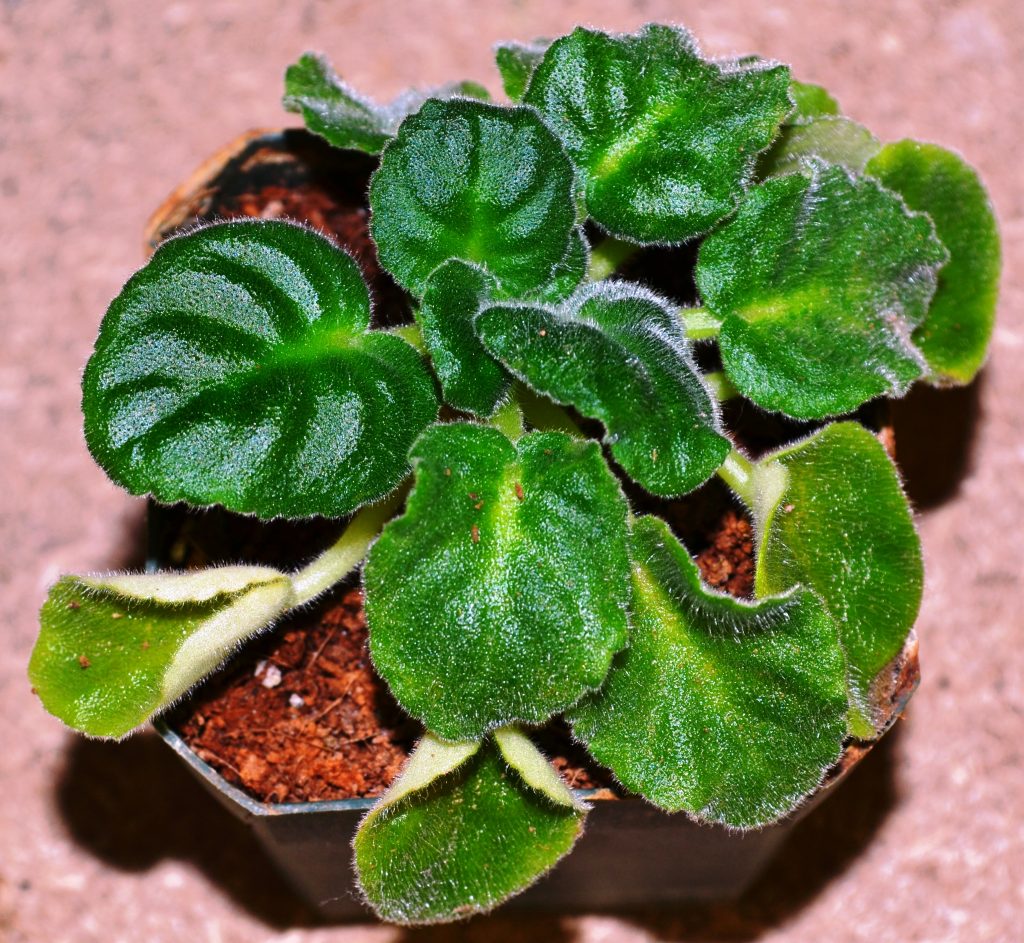
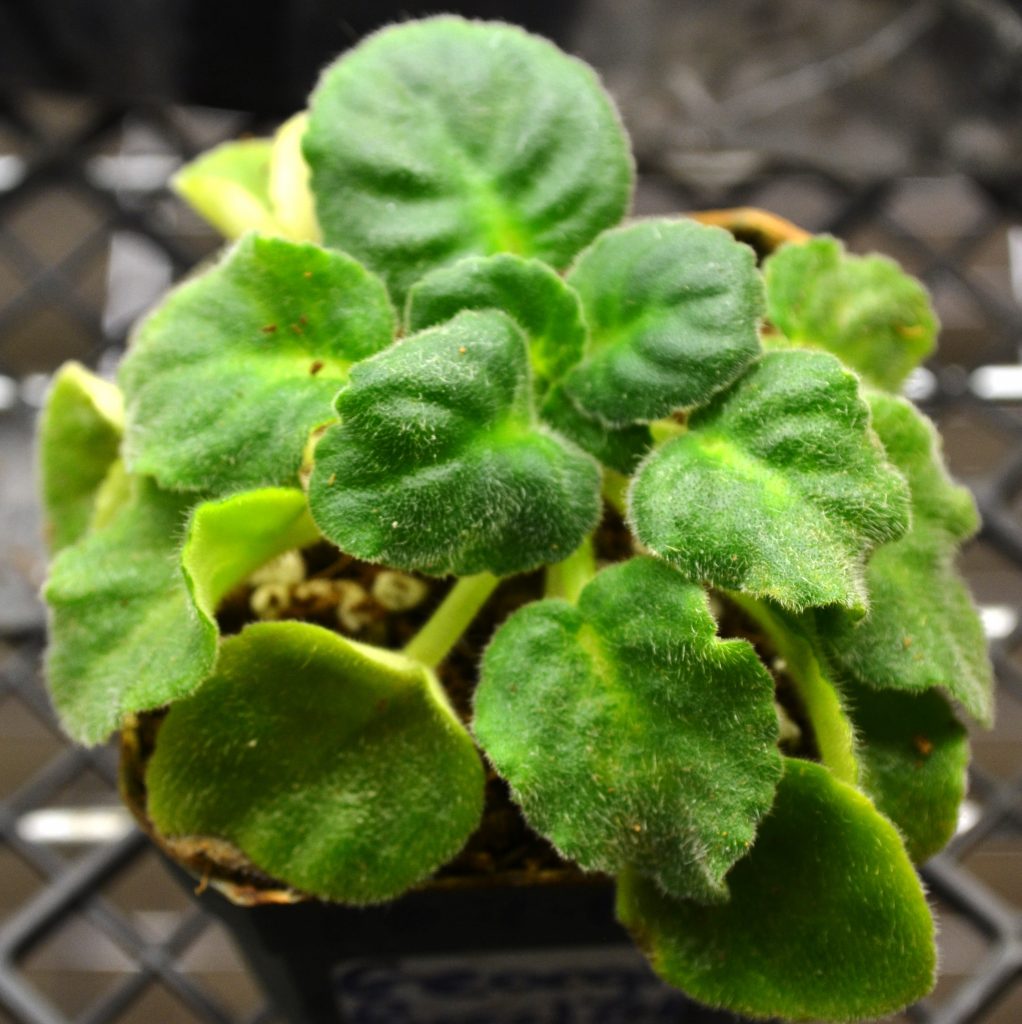
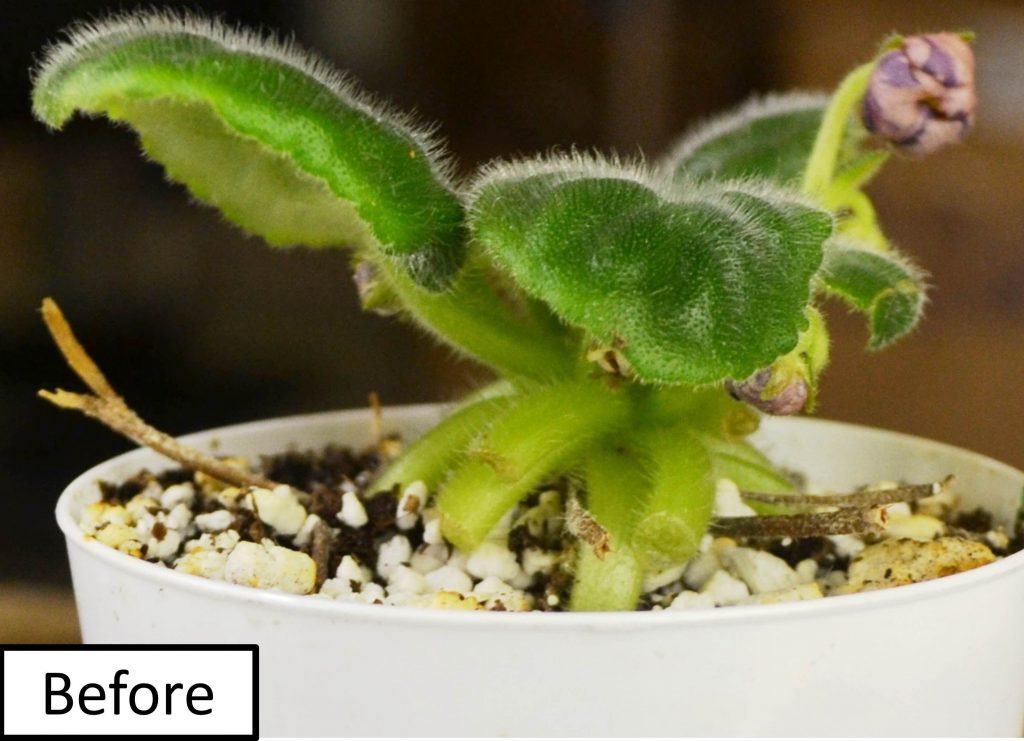
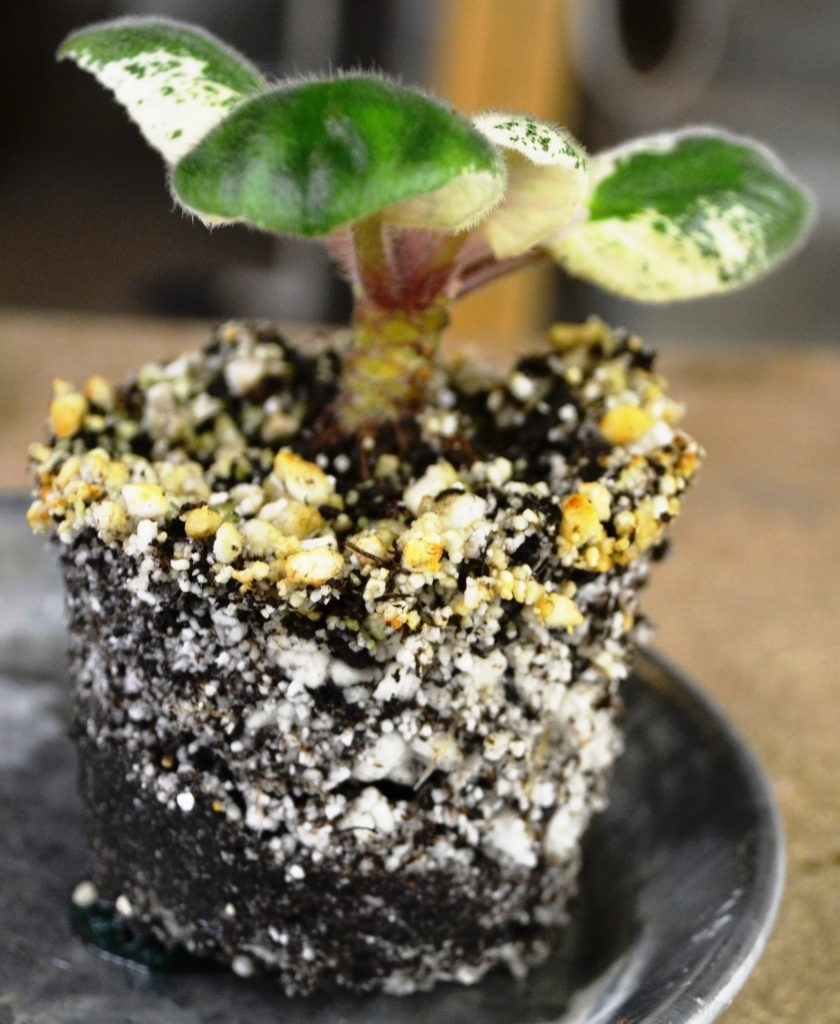
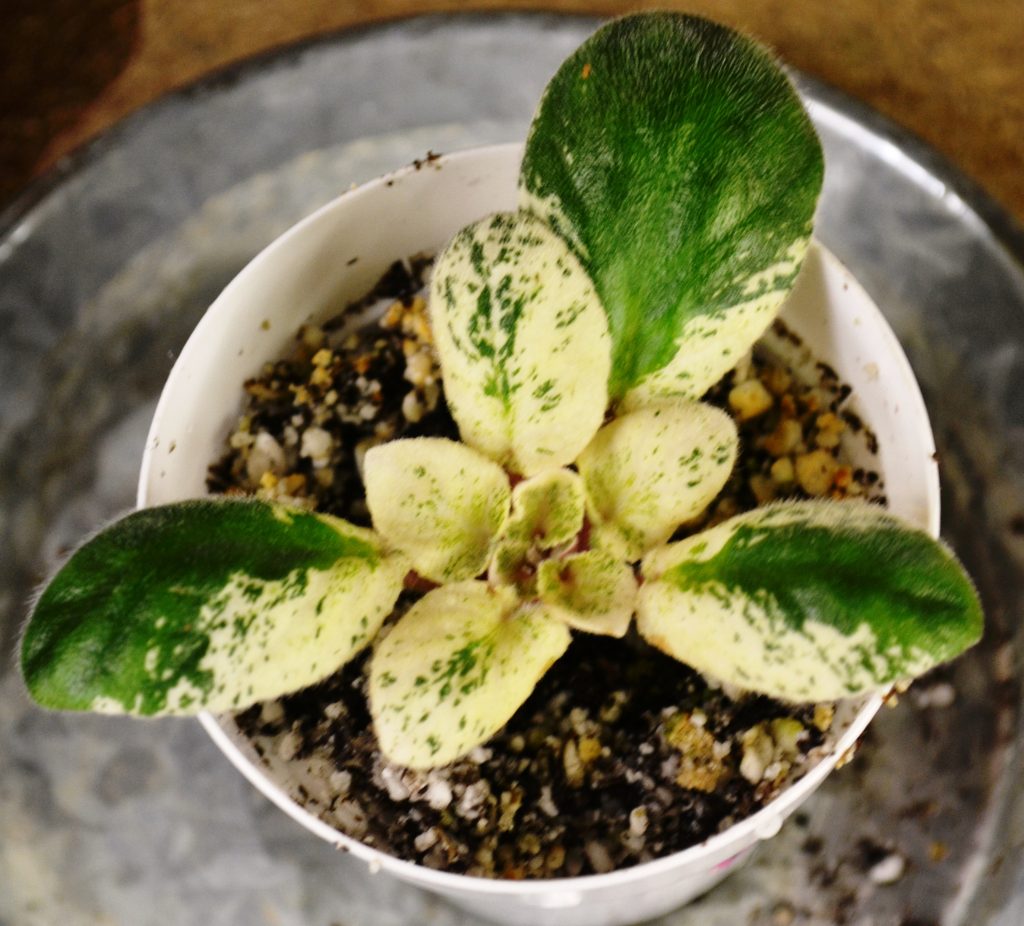
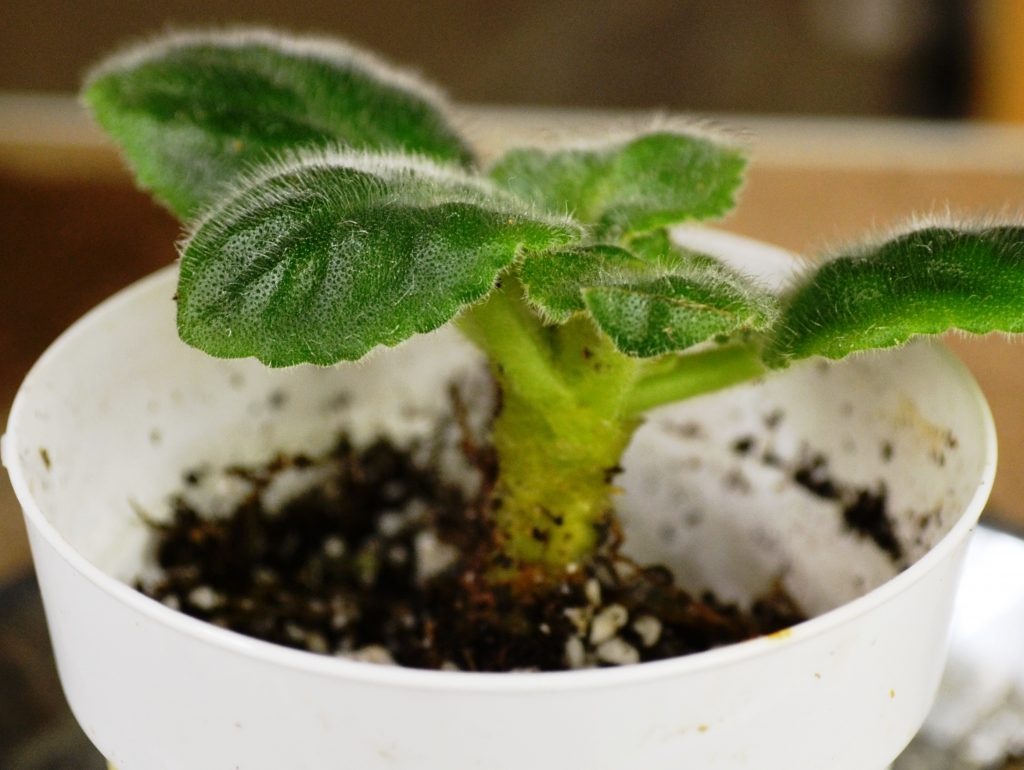
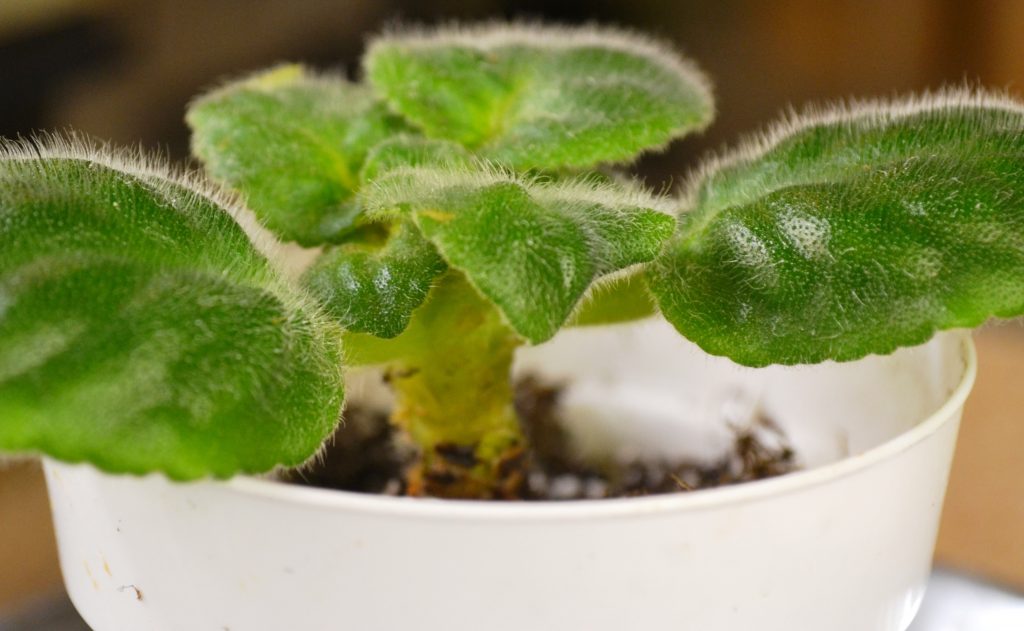
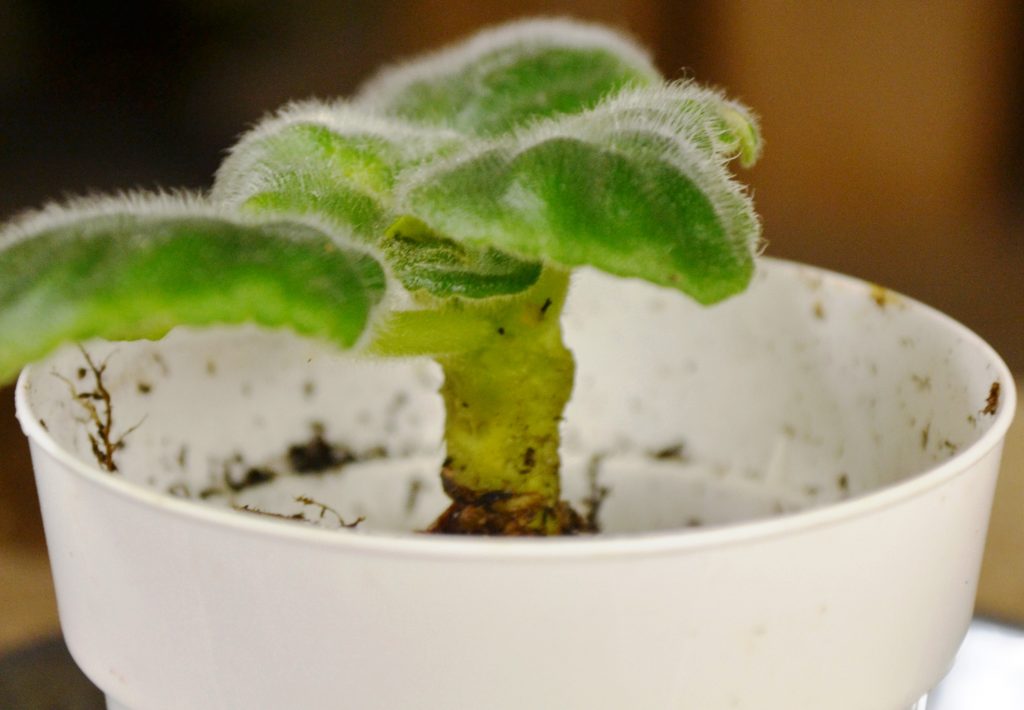
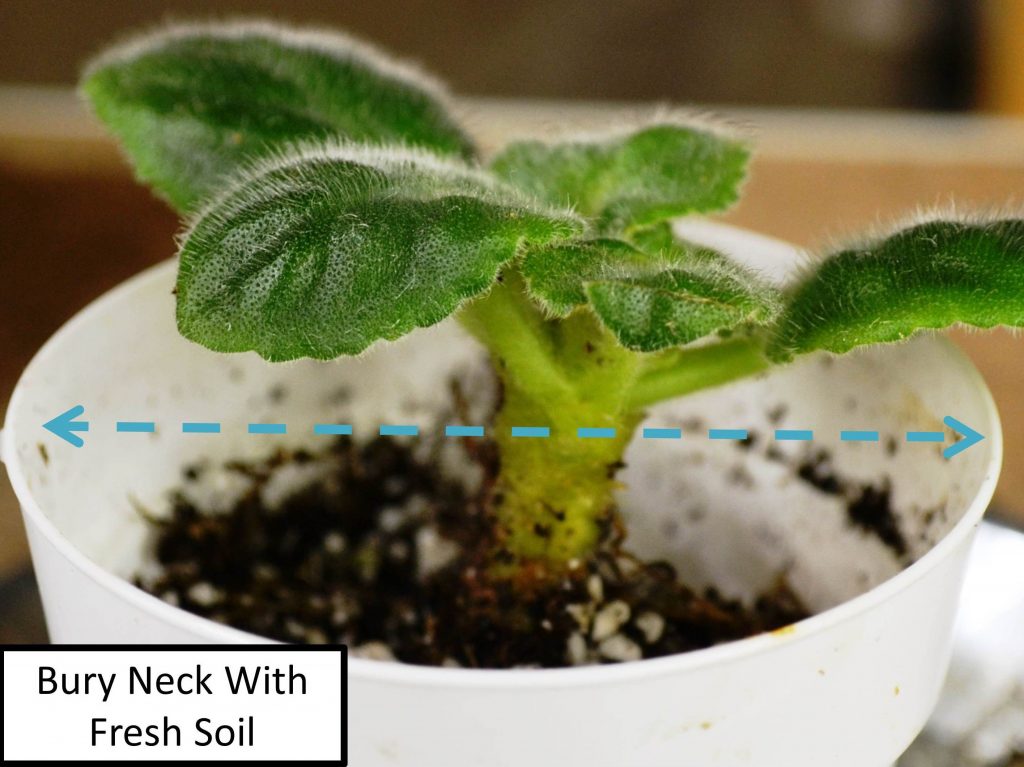
What does a long neck look like on African Violets?
- An African Violet neck looks like a long and thin tree trunk. It can resemble a small tree.
- The trunk starts upwards from the base of the soil and ends at the leaves of the plants.
- Below are three images of an African Violet neck:
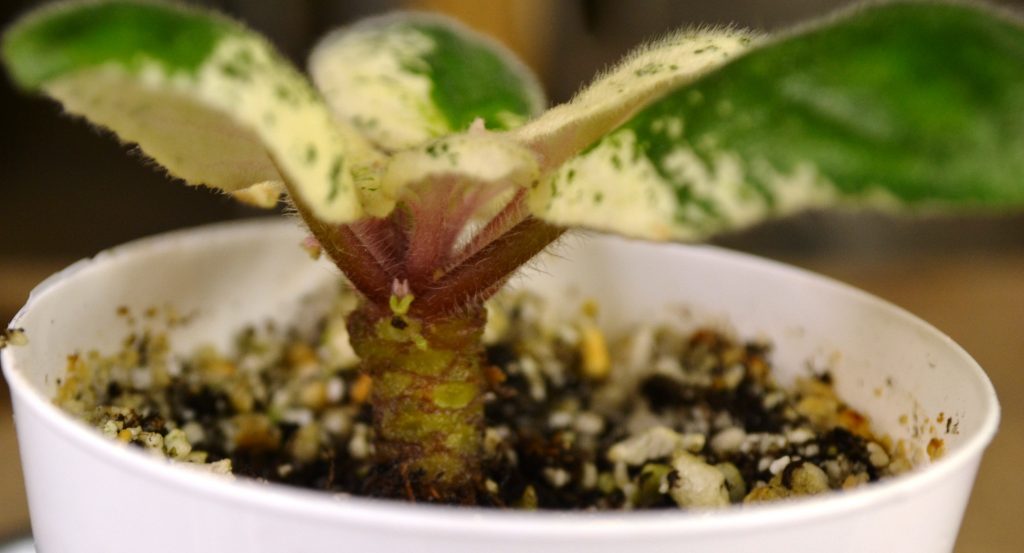
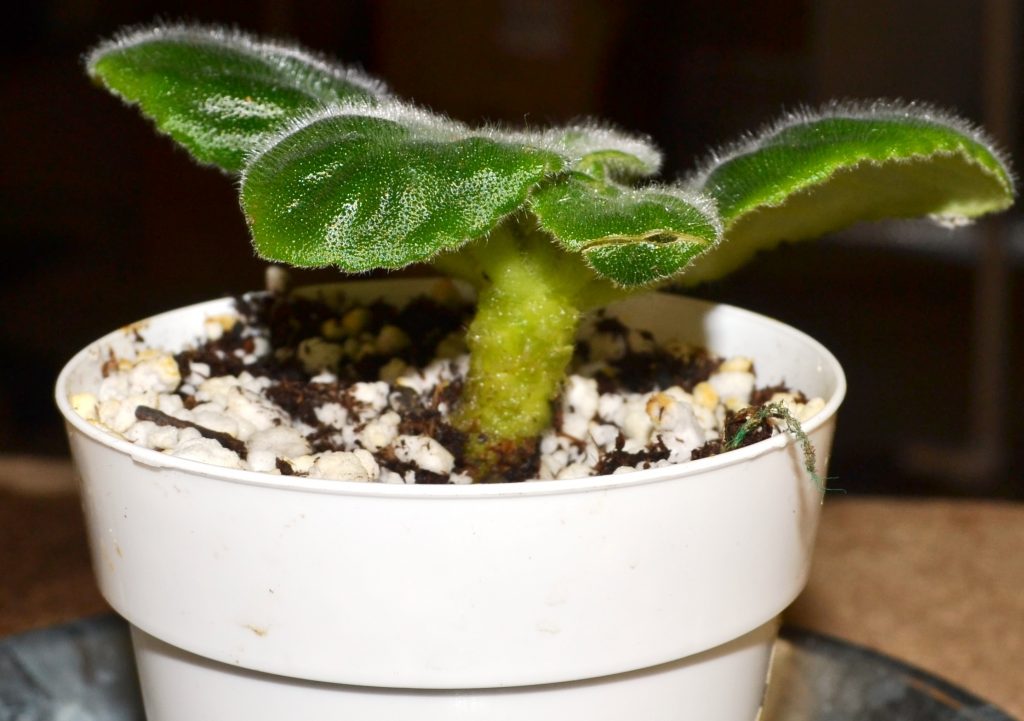
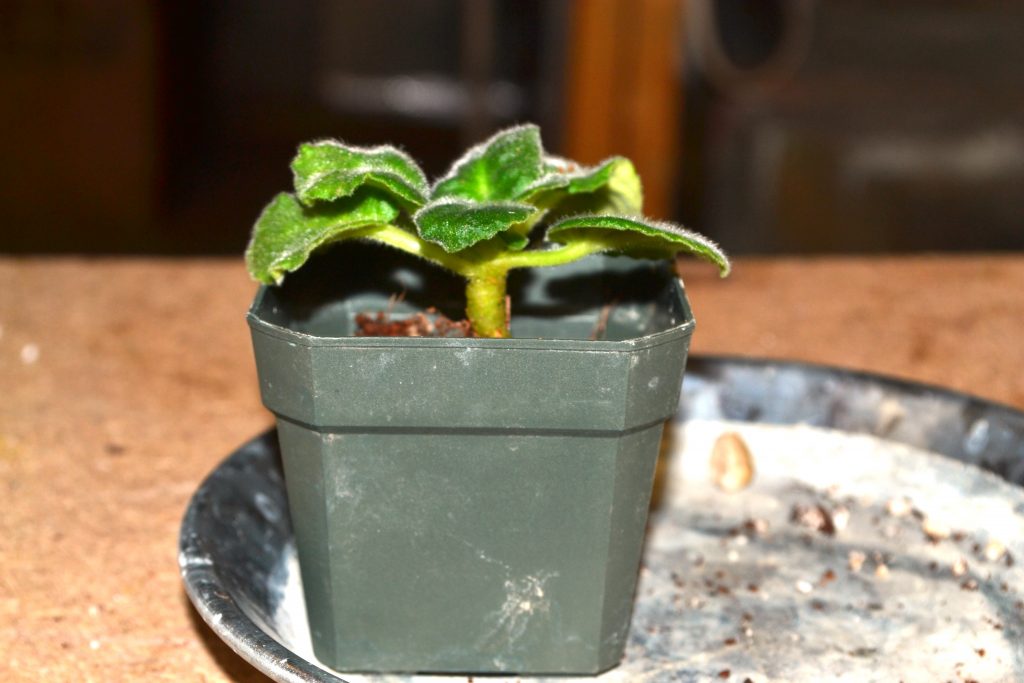
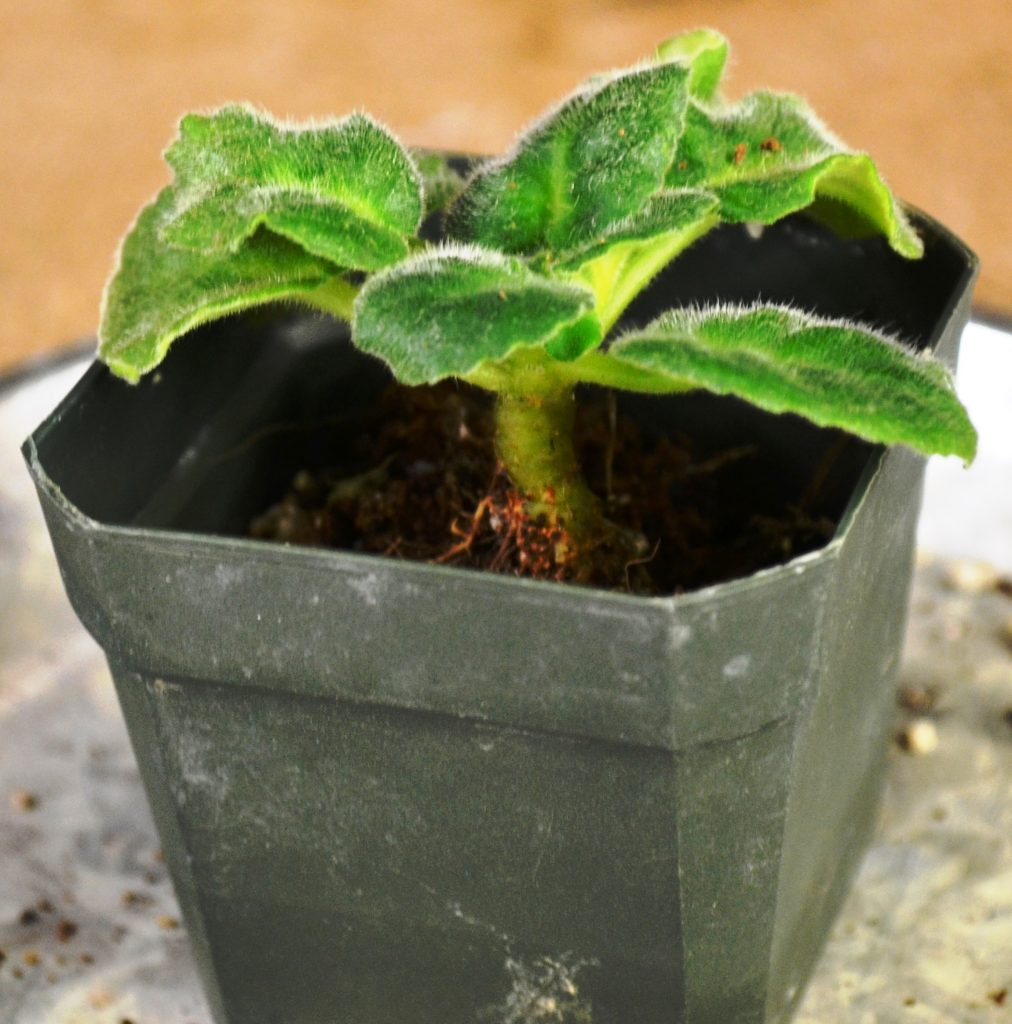
- These are relatively small necks (1-2 inches).
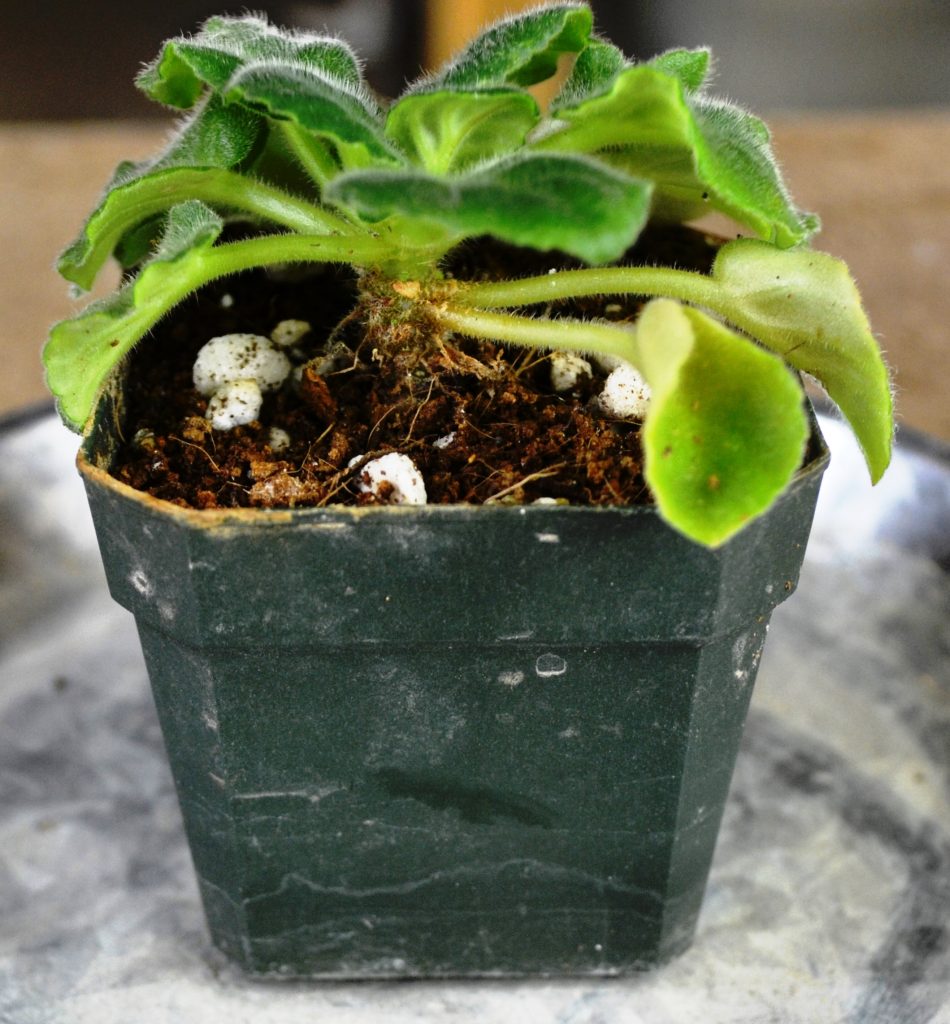
- Sometimes, if an African Violet is left unattended it can develop a long thick neck (5-6 inches) long.
- This kind of neck ultimately tilts sideways due to the weight of the crown. This kind of neck is known as a “goose neck”.
- A neck can also resemble a palm tree/coconut tree trunk.
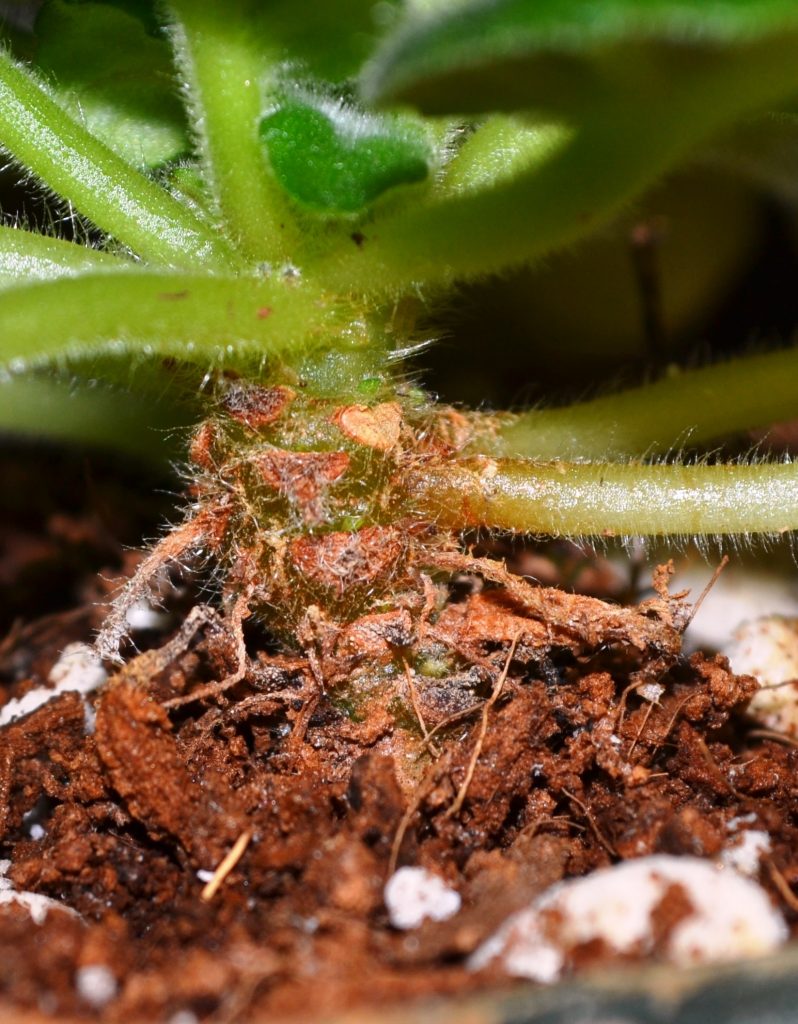
- These are close up images detailing the scaly surface of an African Violet neck:
How does a long neck develop on African Violets?
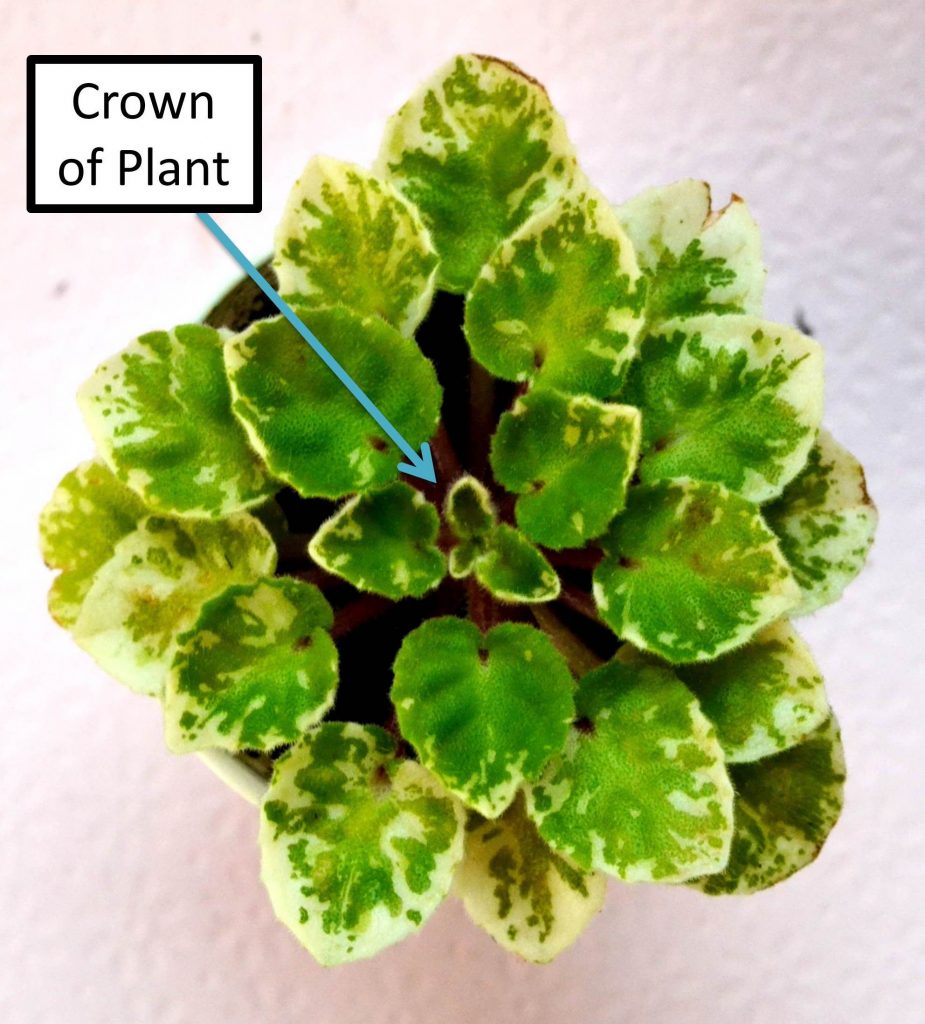
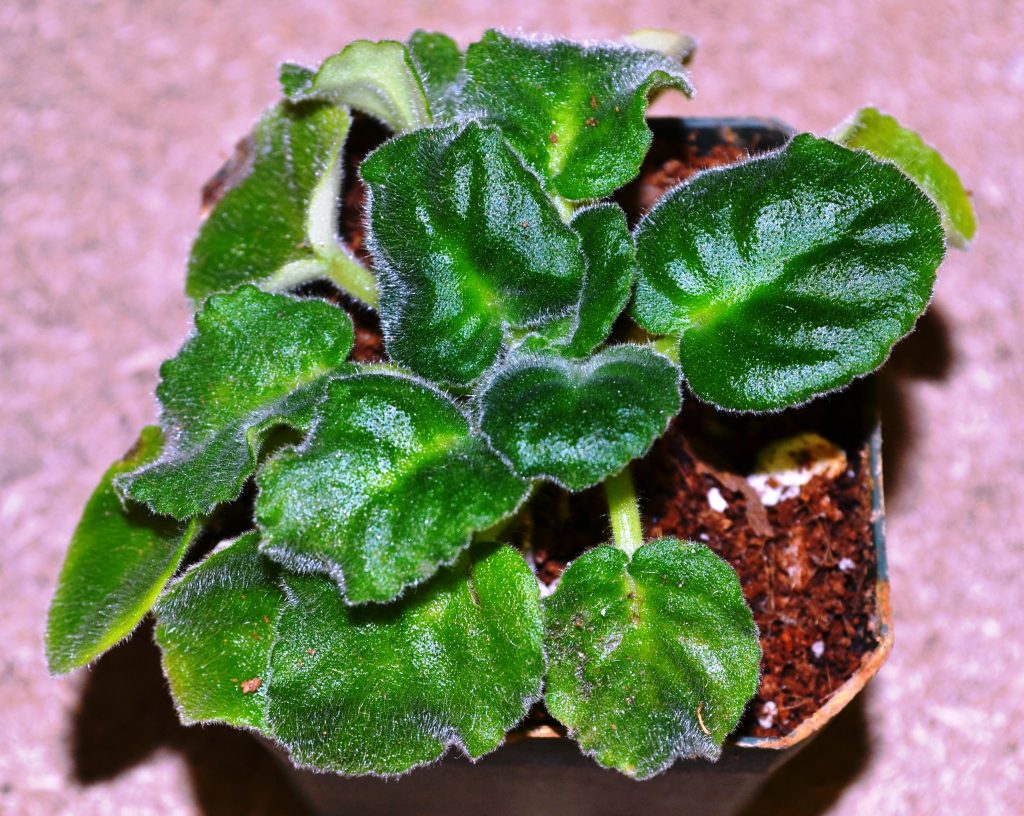
- African Violets grow from the top, developing its crown and displaying its rosette forming leaves.
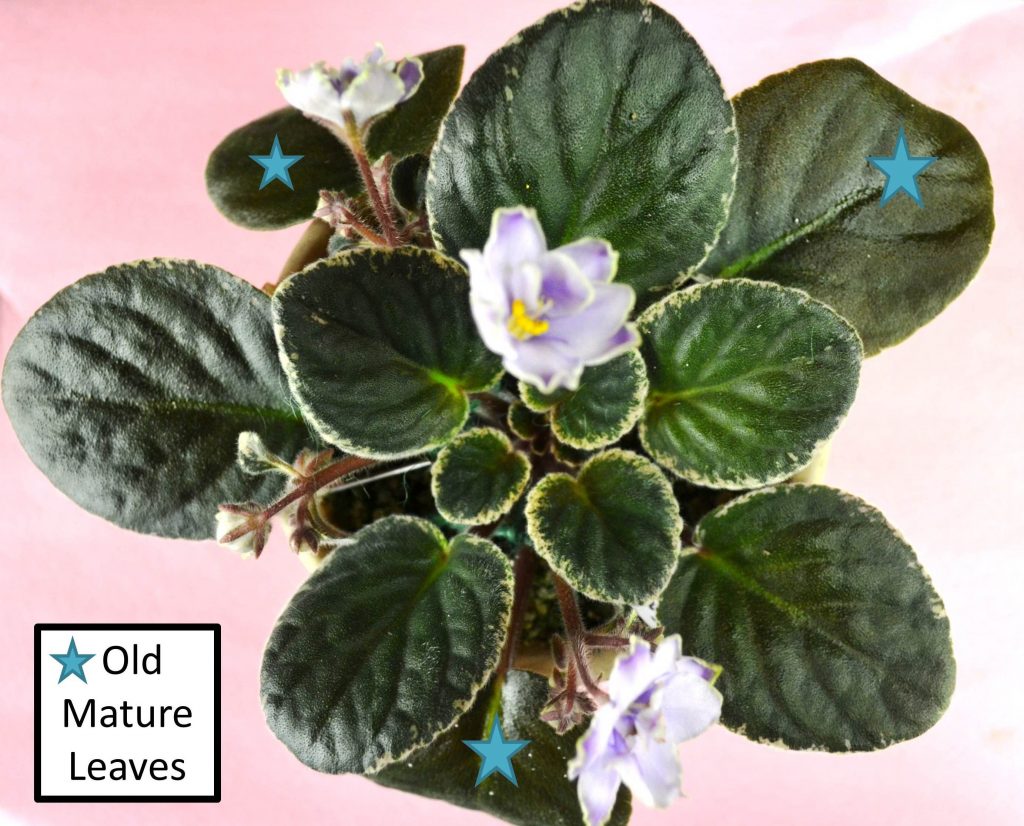
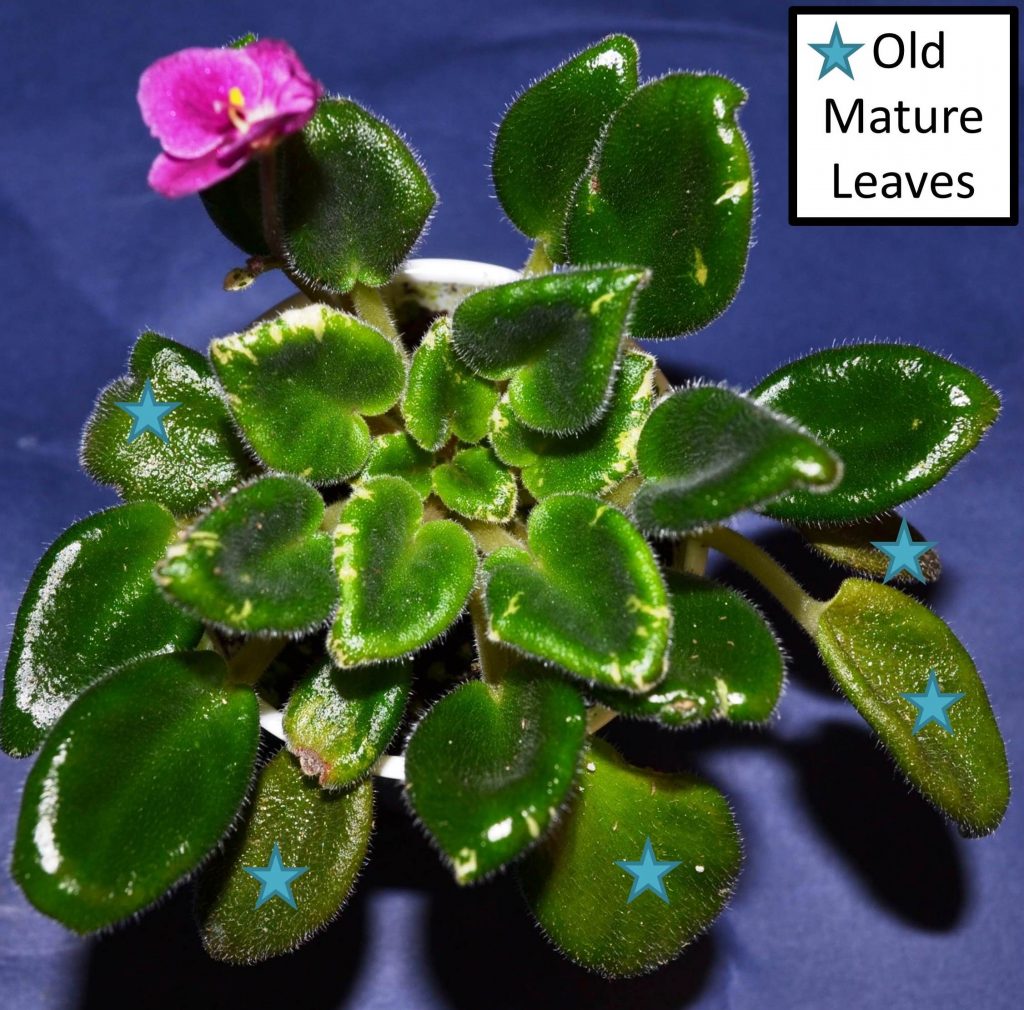
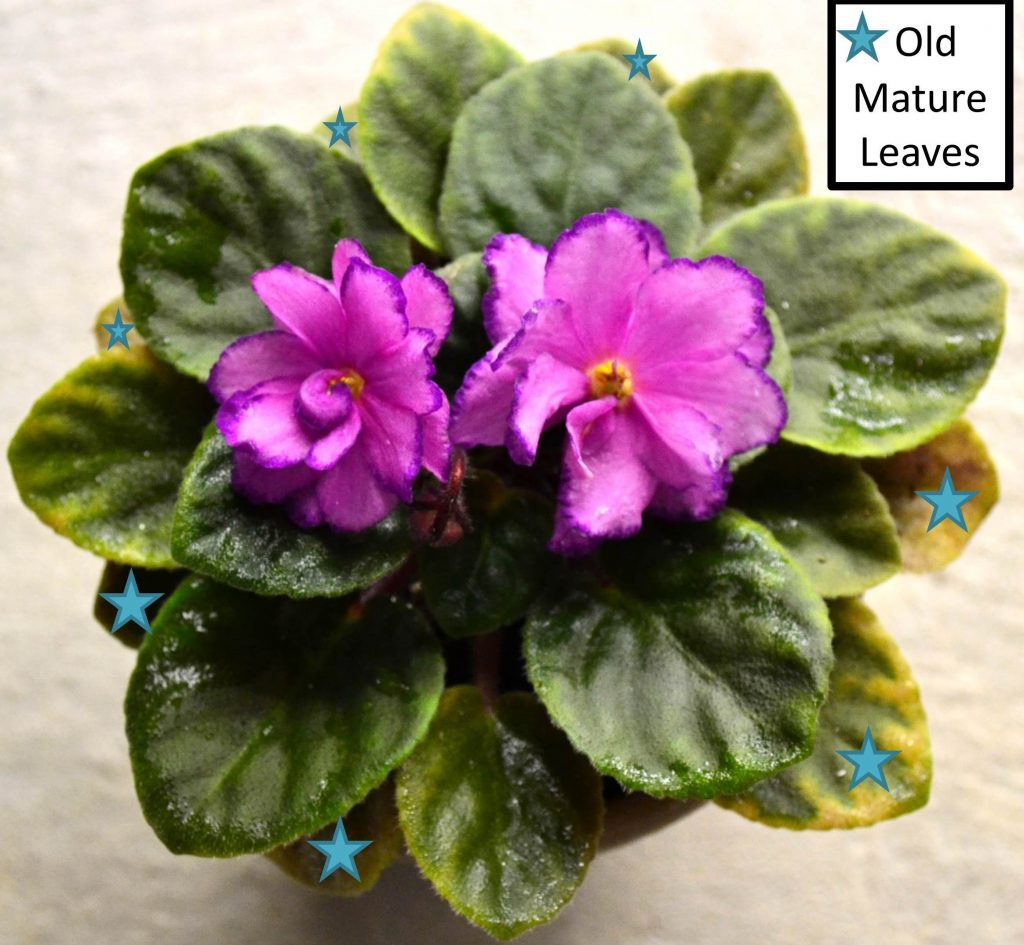
- As the plant uses its energy to produce leaves from the top/center, the lower older leaves start to lose their usefulness and die back.
- The plant loses these mature leaves as they become dry, shriveled or yellow.
- It then becomes necessary to keep removing these lower leaves to promote growth at the top/center of the African Violet plant.
- Overtime, as more and more lower leaves are lost or removed a bare stem or neck forms on the African Violet plant.
- As the African Violet plant grows, the neck pulls the plant away from the soil and the pot.
- This is when the neck needs to be buried/hidden underneath soil and the Violet needs to be repotted.

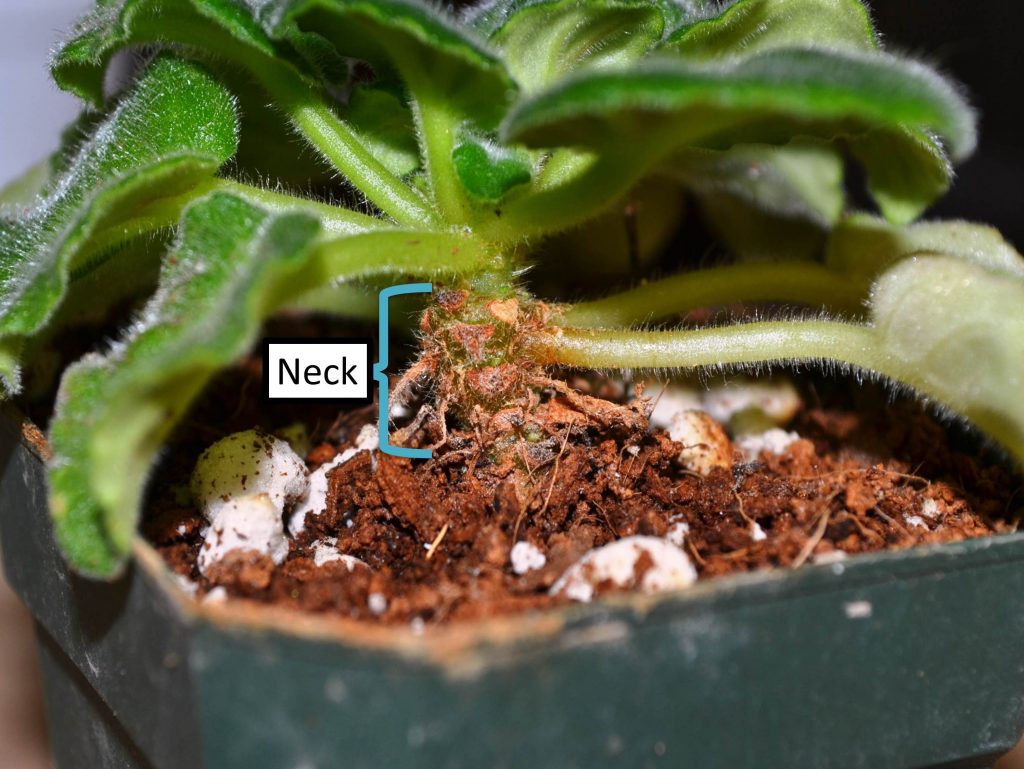
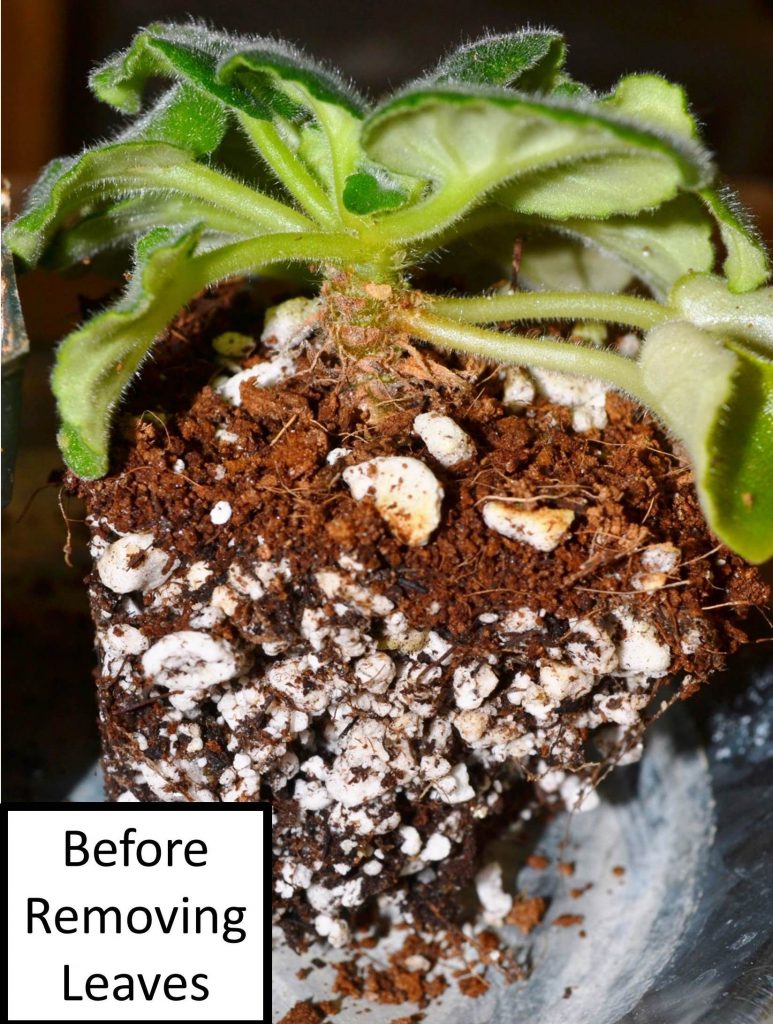
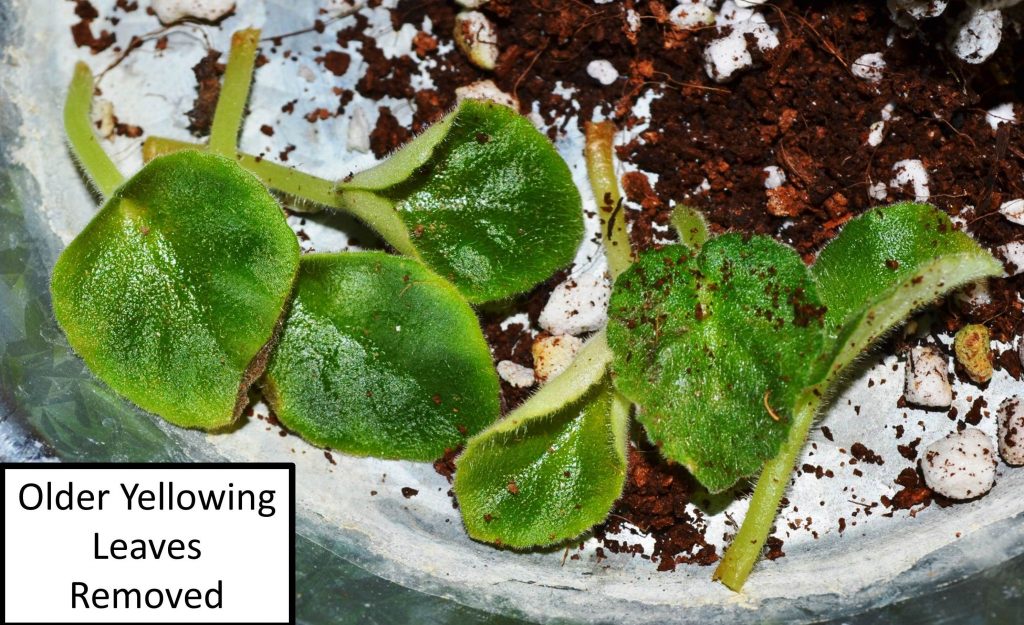
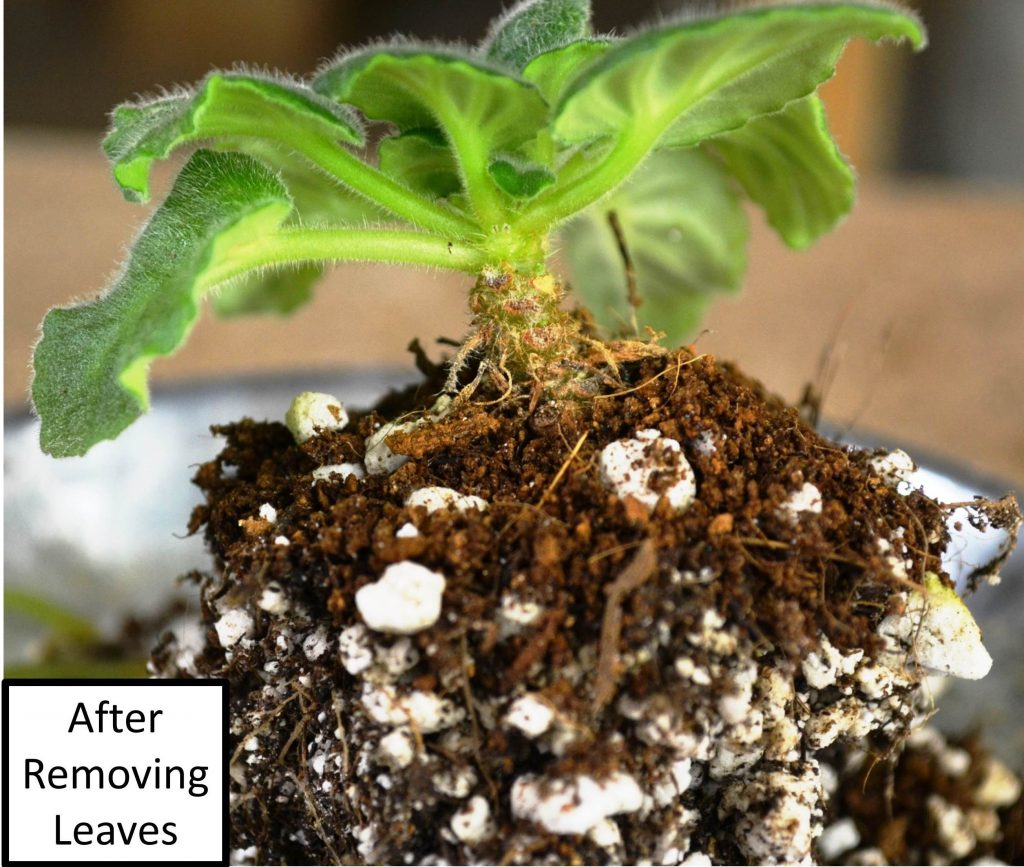
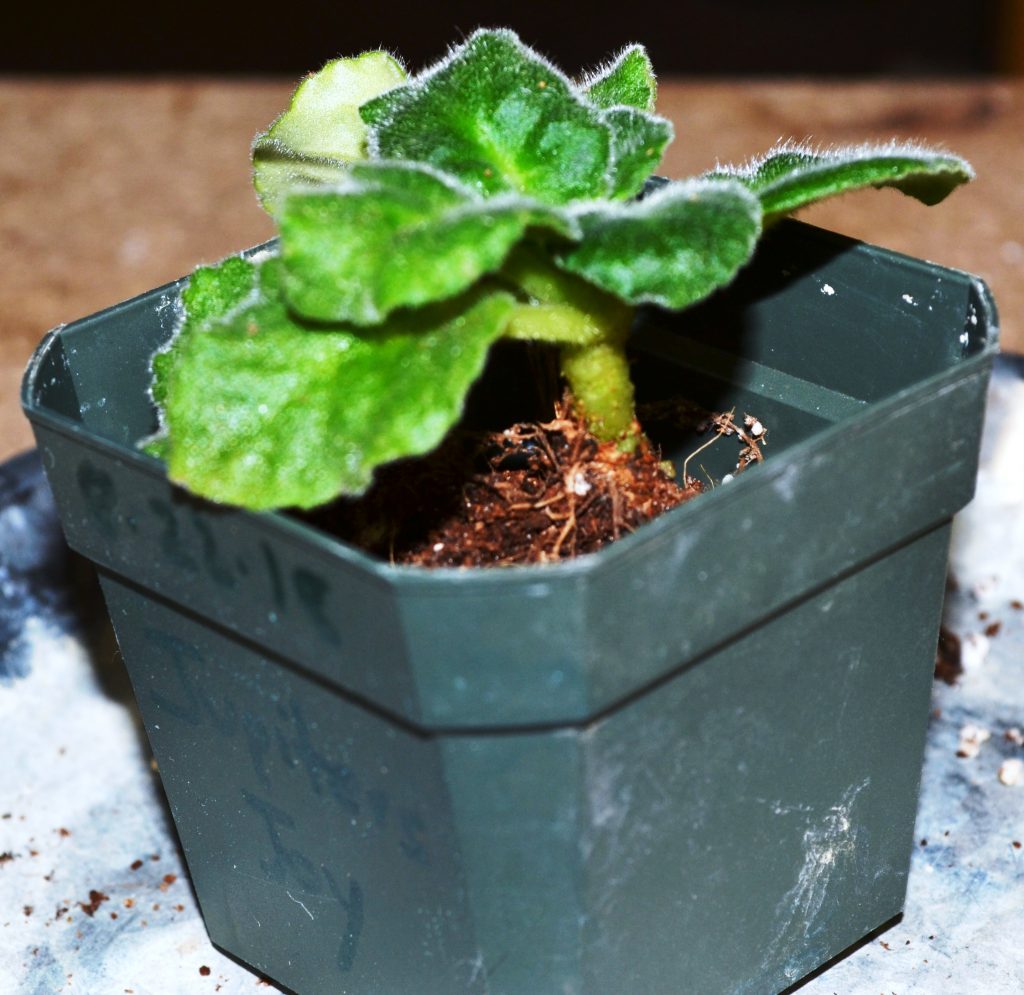
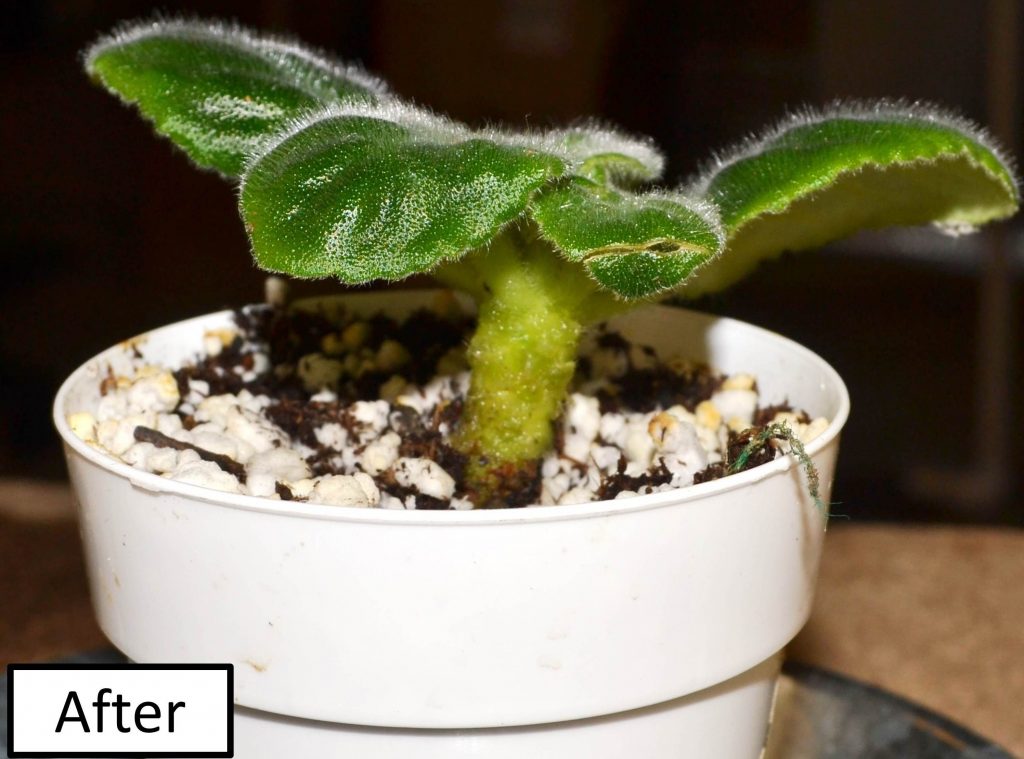
- Sometimes, when the lower ring of leaves become old, tough, yellow, brown or mushy, I remove 1-2 rings of leaves from the plant.
- This leaves behind tiny leaf stalks as seen below.
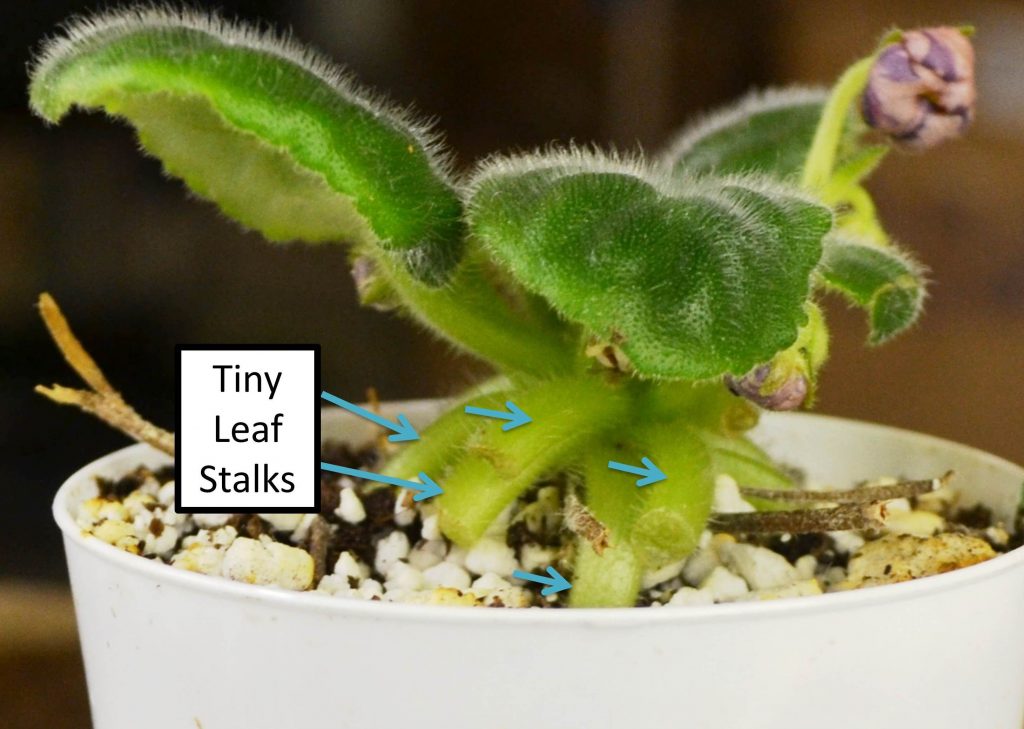
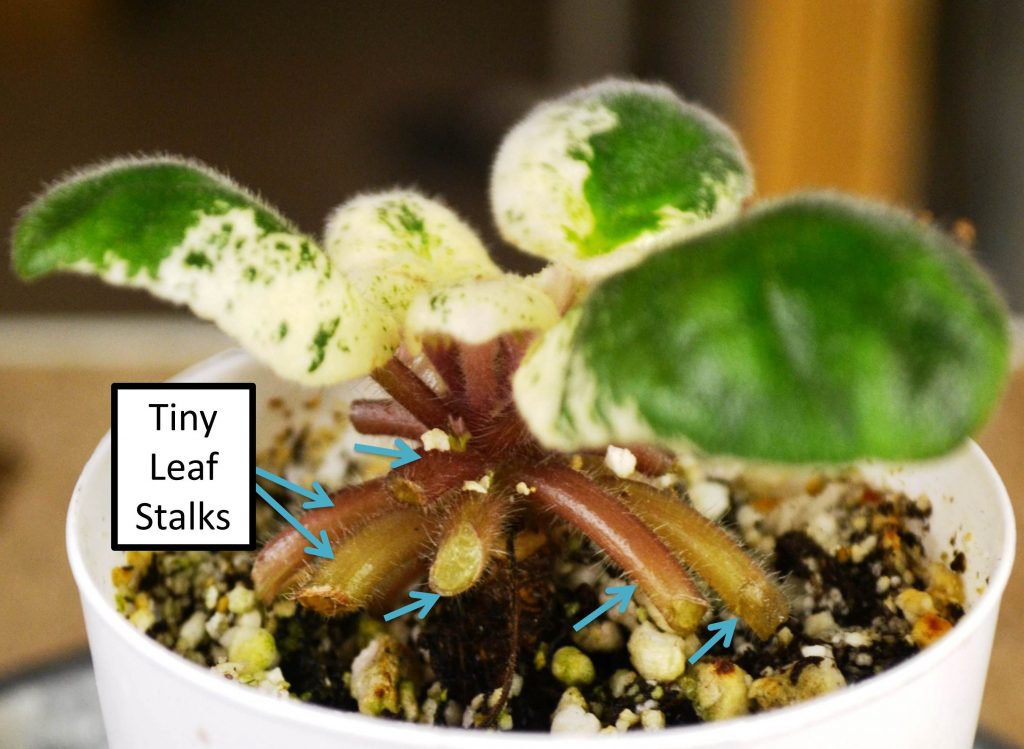
- When these stalks are removed, the neck of the African Violet plant becomes visible.
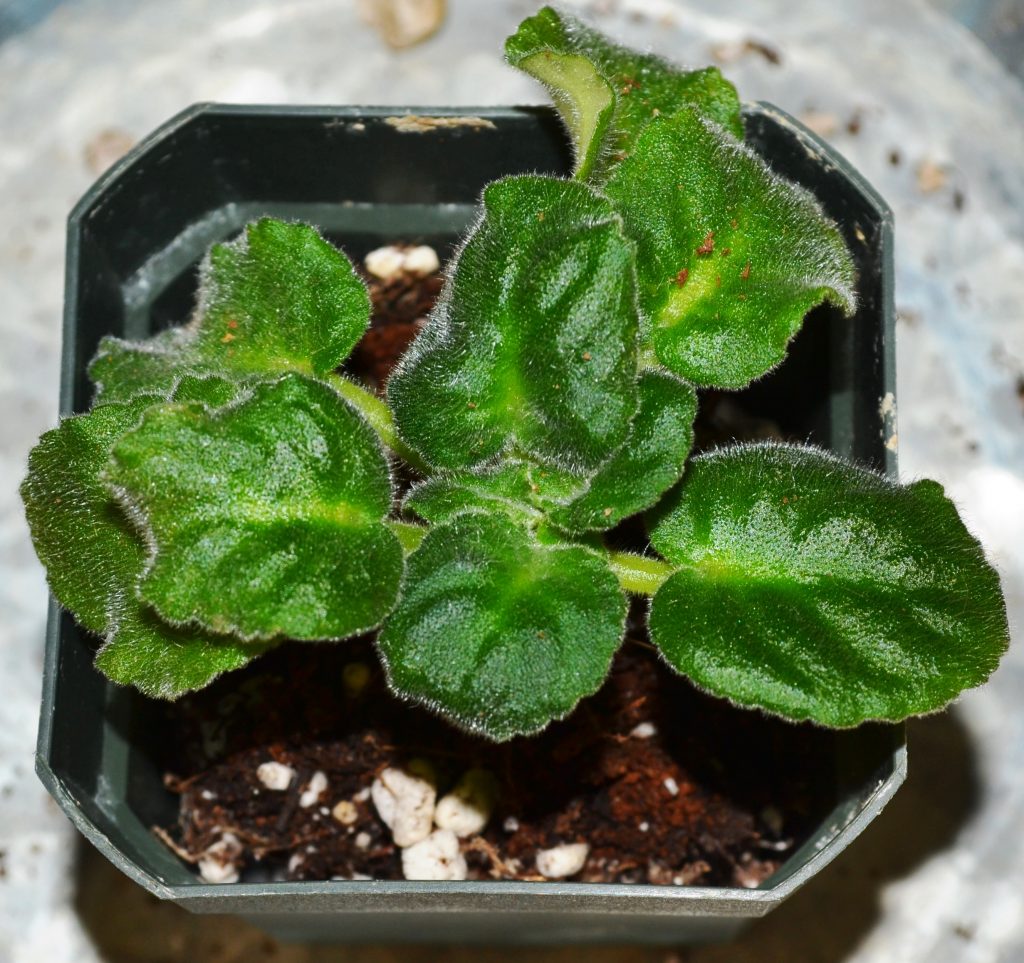
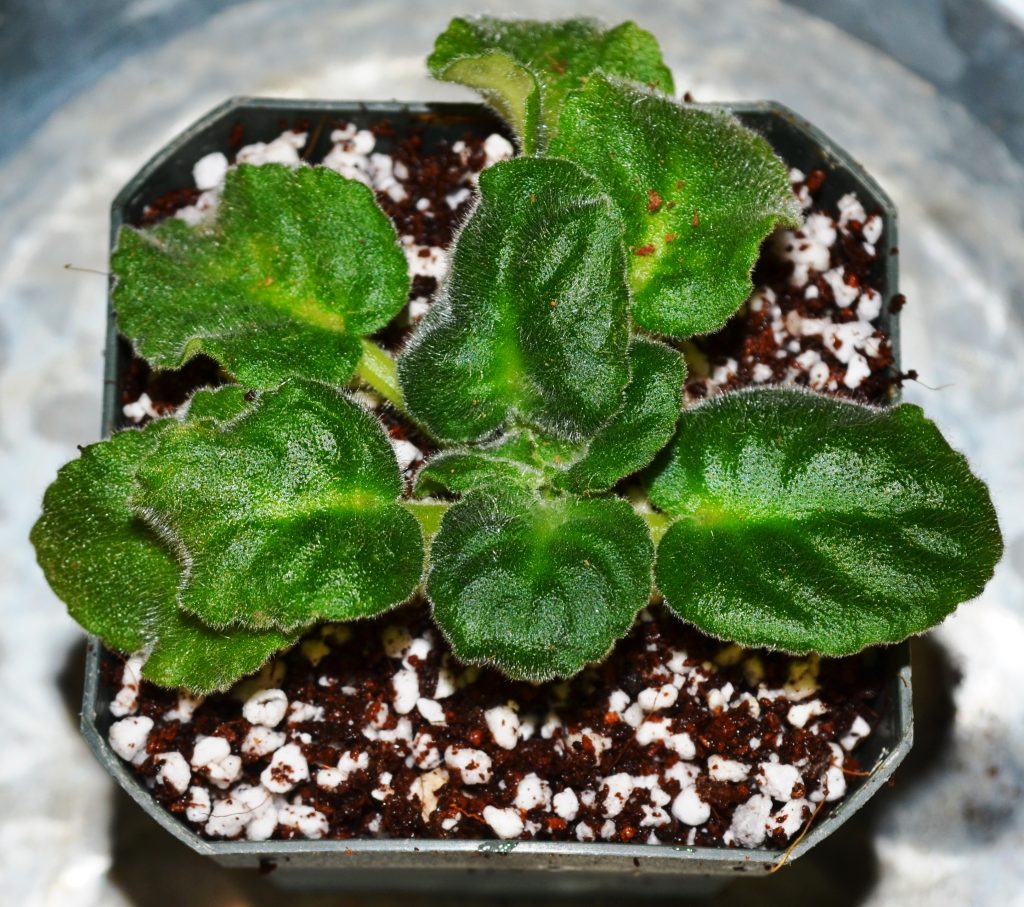
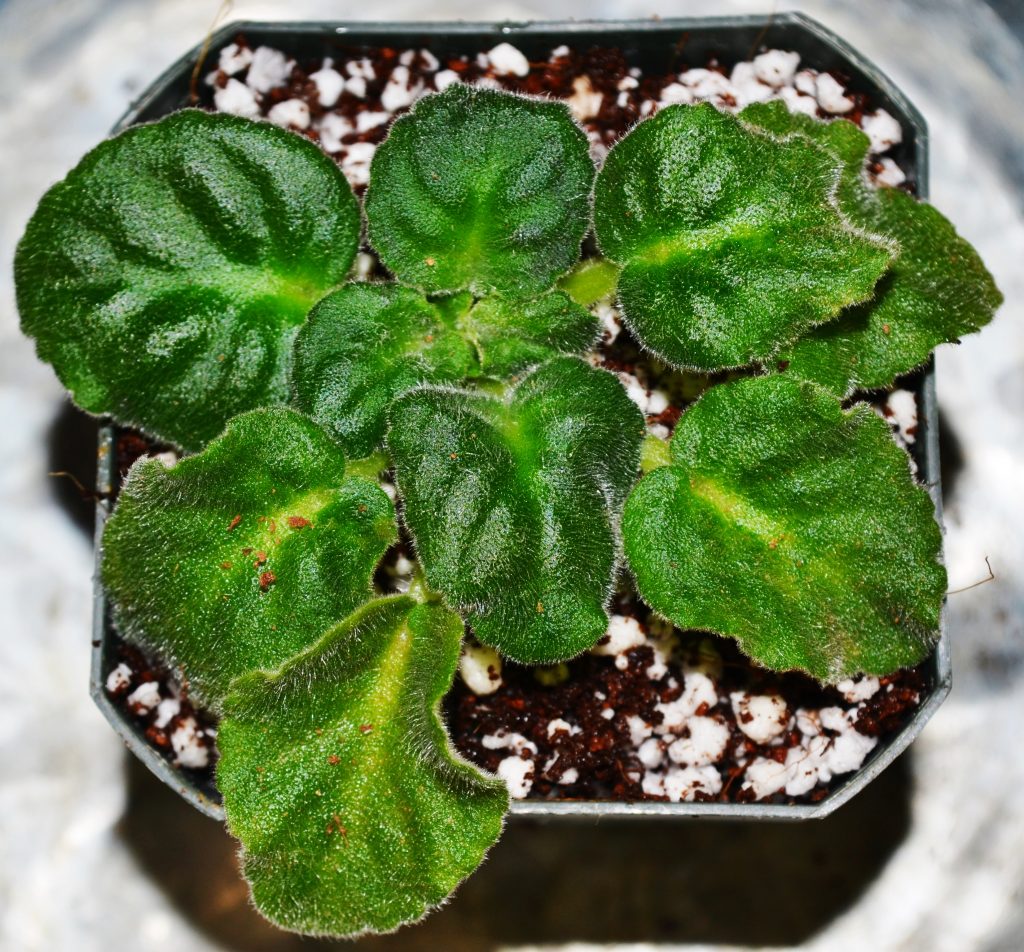
- Below are images of African Violet plants with the lower ring of leaves removed.
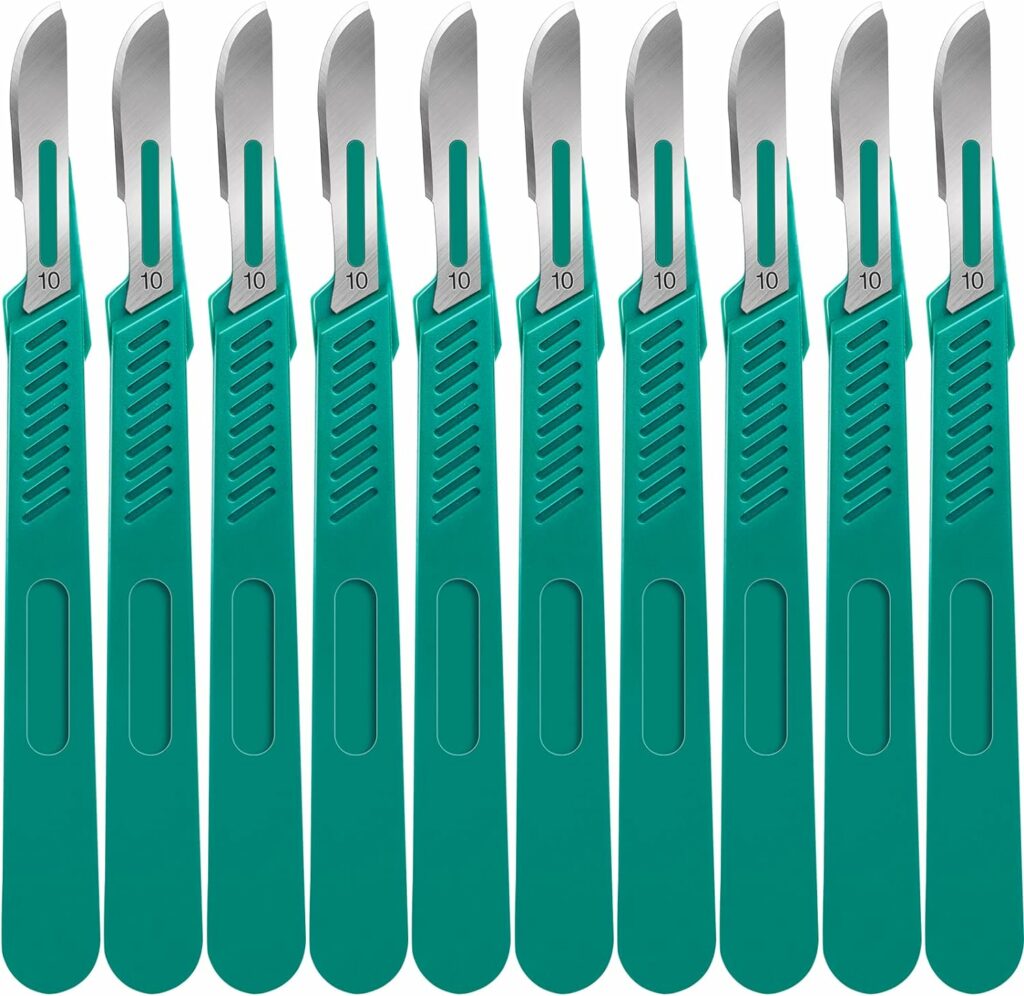
These tools can be helpful to perform the steps outlined below:

Why do we need to remove or hide the neck on African Violets?
- One of the reasons to hide the neck is aesthetics. The African Violet plant will look unattractive as it no longer maintains its flat rosette shape.
- The African Violet plant with a neck will eventually start to grow at an angle.

- The plant will be more susceptible to disease, such as root rot, if the neck is left exposed to the outside environment.
How to repot the neck on African Violets?
- Below are three examples which show how to repot African Violet plants with a neck:
Example 1:
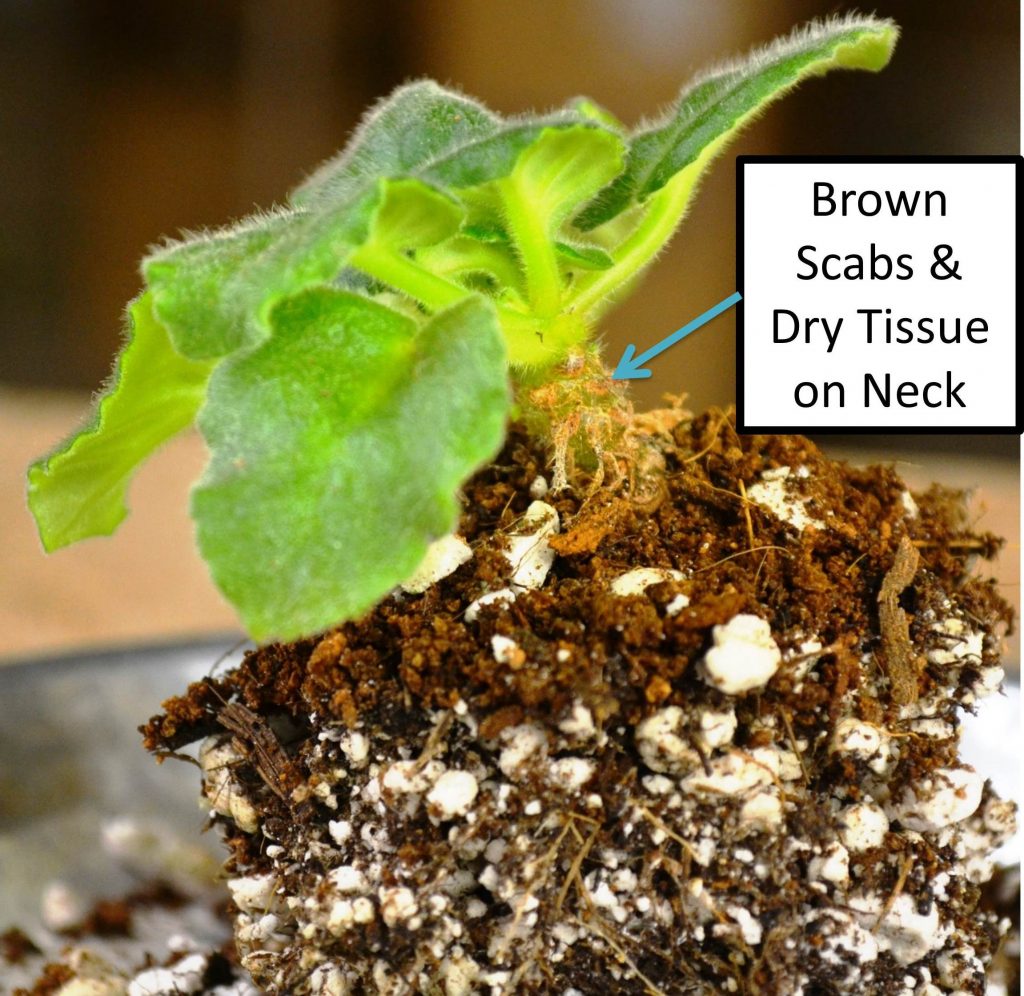
- This plant has lost its rosette shape and the bottom leaves are starting to look damaged, old and yellow.

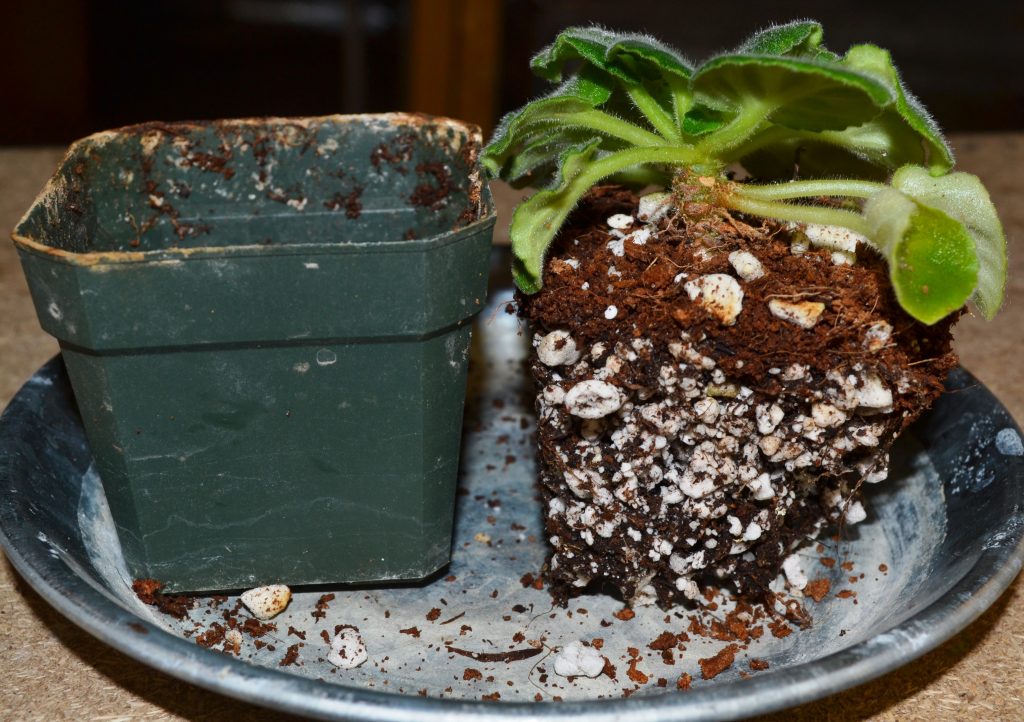
- I first removed few of the damaged, old and yellow leaves.
- This revealed the neck of the African Violet plant, which had brown scabs and dry roots up and around the entire length.
- I then removed the plant along with its root mass from the pot.
- To maintain its rosette shape, I removed a few more straggly leaves.
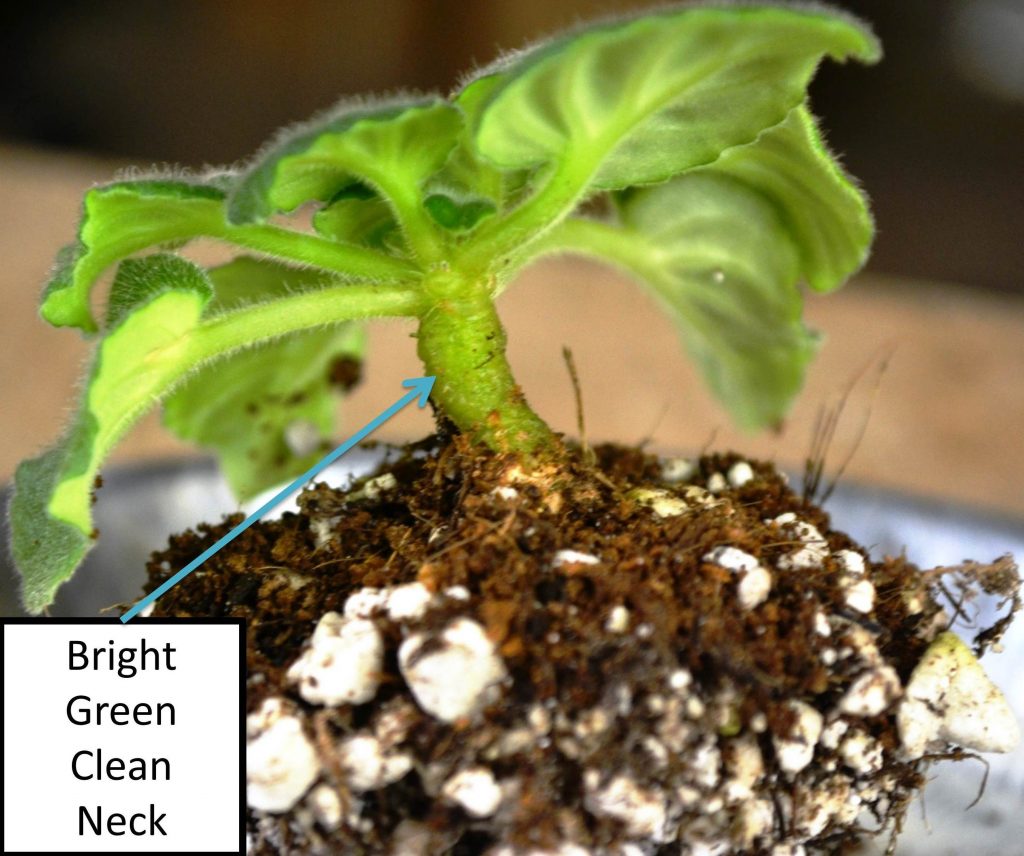
- To encourage new root growth from the neck, I scraped off the brown scabs and dry tissue from the neck of the violet.
- This can be done with a sucker plucker tool, a sharp knife or a clean fingernail.
- After scraping the neck the exposed tissue looks bright green.
Below sucker plucker tools can be used to scrape the stem/neck of the african violet plant. The micro pruners, can be used to clear the extra leaf stems.


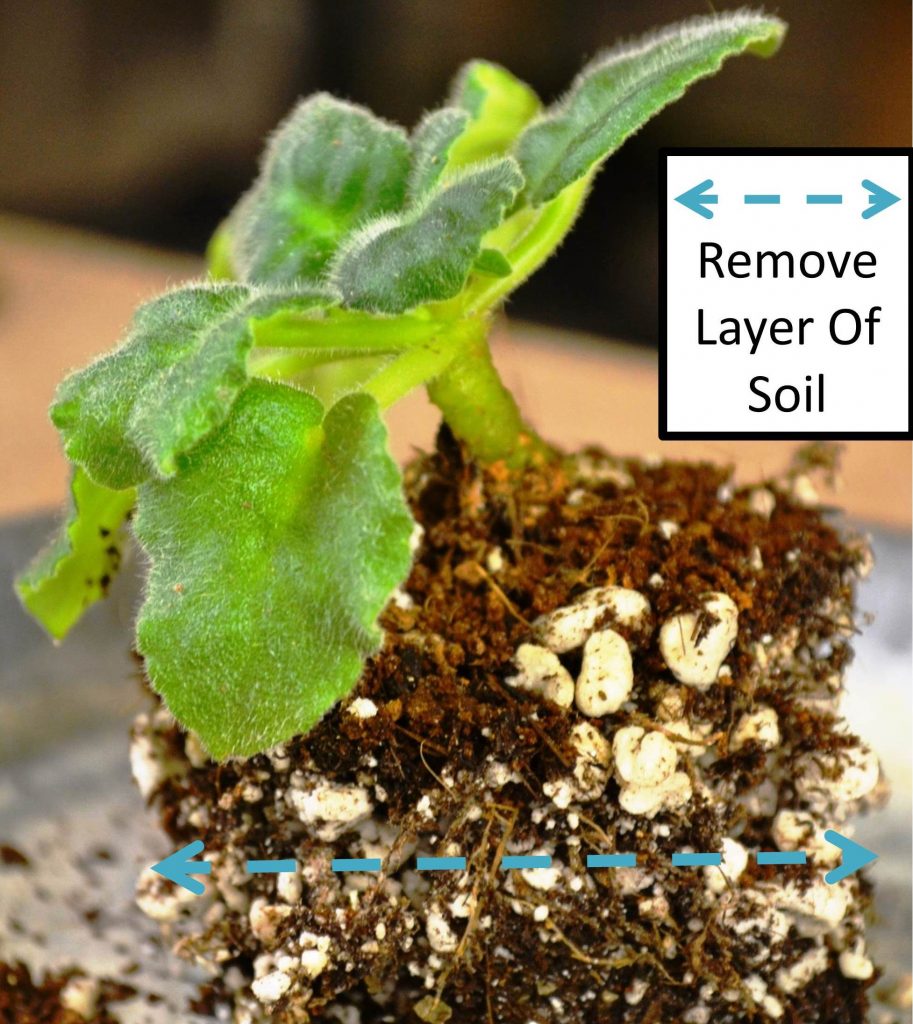
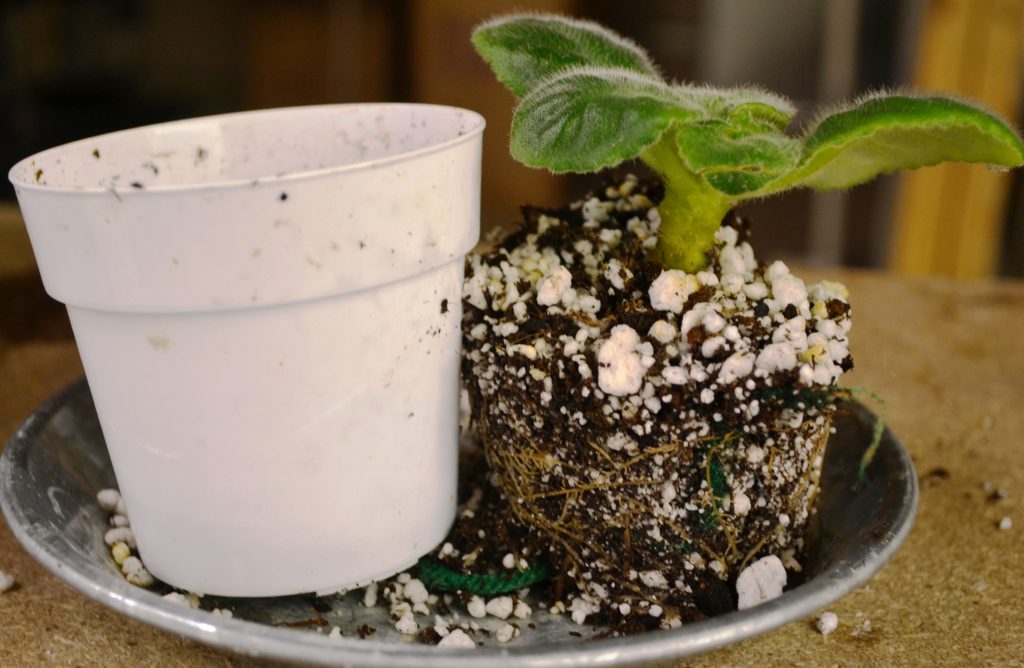
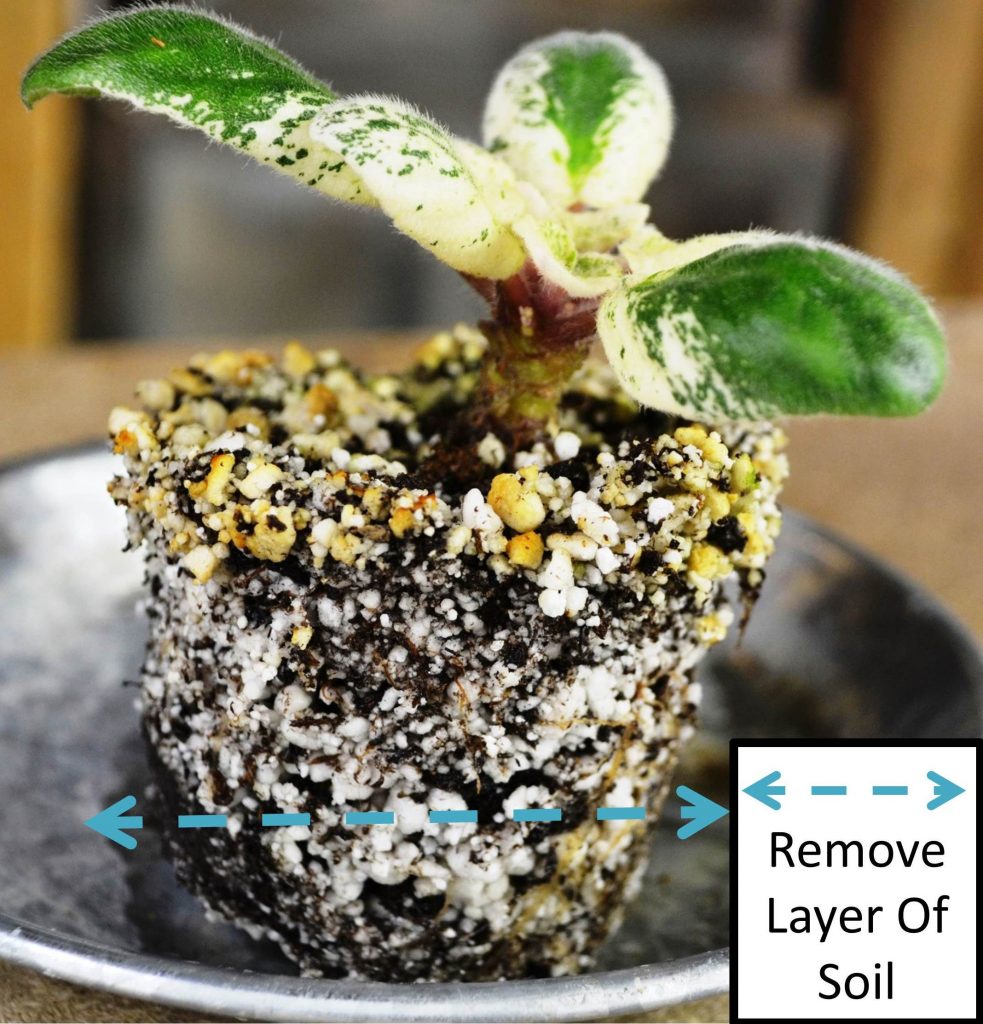
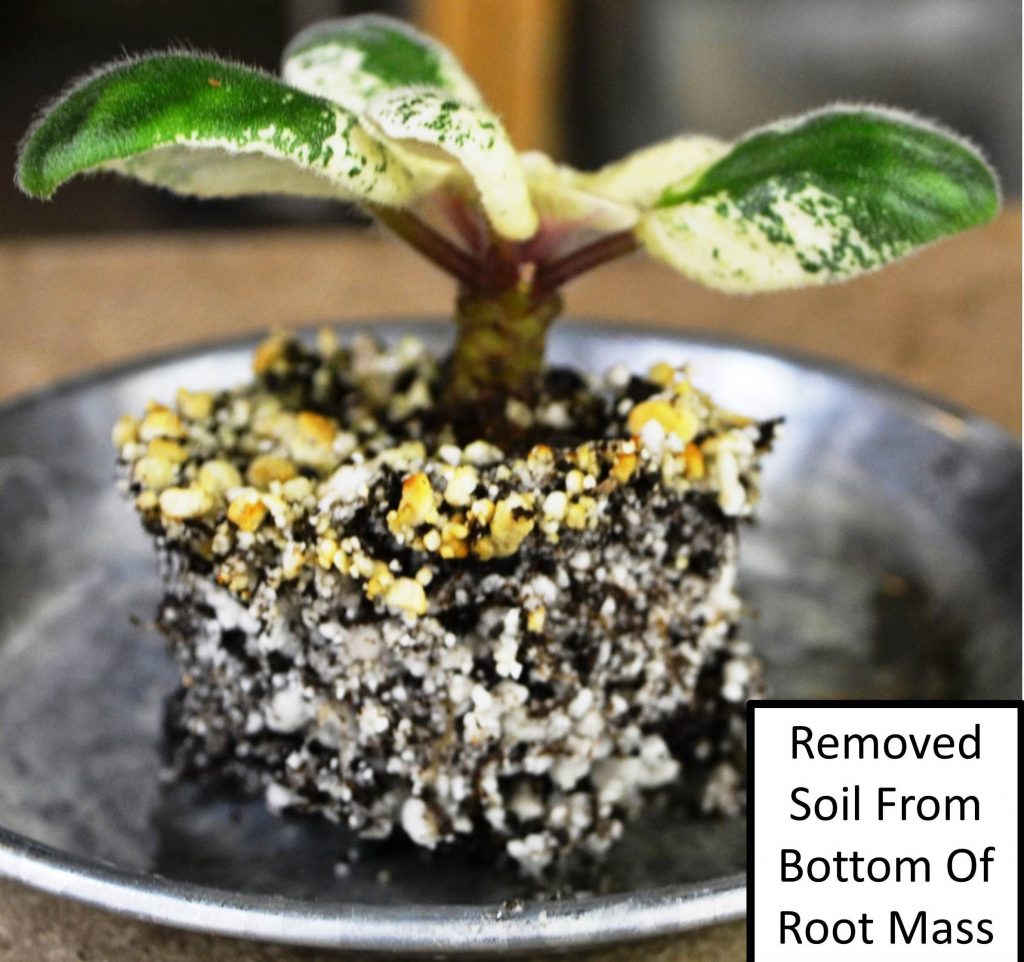
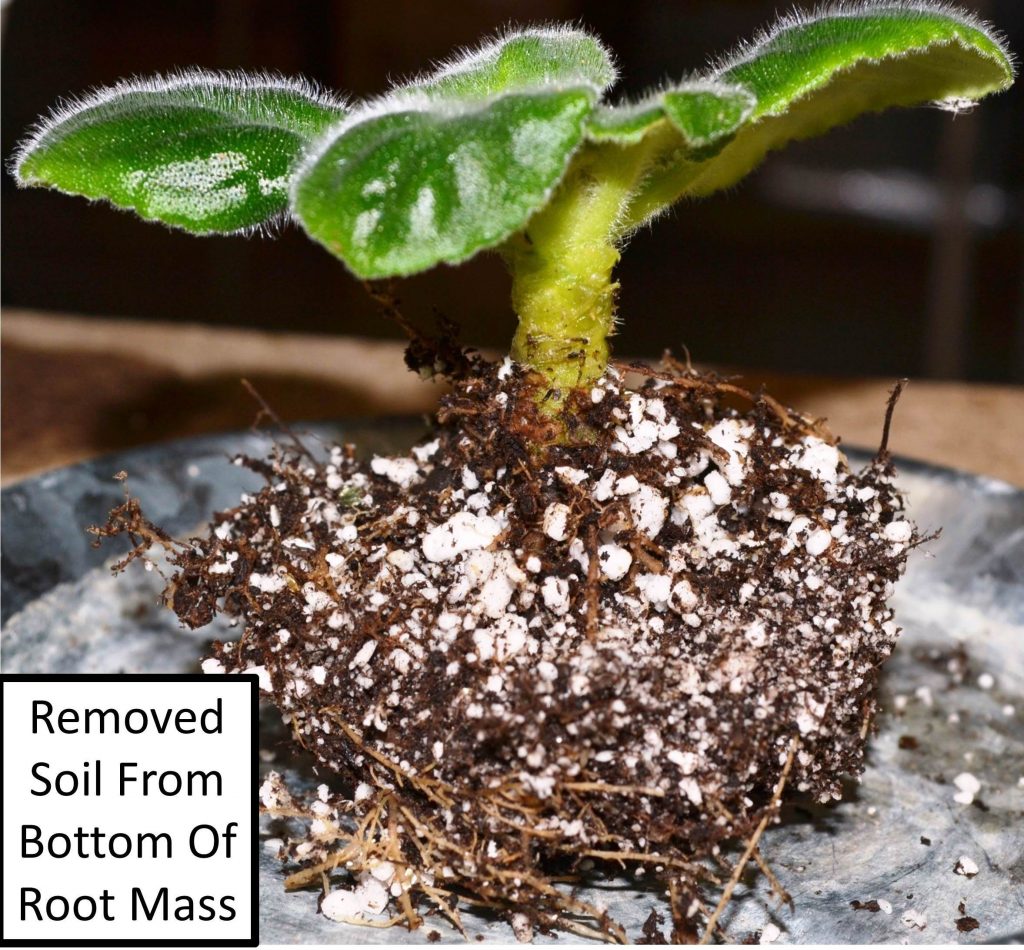
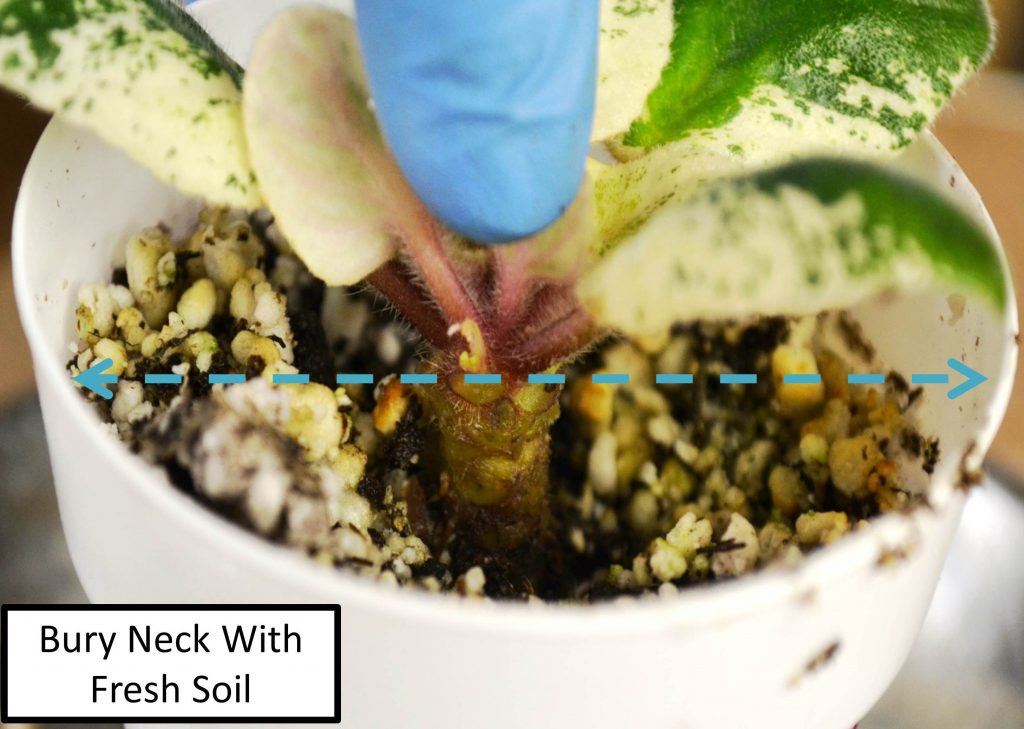
- Since my African Violet plant has not developed a very long neck, I just removed a layer of soil from the bottom of the root mass that is equal to the length of the neck.
- So my neck was around 1” in length, I removed around 1” of soil from the bottom of the root mass.

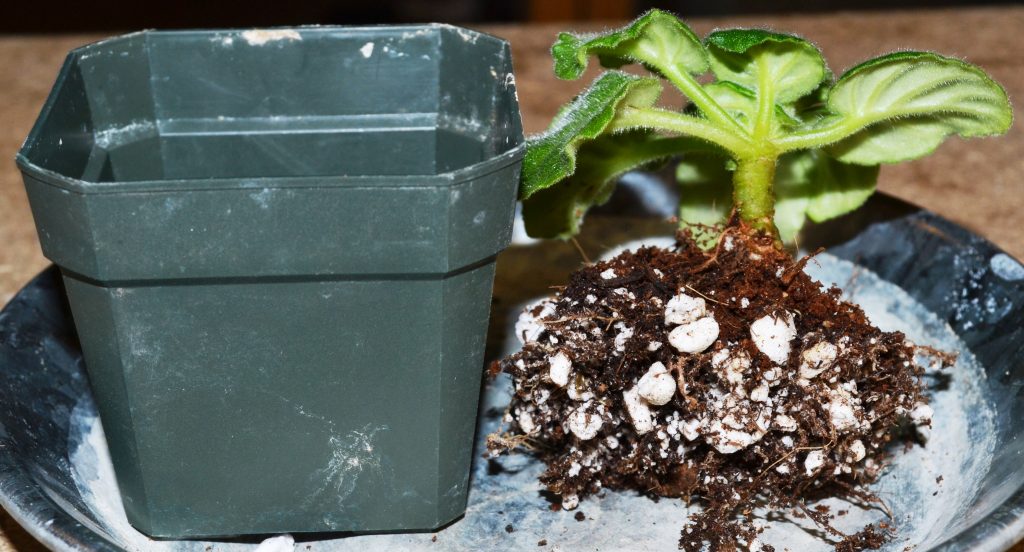
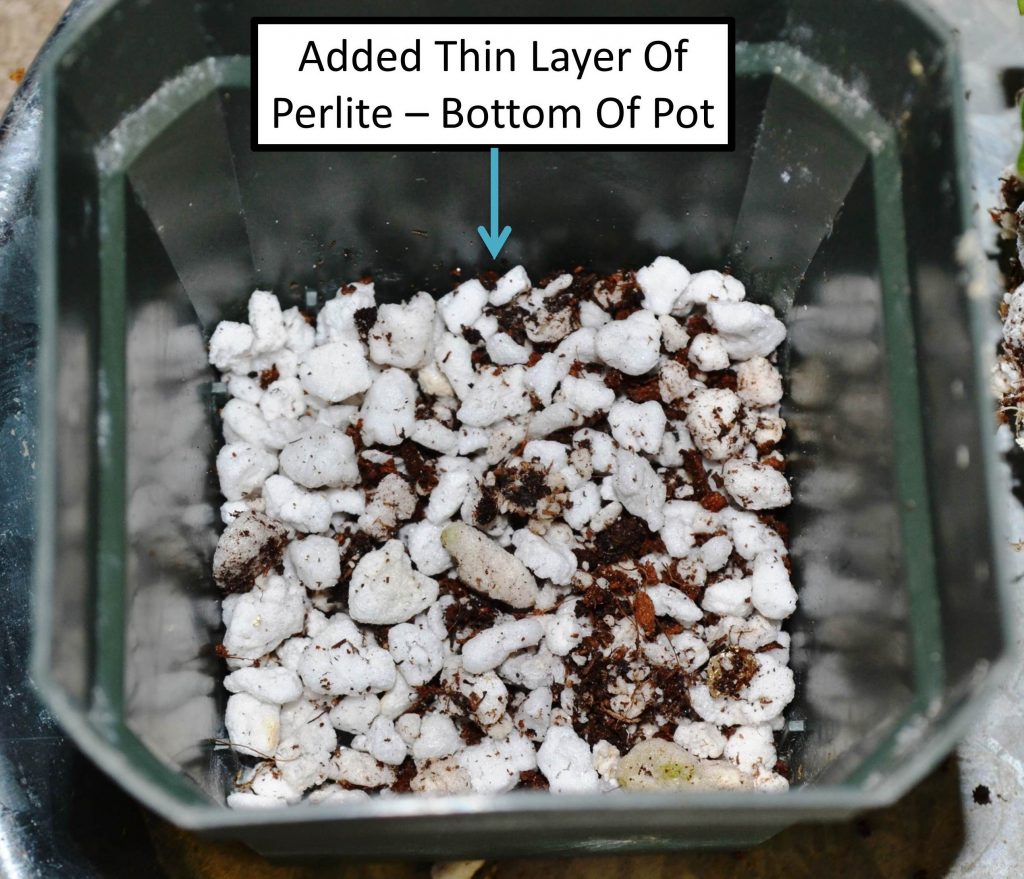
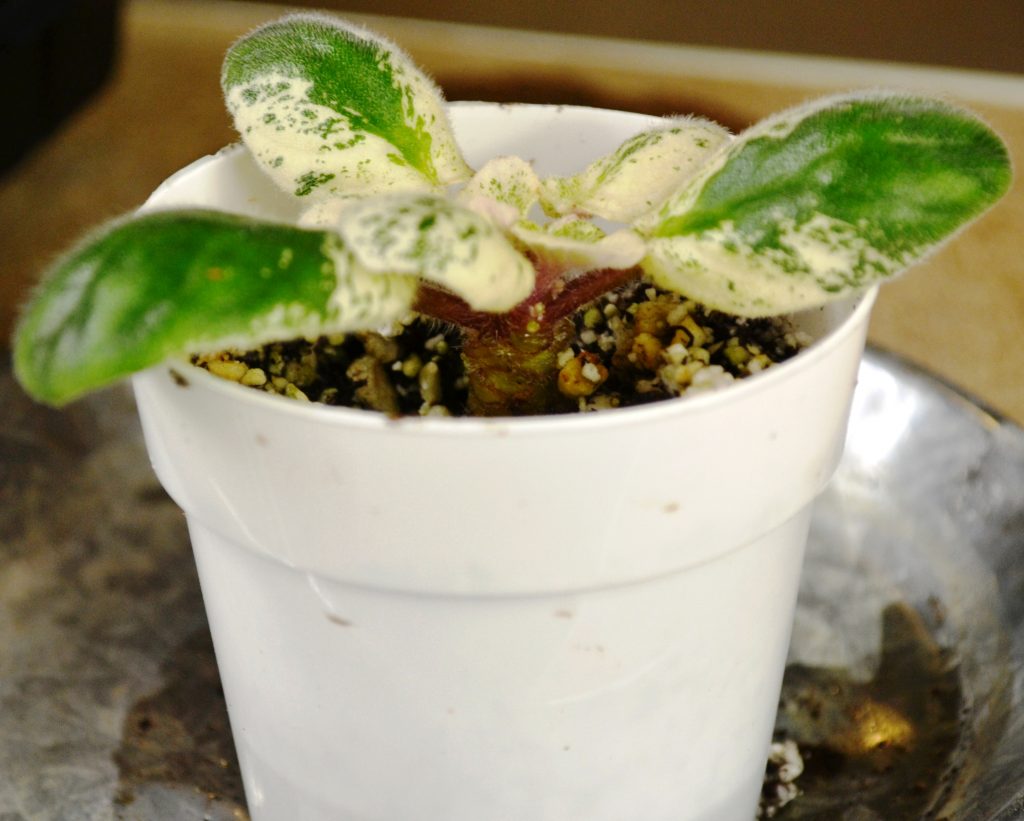
- I added some fresh perlite at the base of the pot and set the plant back into its pot.
- I then filled up the pot with fresh soil and covered the root mass and neck of the African Violet plant.
- The buried neck will now spread out new roots into the soil.
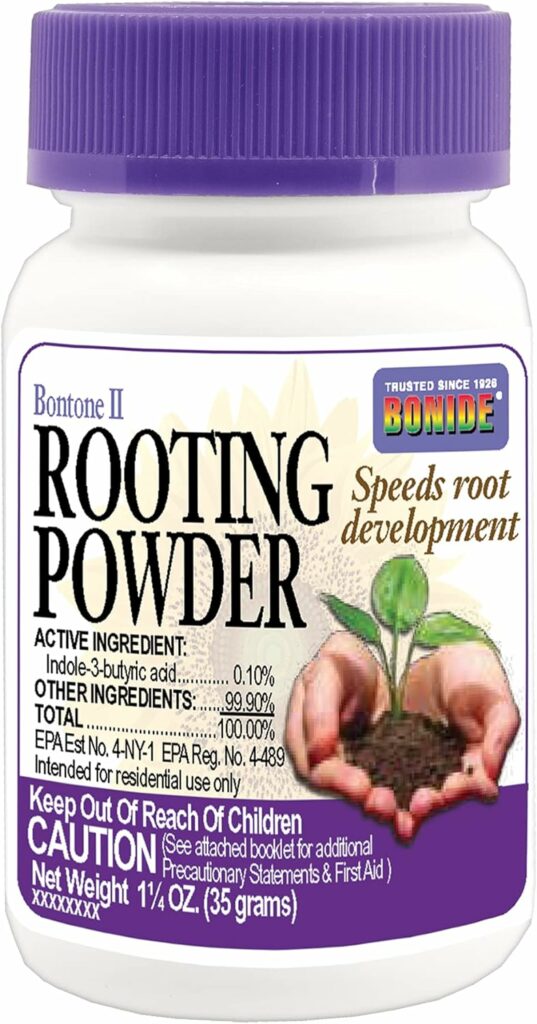
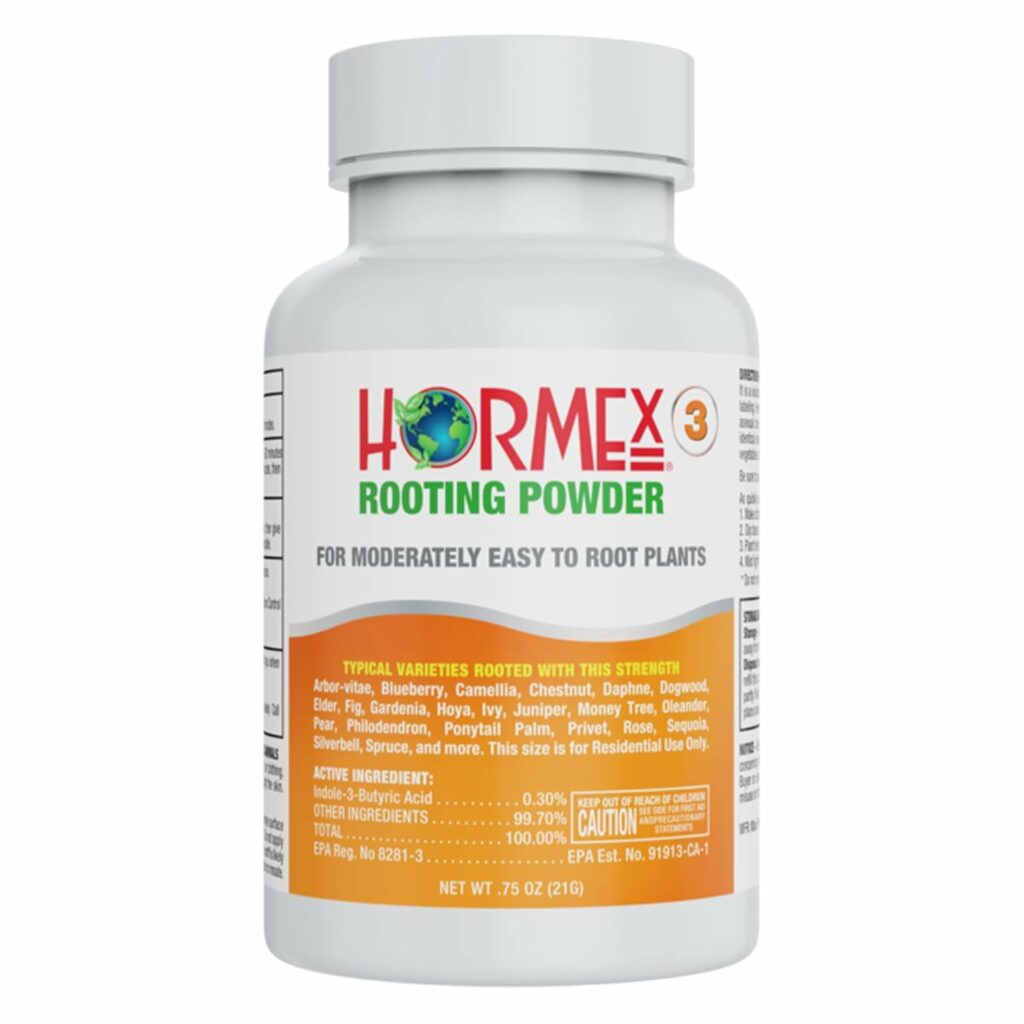
- You can sprinkle the neck with rooting hormone to speed up the process, but I have never done this.
- I just place the freshly potted up neck in a Ziploc bag or humidity dome to increase the humidity and promote root growth.
Example 2 & 3:
- I first removed two sets of leaves (6-9) which were dead, damaged, old, brown or yellowish in color.
- I then removed the tiny leaf stems completely off of the main stem of the plant.

- The plant is now ready for next step. Take a sharp knife or sucker plucker tool or use your clean fingernail and gently scrape the “trunk” or “bare stem” or “neck” of the plant stem all around and down the entire length, to expose the inner green tissue layer of stem.
- Exposure of this tissue layer along the neck/stem promotes growth of new roots.
- I used my fingernail to gently scrape the neck.
- I then removed the plant along with its root mass from the pot.
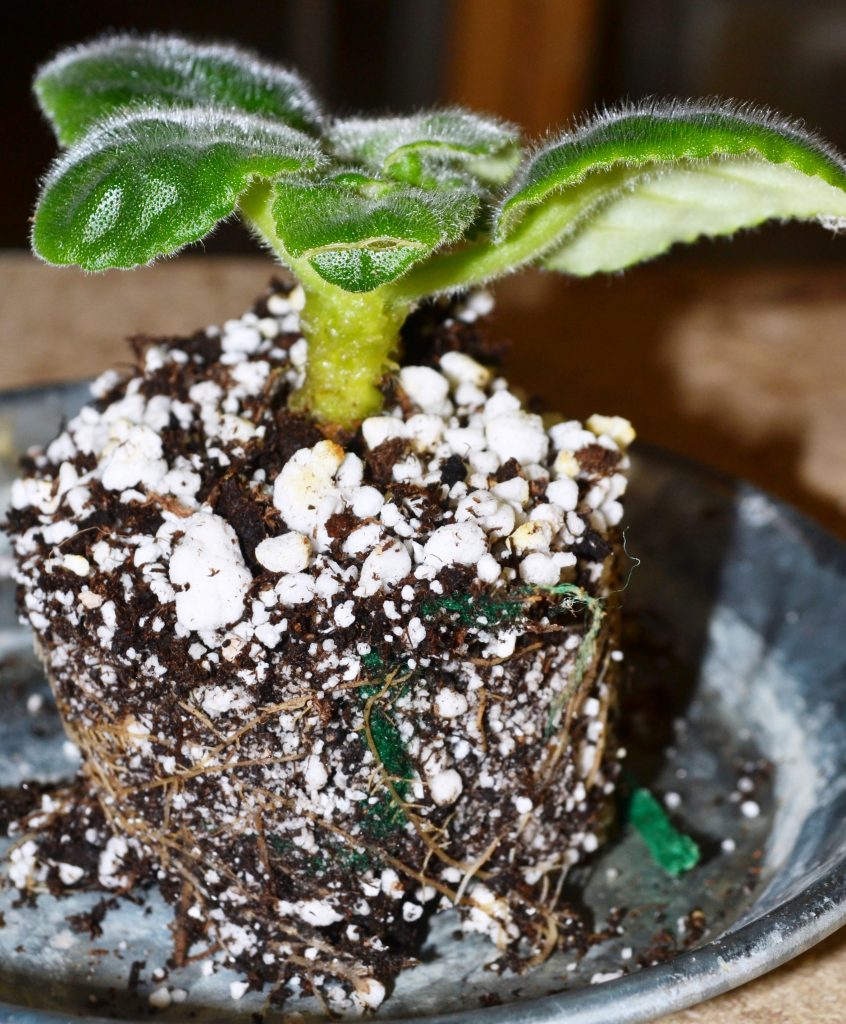
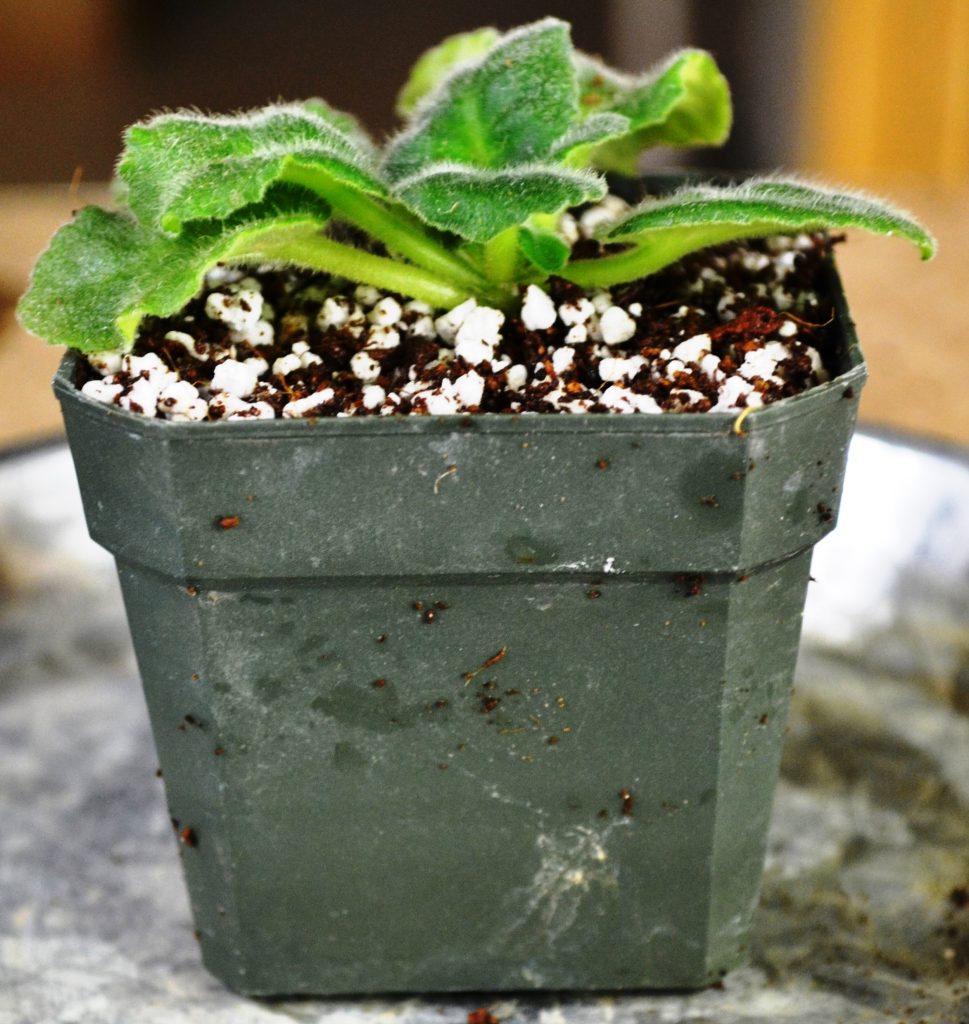
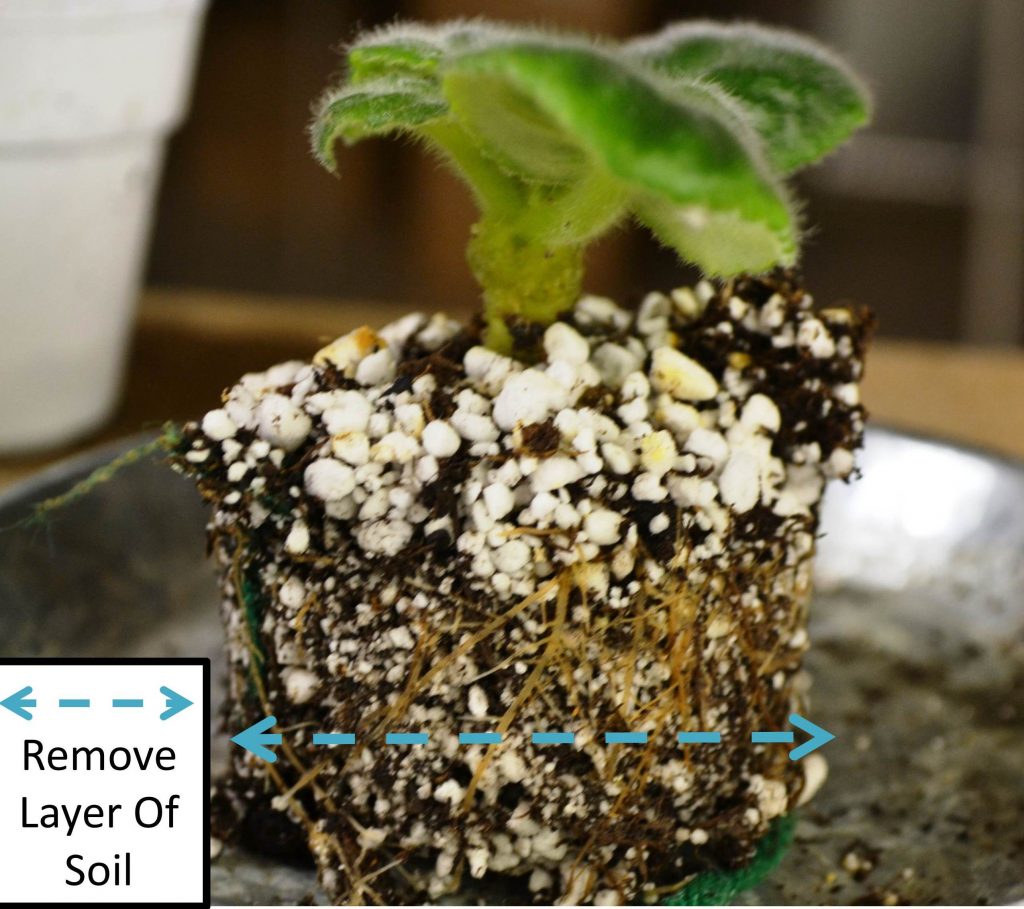
- Since both of these plants have a short neck, I removed only ½” of soil from the bottom of the soil mass.
- Here, I also removed a little bit of perlite from top part of the soil mass.
- Finally, place the plant along with its root mass back into the pot.
- I did not add any extra soil at the bottom of the pot, as there was enough on the plant and the height of the plant in the pot was just right.
Below are rooting hormone examples useful for rooting the sliced African Violet stem/neck or rooting suckers during re-potting or leaf propagation too.


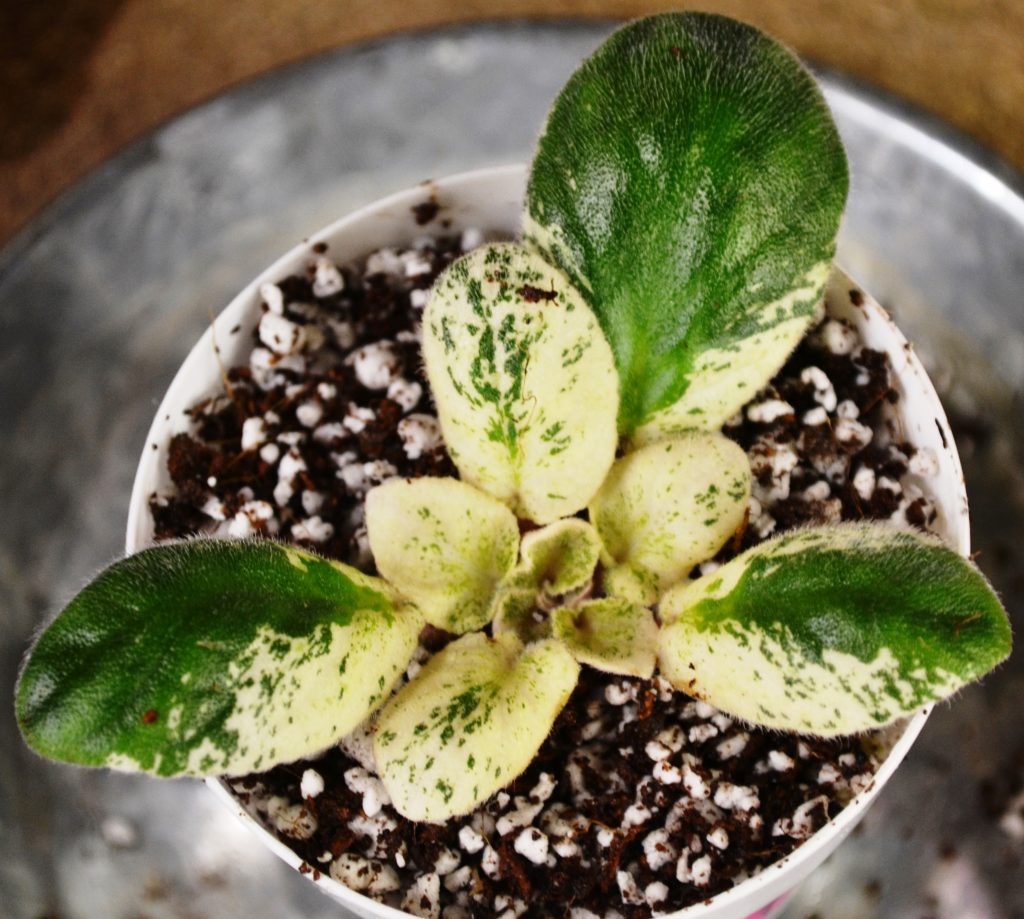
- The bottom leaves of the plant should just touch or graze the rim of the pot.
- If the leaves are too high, you can remove more soil from the bottom of the root mass.
- If the leaves are sitting too deep in the pot, you can add more soil at the bottom and then place the plant and root mass in the pot.
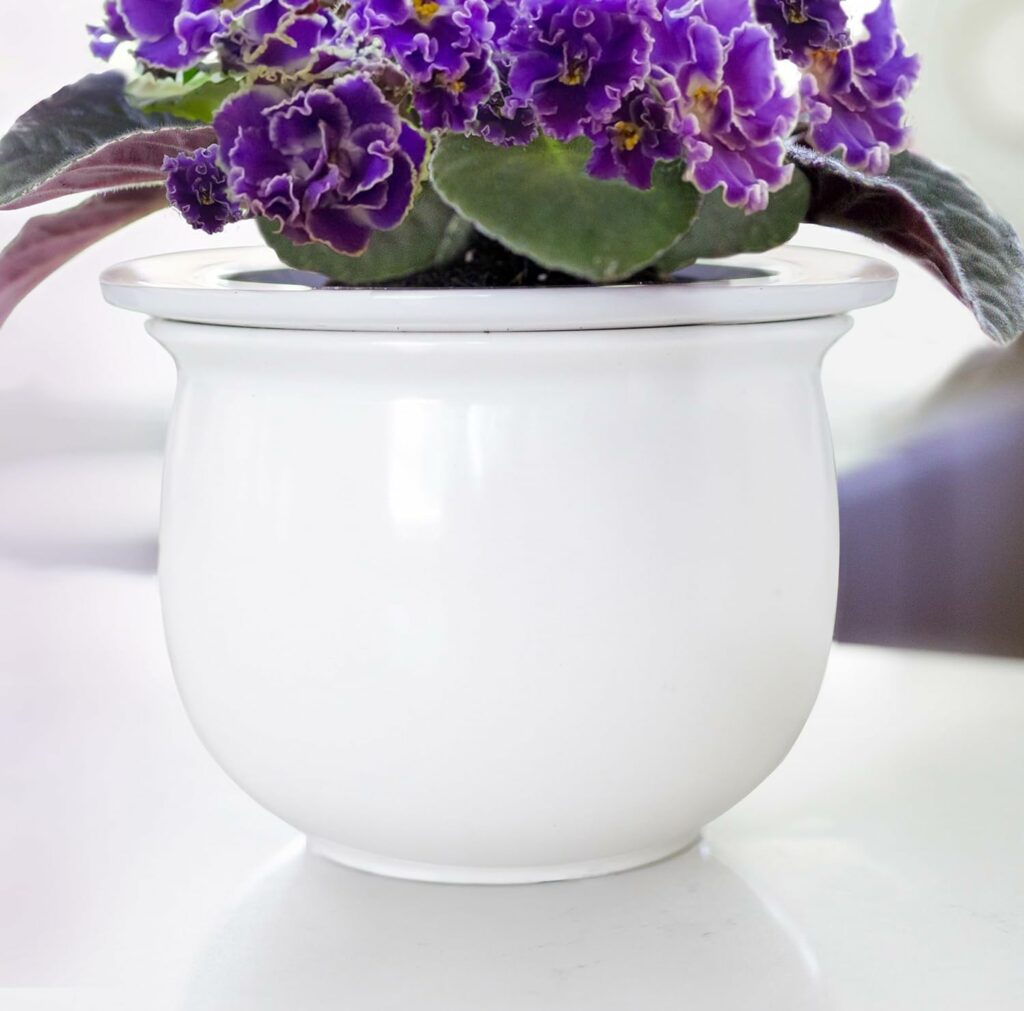
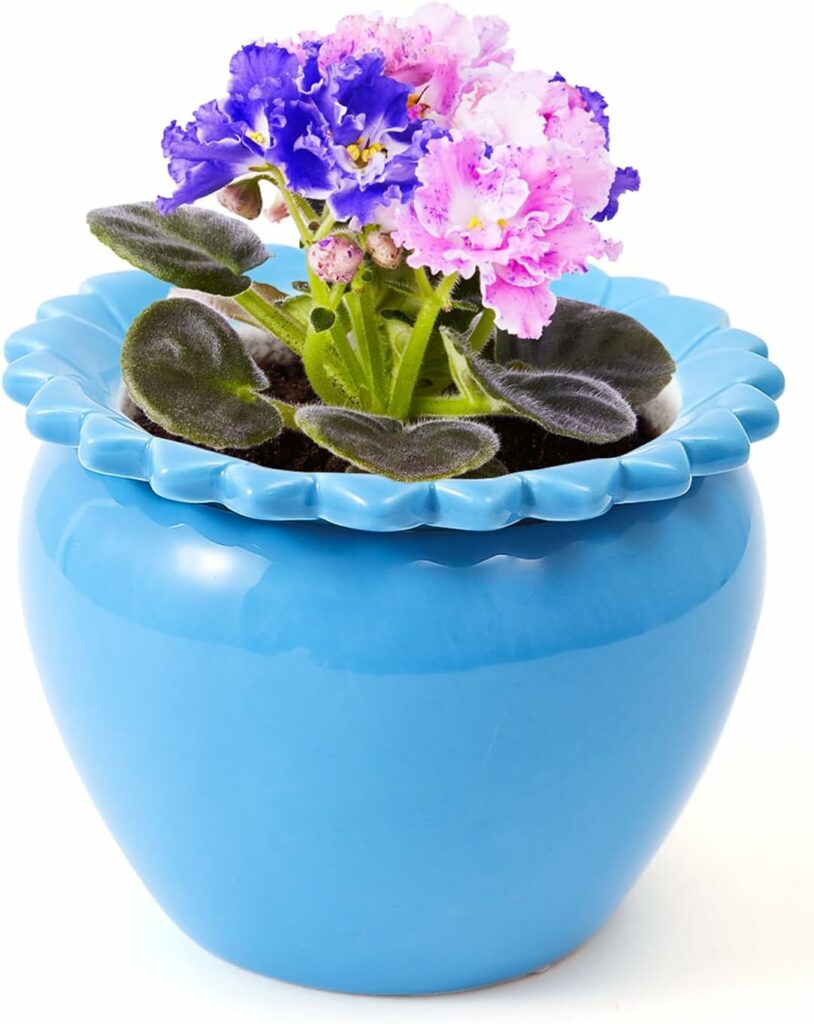
Ceramic pots with different designs, can be used as a nice outer container for your African Violet plants.

thank you for ur detail helpful explanation and pictures with it.
I fell into a swamp of violet.
Never get over it
Thanks Jade for your kind words. Happy hear the articles / blog posts are of interest!
I watched several YouTube videos and didn’t get the information I needed until stumbling upon your post. Thank you so much for your detailed explanation and extremely helpful tips! Off to bury my violet neck now!
Thank you appreciate your kind words, glad to be of help,
regards,
BV
Thank you. I have several violet plants that I need to do this to. Glad to see the explanations and photos.
Hello Barbara,
thank for your kind words, really appreciate it. Happy to hear my posts were useful! Happy Growing! BV
Thank you I read a lot of these and this on e on repotting and cleaning necks was one of the best thank you
Hello Vicky,
I am happy to hear the article was useful.Thank you for your positive feedback, really appreciate it.
regards,
BV
You just answered so many questions of mine,thank you! Your photos made it so easy to follow…. I was afraid to remove suckers thinking they were normal….THANK YOU
Hello Laura,
Thank you so much. Happy to hear the article was useful!
regards,
BV
I have an African violet that had grown too crowded, when I inspected it, it had a long neck with 2 visible plants on it. I don’t
know how to separate them.
Please advise!
Hello Sandra,
thank you for your question. Is your plant a trailer, if it has two visible plants on it then that’s ok. If its a normal rosette variety then if possible, you should try to remove one of the plants, whichever is easiest to remove. If one of the plants is slightly growing to the side, then can remove that one and leave the other plant which is growing in the center or seems to be the main part of the plant. Can carefully slice off one of the plants at the base with a sharp scalpel and pot in a light weight potting mix. Place the pot in a sealed ziploc bag for at least a month. Keep a eye on it, water when necessary, no need to fertilize for now and it should start to send out roots. If you could send a picture, that would be helpful, could give more specific advice. Best of Luck! BV.
Thanks for the response, But I’m still confused. Where should I send the pictures?
Hi Sandra,
can send pictures at babyvioletss@gmail.com.
thanks,
BV
Ok I send them!
Hi , this Sandra again, the one that sent the pictures on March 7.
I have the plant in the plastic bag like you said, however I forgot to ask if I close the bags and if I place them on the window south side or a neutral place with some light and no sun.
Thank you
Sandra
Hi Sandra,
Yes, the bag should be closed. An enclosed environment will help the crown give out new roots. If you observe lots of condensation / water droplets inside the bag, you can open it up, wipe the water drops clean, or leave the bag open for a few hours, then close the bag again. If the soil becomes too moist/soggy due to condensation, then open up the bag a little to allow for air circulation, keep bag open. I am not sure about the light. I usually keep my recovering plants in the same light as they were before. I dont give any special light treatment. If you had kept them in a south window, keep them there as before. African Violets like indirect filtered light, no direct sunlight. Hope this helps, best of luck, BV
Thank you very much!
Hello, I’m enjoying reading all your good advice! I have several nice rosette type African Violets, have had beautiful healthy foliage and lots of blooms. Then I brought home a new color from a local nursery, and soon my plants all had tiny green aphid-looking insects on the flowers! The nursery denies any responsibility, but I never had any pests, for several years until I bought the new plant. I’ve diligently cleaned every tiny green insect off with a Q-tip, scotch tape, often checking the plants, every few hours for more. I get them cleaned off, and all look good for a while, until another set of blooms on any of the plants, and then it’s as if the tiny aphids emerge with the buds! Soon the first flowers to open have drops of residue, and little shed skins or excrement?, and the rest of the clusters of buds get hard and often don’t open. I snip them carefully out and discard, have tried so hard to clean these insects off manually, isolating the ones that are blooming, and for a few weeks I don’t see any aphids, the foliage looks full, healthy, vibrant, and then the aphids come again when the bud clusters come up.
Please help!
Hello Marilyn,
thank you for your question. So sorry to hear about your dilemma. It seems like maybe after your cleaning, new eggs are hatching and they show up again. Did you check the soil? Is there anything in there. I am not sure what these bugs are, they sound like thrips. If they are clear in color and hang out around the buds, then it may be thrips. If so, first remove all the buds. Check the leaves, do you see any, underneath also. You mentioned you see sheds of skin? this may be pollen on the flower, which the thrips spill as they feed on the flowers. I would recommend using neem oil, this may help. Try it for a few weeks, spraying once a week. If it doesnt help, then any other insecticide, for thrips/aphids. Are they transferring to your other plants? Or just this one plant. I would isolate this plant in a ziploc baggie or keep it away from your other plants. Next time when you bring a new plant, make sure to isolate it for a month at least. Change the soil after a month and still keep it isolated for a few more weeks. Hope this helps. Maybe you can send a picture of the bug to my email at babyvioletss@gmail.com and I could assist more. regards, BV
Great info! My poor violets have been neglected for over a year but made it through 2 moves. Unfortunately, they now have very long goose necks. I don’t want to repot into larger pots and have heard that the neck can be cut off and roots will grow from the remaining neck. Will that work after preparing the neck the way you describe or is cutting off the old neck with roots too much of a shock? Thanks!
Hello Keitha, thank you for your question. Yes you are absolutely right, it is possible to cutt off the neck and then repot, the roots will grow back. In fact I did that to 10 of my violets last week and took pictures too. In the future hoping to write an article about that. Coming back to your question, yes, you first remove all the roots/soil away from the neck. Then remove the blooms and leaves, except for 4-5 leaves. Its important to leave a few leaves on the plant, that will help feed the new growing roots. Then you cut the neck around 1″ – 2″ in length, if you have that much. Then you can scrape the neck as I have shown. Clean the brown scappy part off and clean off the soil from neck. Then at the bottom cut part of the neck, try to make a V shape, that is the bottom should be like a sharp pencil. Can use a scalpel to slice the bottom sides (1cm) into a V shape. Add soil to your 2″ pot, insert the cut neck, place pot in a baggie or humid enclosed environment. Leaves for a month. Hopefully should see roots. Hope this helps, regards, BV
Thank you so much! I’ll get started!
Great post! I appreciate the detail and accompanying pictures. I have tried to re-pot and bury the necks of my violets before but found that the neck rotted out and I either lost the plant or had to re-root it in water. I had not seen the step of cleaning the neck back to green before, so that is different, but is there something else I may have done wrong when I tried before? I do water from the bottom, so it wasn’t that.
Thank you so much for your help and original post!
I have had fantastic results by re-rooting my plants in water first, then re-potting. They even bloom while still in the water.
Thank you for posting this. I have a 7 year old African Violet. It developed I long neck that I left mostly exposed when I reported a few months ago. I recently noticed two additional plants growing off of the neck. Now I know what to do. Thanks!
Thank you for your comment, appreciate it! Glad to hear things worked out.
Thanks for the info. We have a violet that I bought for my wife on our first Valentine’s Day together over 28 years ago!
Why do I get white spots on the leaves?
Hello Scott,
thank you for your kind words. Glad to hear your violet is still thriving!
regards,
BV
Hello Leona,
thanks for your question. There may be a couple of reasons for the white spots on African Violet leaves. It may be cold water splashed on the leaves, which can leave behind a white/yellow spot/ring mark. After watering, remember to soak up any water spills or droplets. It could also be sunburn, if the leaf is exposed to direct bright sunlight. If its tiny white specks or spots, it may be powdery mildew. Hope this is helpful,
regards,
BV
Great post! The only one I came
Across with pictures that were very helpful. 😊
Thank you so much for this detailed, clearly written, and informative post. It was so very helpful and gave me the confidence to repot my long necked AV! Before I repotted, I removed all of the flowers so that the plant could focus on growing new roots. Do you know roughly when I can expect to see my AV bloom again? Thank you!
Hello Rena,
thank you for your kind words. Glad to hear the article was useful for you. First you should see new growth coming from the crown and within 1-2 months a new set of leaves from the center crown should appear. Then you should see new buds appear with enough humidity and regular fertilizing. Hope this helps,
regards,
BV
Hello Bobbie,
thank you, appreciate it!
regards, BV
Your post with all the details and photos of each step how to repot the long neck violet is so wonderful. Thank you.
I have a violet that seems to grow so many small leaves with short stem and would not bloom . Can you help? Another one grows long stem leaves on one side and short stem leaves on the other even though I rotate the plant often
Hello Thuy,
Thanks for your question. That is quite interesting that you have long leaves on one side and short leaves on the other side. Did you groom the plant and remove some of the leaves, it may be that the leaves are from different rows. Usually the longer leaves are found at the bottom rows (closer to the pot rim) and the smaller leaves grow closer to the crown. With regards to no blooms, the first step would be checking the soil, if it needs re-potting (once every 6 months) and regular weak fertilizer should help too,
regards,
BV
Hello, I have an African Violet that has grown quite large. It also has another large African Violet growing out of the stem. How do I separate them without damaging either one? Do I cut off the one growing out of the stem and re-pot it hoping it won’t die?
Thank you.
KF
Hello Kathy,
thanks for your question. It sounds like you have a large sucker on your main African Violet stem. Yes, you can carefully slice off or scrape off the out growth from the main plant and repot. You can use a sucker plucker tool like this, https://amzn.to/2WAq1Ld. Also, for more details on removing suckers, can read this, https://www.babyviolets.com/african-violet-suckers-what-are-they-and-removal/. Best of Luck! BV
I kept buying bigger pots???? getting ridiculous thanks for info!
Hello Donna, glad to be of help, regards, BV.
I have a continuing problem on my AV’s (currently numbering 62) and that is that the stems and leaves will turn dark and “rot”, usually one or two at a time and not destroying the plant. I pluck them off, but can’t understand why this happens and would love to figure it out. Can you help? I can’t resist starting new babies and giving plants to friends and neighbors. I donated 50 plants last Christmas to a church bazaar. I wish I was young enough to start a new carreer.
Hello Leona,
thank you for your question. Are you overwatering? or is the soil remaining wet all the time. Do you have enough perlite in your soil? Sometimes if its just peat /soil, it can become heavy and clogged with water. Water cannot flow through and it rots the roots/stem/leaves. Make sure to add enough coarse perlite for drainage. I use, https://amzn.to/35qowUf, this perlite. To assist in drainage, you can also put a thin layer of perlite at the bottom of the pot and then add your regular soil on top. Another reason could be that your plant is planted too deep in the pot, so the leaves are always touching the wet soil. You can repot the plant higher, so that the leaves and stems just barely graze the rim of the pot. Also you mentioned that it just happens to a few leaves, that is fine over time, if its just a few leaves, maybe they are just old and they need to be removed anyway. If these leaves are the outer ring leaves, then its ok if they turn brown and soggy over time, that happens as they get old. As long as it doesnt happen to all the leaves or the majority of leaves, you should be ok. Hope ths helps, regards, BV
I must say this is the most helpful site I have found regarding violets. The details and pictures you provide make it even better! Now I will be able to help my once beautiful violets that are leaning over. Learned so much I now feel comfortable knowing what to do and can’t wait to get started. You are a real GEM! Blessings, Nancy B
Thank you Nancy for your kind words. regards, BV
Thank you for posting all this! There is hope for my sweet babies!
Your welcome! BV
THANK YOU for your well detailed and illustrated explanation. I’ve been growing African Violets for years, became a master gardener and I still couldn’t get the right information about this problem. You’re awesome!
Hello Julia, thank you for your kind words. Glad to be of help, regards, BV
My ladies got frostbite when our power went out. Texas freeze. I thought they were lost. Thanks to
you, I’ll try removing damaged leaves, scraping stems and repotting. Thanks
Hello Susan, hope your plants are doing well! Yes, I did hear that lots of people were worried about there violets. Lots of damage was done, glad to hear yours survived! Happy to be of help, regards, BV
Thanks you so much for your help. I have two very large goose neck violets, trying to get out of the pot. I’ll have to try cutting them and repotting. It will be hard to cut off all of the beautiful foliage but guess it has to be done. I never realized that african violets would get so large.
Glad to be of help Connie!
Your information is so helpful, I am learning so much.
Hello Elsa,
thank you for your kind words! Really appreciate it, regards, BV
I have two large and old (one 25 years, the other about 11) AVs with long goose necks curling inside the pot’s rim; they continuously bloom beautifully and only lose a few lower leaves, though now they grow lopsided. But I don’t have the heart to remove so many leaves as in yr. pictures and lose the size. Could I leave them almost the same size, just cut and scrape and root the top 2 ” of the neck?
Hello Ivana,
Thank you for your question. Yes you can leave the bottom leaves on your plant, dont have to remove so many. Can remove a few, thats fine. Just cutting and scraping the neck will work too. Hope this helps, regards, BV
My violets bloom on a regular basis, but I need to take the side babies off several. Do I wait until after the plants stop blooming? I am assuming so.
This site is very good with helpful pictures and step by step instructions.
Hello Leslie, thank you for your kind words, glad to be of help. With regards to your question, as long as the side babies are small (less than an inch big) and you just have a 2-3 you can go ahead and remove those side babies off. If those babies are like lots of large side baby plants growing on the side, I would wait till your original plant stops blooming or the blooms die off, then remove. Regards, BV
My violets don’t bloom. I’ve been trying for about 3 months to make it better, it has a name “Rose”; my 5 year old grandson and I go by her talk to her and gently rub her leaves. She loves it, but still no blooms What to do. You are great, thank you
Hello Joy,
thank you for your question. So sorry to hear about your plants. If you havent had blooms in a while, I would recommend fertilizing the plants, this optimara fertilizer (https://amzn.to/3oXUvCB) has worked wonders for me. Another suggestion would be to re-pot your plant in fresh soil, if you havent done so in the past 6 months. An equal mix of peat moss and perlite will work. Glad to hear your grandson is taking an interest in your violets!!
regards,
BV
I have 2 very long neck AV’s, about 10 inches long. So are you saying I can cut the main stem and scrape what is left and repot it?
Hello John,
thank you for your question. Yes, you can cut the main stem, then keep the main stem/leafy plant/crown part that you cut off, scrape the cut off part and the re-pot. You can get rid of the left over cut stem which is still in the soil, the rooted part, you can get rid of. Can check this article, it has pictures, to get a better idea of how and where to cut, https://www.babyviolets.com/decapitating-african-violet-crowns-why-and-how/
regards,
BV
To Babyviolets. I can’t see where to make my post separate so joining in here to say that the pictures did help very much to know how to deal with repotting.
Hello Sharon,
thank you for your kind words. Happy to hear the pictures helped. regards, BV
I have been raising African violets since stumbling on a violet show while studing at the London University during a rather boring summer in the late 60’s. I was hooked. could not wait to get back to the states and try to grow a few of these beauties myself. Sorry ,I digress .This is the best site I have ever seen. So informative and professionally done. I just wish I had you as a resource when I started.
Thank you so much for your kind words!! I really appreciate it and happy to hear the posts are useful. Regards, BV
I only have a neck left sticking our of the soil. Can I clean it up, repot it and put it in a bag? Will it produce new leaves and furbish?
Hello Teres,
thank you for your question. Yes, you are correct. You can clean it up, repot and put it into a bag, it will produce leaves and become healthy again within 2-3 months. Best of Luck! BV
Hi, my violet had a neck almost 4 inches long. When I removed it from it’s old pot most of the dirt fell away. As I was trying to clean the brown scales from the neck about 3 inches broke off. I used rooting powder and placed it into fresh soil. Is there any hope that it will re-root? Could I plant the broken off neck into soil and would that grow? I love your informative website. A lot of good information here. Thank you.
Hello Carol, thank you for your question. Yes, you have done everything correctly. Yes, the plant with the short neck will re-root within 2-3 months. Keep an eye on the soil, make sure it doesnt get too wet. This can cause the crown and neck to rot. I am not sure about the broken off piece of neck. You can try to plant it, maybe some suckers will develop and later on you can remove & plant them. Thank you for your kind words, glad the website it helpful. Regards, BV
Me too. This is the first time I’ve understood it! I’m so grateful, and I thank you Babyviolets! I’m going to buy some more violets and start growing them again. Now I know how to care for them!
Can you strip off about 20 leaves that are about 1/2 brown? Then shouldn’t the old dirt be replaced totally? Before placing in plastic bag should it be lightly watered? You didn’t say anything about watering, but if the dirt is totally dry will leaves and roots grow? Wonderfully helpful site, thank you for the great instructions!
Hello Mary, thank you for your question. Yes, you can remove 20 leaves that are 1/2 brown. Make sure to leave at least 4-5 leaves at the crown. You can change the old dirt, yes you are correct. Yes, you can water the plant slightly before placing in the bag. However, if you are repotting in fresh soil, I am assuming your soil is already moist and prewatered. That is you mix your soil before with water and then pot up your plant. In this case, you do not need to water before placing in the bag, as the soil is already moist. You can keep an eye on it, after a 2 weeks, if the soil seems dry, can water lightly. Thank you for your kind words, glad the site is helpful. BV
Hi, your violet info has been so helpful but I have a question about the pots. I had removed my plants from the plastic pots and placed them in clay pots. Is that okay for them?
Hello Dorothy,
thank you for your question. Personally I prefer plastic pots, I think they are low maintenance. Clay pots tend to dry out the soil faster. If you can keep an eye on the plant and monitor when the soil becomes dry, it should be ok. As long as you are routinely around the plant (for e.g. if its on your kitchen windowsill, you get to glance at it everyday), clay pots should be ok too. If you worry that the soil keeps drying out too fast, then I would recommend transferring back to a plastic pot. Hope this helps,
regards,
BV
Thanks so much for your detailed information and pictures on repotting AVs. I have one that needs to be repotted and have been afraid that I would kill it in the process. You’ve given me the confidence to go ahead, with your clear instructions.
Hello Kay, glad to be of help, BV
Beautiful instruction. My plant will be grateful. Thank you.
I have been reading many of your articles. I am sure you will be able to help me. My grandma has an unusual av. She is 99 now. It belonged to her mother who passed in 1972. I am trying to find out everything I can about this plant. I would like be to send a couple pictures of the foliage as it doesn’t look like any I’ve ever seen before.
Hello Jessica, yes you are more then welcome to send me a couple of pics, I can definitely take a look, regards, BV
Thank you Lucinda for your kind words!
Honestly, I am thankful and relieved that I found your article!! I’ve been so sad about my pretty sweet plant falling into a heap!
Thank you Alesia for your kind words, I really do hope your plant perks up. BV
I just repotted my violets and bagged them. 2 questions
How long do you keep them in the bags. Do you water them?
Do you keep them under a grow light and if so how many hours
Love your instructions thanks
Hello Jo, you can keep them in bags for 2-3 weeks (sometimes if my basement is cooler, I will leave them in the baggies for 2-3 months, until spring arrives). I rarely or never water, as condensation develops in the bag and the soil stays relatively moist. However, if you do notice the pot feels light weight or soil looks light brown or dry, can give very little water. Yes I do keep them under grow lights, about 8-10hrs a day. Hope this helps, BV
Thank you for your wonderful instructions about repotting a plant with a long “stem”. If you bury the stem should it remain in the same pot? Plant is healthy and I would hate to lose it. Thanks again for your information.
Hello Carole,
Yes you can re-pot the long stem in the same pot, as long as it will fit inside and you can cover the stem with soil. Hope this helps, regards, BV
what are your thoughts on the AV pots .2 pieces plant in top water in bottom?
Hello Gracie, I am not sure I understood the question. Is it about watering the plant from the top? That can be done, if water is added directly into the soil and gently and only a little bit. regards,BV
Thank you so very much ❤️ your pictures and detailed instructions they are just what I needed. Now I can repot with confidence.
I plan on rooting the leaves I’ve removed, hoping I can get them pitted as gifts later on.
Thank you, Lola
The ration of the size of the plant to the size of the pot. Is it about 1/3 rd of the pot per plant, for example 9″ plant 3″ pot
I have had a couple of African violets since 2008. These have sentimental value as they were from my late great Aunt’s 100th birthday celebration. I had no ides that you were supposed to clean the stalks and add more soil. I just kept repotting them as they got bigger and bigger. Now the stalks are very long. And, my purple one with e plants has two that the stalks both just rotted. Can these be saved? They don’t have any root left, just partial stalk/trunk. Thanks for any info or help that you can provide.
Hello Doreen, thank you for your question, sorry for the delay in replying, Hope your plant was able to make it. If the stalk does not have any roots left and its completely rotted, then unfortunately I dont think it can be saved. You can try to gently remove the brown /rotted bark from the trunk/root stem by scraping it off with a sharp tool or your finger nails. If after removing the brown part, there is still green inside and it does not look rotted then you can save it (even if it doesnt have any roots). After scraping off the brown, once you reach the green, then slice the bottom part of the stem into a V shape. You can then plant this V shape into the soil and leave the stalk part on the top of the soil. For more details, check here, http://www.babyviolets.com/decapitating-african-violet-crowns-why-and-how/ , http://www.babyviolets.com/how-to-bury-and-re-pot-african-violet-bare-stems-or-necks/ and http://www.babyviolets.com/root-rot-on-african-violet-plants/ Hope this helps, BV